SFDC Stop - Always the latest about Salesforce


Full Tutorial Series with videos, free apps, live sessions, salesforce consulting and much more.


Telegram logo   Join our Telegram Channel
Showing posts with label Test Class. Show all posts

Saturday, 7 May 2022

How to create test class for a flow? | Test coverage for flows | Salesforce Flow Test Class Basics

Hello Trailblazers,


In this post we're going to learn How to create test class for a flow? Most of the developers I've met have never written a test class for flow and some of them are not even aware that we can write a test class for flow and evaluate the test coverage. The question that I get is: Is it possible to create test class for a flow??


YES, THIS IS POSSIBLE!! LET'S SEE HOW?

Create a Flow

First of all, let's create a simple flow. I am sharing the details of the flow below:


Flow Type: Record Triggered Flow

Object: Lead

Trigger the Flow When: A record is created or updated

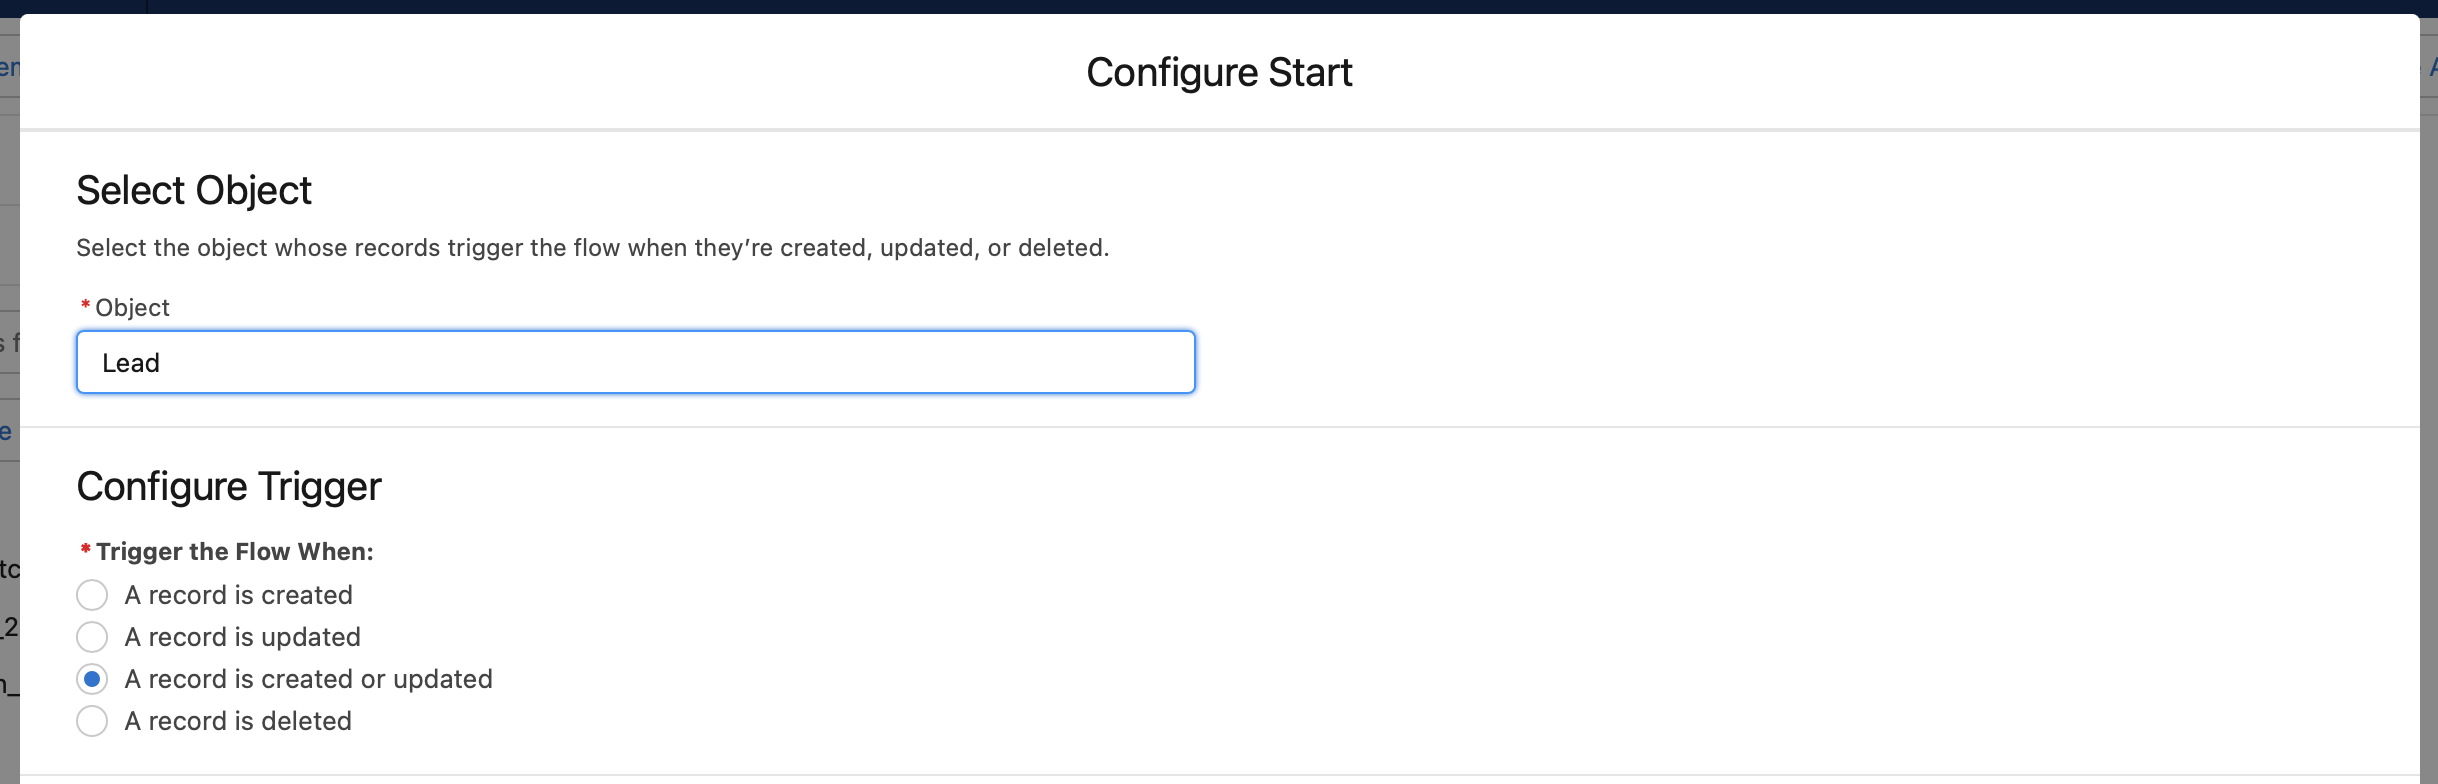
Entry Conditions: All Conditions Are Met (AND) -> AnnualRevenue -> Is Changed -> True

Optimize the Flow for: Fast Field Updates

Flow Label: Update Lead Rating based on Annual Revenue

Flow Description: This flow will update lead rating based on the value of annual revenue


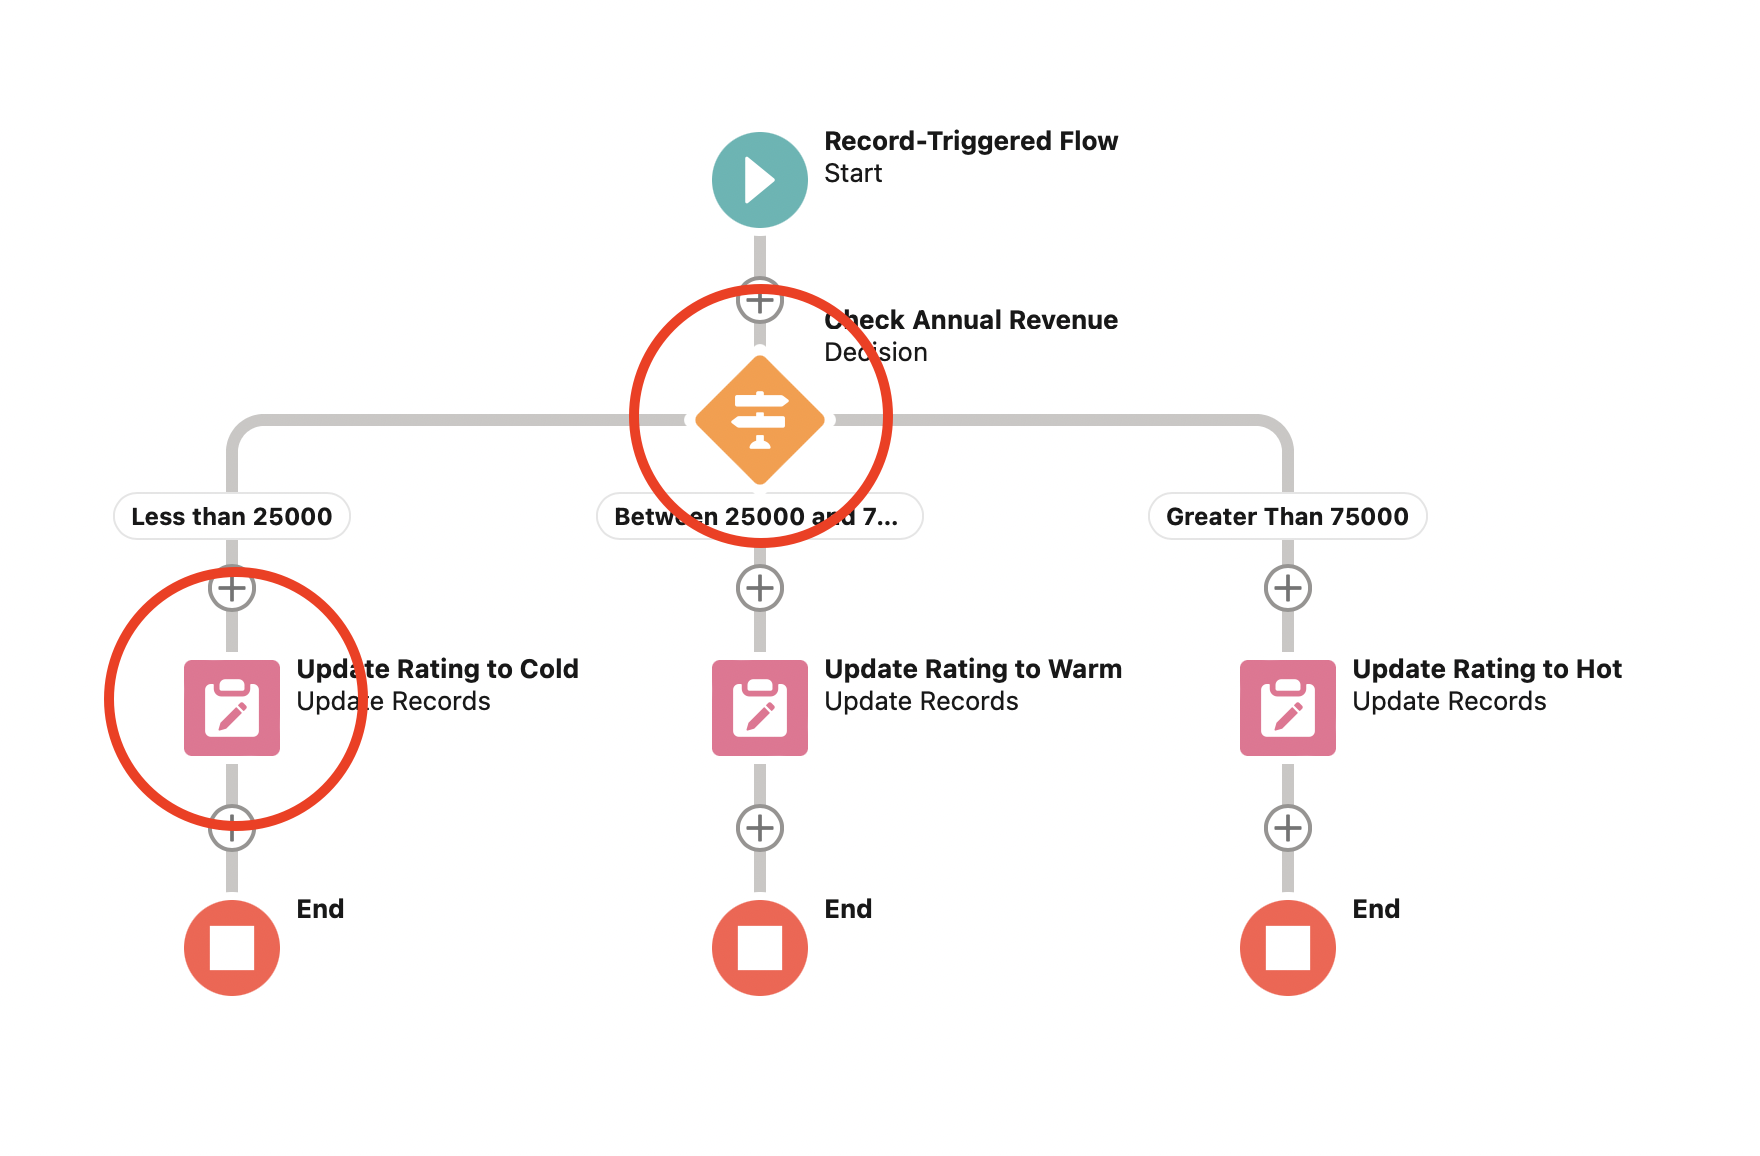
What this flow is going to do?


Our flow will update the Lead Rating based on the value of Annual Revenue of lead. There are 3 conditions that it'll cover:


  1. Annual Revenue is less than 25,000 -> Lead Rating = Cold

  2. Annual Revenue is between 25,000 and 75,000 -> Lead Rating = Warm

  3. Annual Revenue is greater than 75,000 -> Lead Rating = Hot

So, we created a decision element named "Check Annual Revenue". It'll have 3 outcomes based on the above 3 conditions:

Less than 25,000


Between 25,000 and 75,000


Greater than 75,000 (Default Outcome)


Now, let's create 3 update elements as well:

Update Rating to Cold


Update Rating to Warm


Update Rating to Hot


Now that we have our update elements, we need to link these 3 update elements with our decision outcomes so that, when: 
  • Annual Revenue is less than 25,000 -> Lead Rating = Cold
  • Annual Revenue is between 25,000 and 75,000 -> Lead Rating = Warm
  • Annual Revenue is greater than 75,000 -> Lead Rating = Hot

This is how our final flow looks like:

Create a test class for the above flow

Now, it's time to create a test class for this flow. While creating a test class for flow, The intent is to cover all the flow elements, while testing various scenarios and verify the result. Let's have a look at the full code for the test class below covering all scenarios and then we'll see each method one by one in detail.
/*
* Created:- 07/05/2022
* Last Updated:- 07/05/2022
* Description:- This is the test class for Update_Lead_Rating_based_on_Annual_Revenue Flow
*/
@isTest
public with sharing class LeadUpdateFlowTest {

    // * Constants
    static final Integer NUMBER_OF_RECORDS = 200;
    static final String RATING_COLD = 'Cold';
    static final String RATING_WARM = 'Warm';
    static final String RATING_HOT = 'Hot';

    // * Description: This method is used to create initial data for the test methods
    @TestSetup
    static void makeData() {
        List<Lead> leads = new List<Lead>();
        for(Integer i=1; i<=NUMBER_OF_RECORDS; i++) {
            leads.add(new Lead(LastName = 'Test Lead ' + i, Company='Test Company'));
        }
        insert leads;
    }

    /*
    *   Description: This method is used to verify lead rating
    *   when the annual revenue is less than 25,000
    */
    @isTest
    public static void updateLeadBasedOnAnnualRevenueLessThan25kTest() {
        List<Lead> leads = [SELECT AnnualRevenue FROM Lead];
        Test.startTest();
        for(Lead lead : leads) {
            lead.AnnualRevenue = 24999;
        }
        update leads;
        List<Lead> updatedLeads = [SELECT Rating FROM Lead];
        for(Lead lead : updatedLeads) {
            System.assertEquals(RATING_COLD, lead.Rating, 'Lead rating should be: ' + RATING_COLD);
        }
        Test.stopTest();
    }

    /*
    *   Description: This method is used to verify lead rating
    *   when the annual revenue is between 25,000 and 75,000.
    *   We're keeping the value at floor i.e. 25,000 for this test
    */
    @isTest
    public static void updateLeadBasedOnAnnualRevenueBetween25kAnd75kFloorTest() {
        List<Lead> leads = [SELECT AnnualRevenue FROM Lead];
        Test.startTest();
        for(Lead lead : leads) {
            lead.AnnualRevenue = 25000;
        }
        update leads;
        List<Lead> updatedLeads = [SELECT Rating FROM Lead];
        for(Lead lead : updatedLeads) {
            System.assertEquals(RATING_WARM, lead.Rating, 'Lead rating should be: ' + RATING_WARM);
        }
        Test.stopTest();
    }

    /*
    *   Description: This method is used to verify lead rating
    *   when the annual revenue is between 25,000 and 75,000.
    *   We're keeping the value at ceiling i.e. 75,000 for this test
    */
    @isTest
    public static void updateLeadBasedOnAnnualRevenueBetween25kAnd75kCeilingTest() {
        List<Lead> leads = [SELECT AnnualRevenue FROM Lead];
        Test.startTest();
        for(Lead lead : leads) {
            lead.AnnualRevenue = 75000;
        }
        update leads;
        List<Lead> updatedLeads = [SELECT Rating FROM Lead];
        for(Lead lead : updatedLeads) {
            System.assertEquals(RATING_WARM, lead.Rating, 'Lead rating should be: ' + RATING_WARM);
        }
        Test.stopTest();
    }

    /*
    *   Description: This method is used to verify lead rating
    *   when the annual revenue is greater than 75,000
    */
    @isTest
    public static void updateLeadBasedOnAnnualRevenueGreaterThan75kTest() {
        List<Lead> leads = [SELECT AnnualRevenue FROM Lead];
        Test.startTest();
        for(Lead lead : leads) {
            lead.AnnualRevenue = 75001;
        }
        update leads;
        List<Lead> updatedLeads = [SELECT Rating FROM Lead];
        for(Lead lead : updatedLeads) {
            System.assertEquals(RATING_HOT, lead.Rating, 'Lead rating should be: ' + RATING_HOT);
        }
        Test.stopTest();
    }

    /*
    *   Description: This method is used to cover all low elements and verify lead rating
    *   when the annual revenue is less than 25k, between 25k and 75k and also greater than 75k
    */
    @isTest
    public static void updateLeadBasedOnAnnualRevenueAllElementsTest() {
        List<Lead> leads = [SELECT AnnualRevenue FROM Lead];
        Test.startTest();
        for(Lead lead : leads) {
            lead.AnnualRevenue = 20000;
        }
        update leads;
        List<Lead> updatedLeadsWithRatingCold = [SELECT Rating FROM Lead];
        for(Lead lead : updatedLeadsWithRatingCold) {
            System.assertEquals(RATING_COLD, lead.Rating, 'Lead rating should be: ' + RATING_COLD);
        }
        for(Lead lead : leads) {
            lead.AnnualRevenue = 50000;
        }
        update leads;
        List<Lead> updatedLeadsWithRatingWarm = [SELECT Rating FROM Lead];
        for(Lead lead : updatedLeadsWithRatingWarm) {
            System.assertEquals(RATING_WARM, lead.Rating, 'Lead rating should be: ' + RATING_WARM);
        }
        for(Lead lead : leads) {
            lead.AnnualRevenue = 80000;
        }
        update leads;
        List<Lead> updatedLeadsWithRatingHot = [SELECT Rating FROM Lead];
        for(Lead lead : updatedLeadsWithRatingHot) {
            System.assertEquals(RATING_HOT, lead.Rating, 'Lead rating should be: ' + RATING_HOT);
        }
        Test.stopTest();
    }
}
Now let's understand each method one by one in detail:
    // * Constants
    static final Integer NUMBER_OF_RECORDS = 200;
    static final String RATING_COLD = 'Cold';
    static final String RATING_WARM = 'Warm';
    static final String RATING_HOT = 'Hot';
First of all I created some constants where I specified the total number of records my test class will create and also the 3 lead ratings that I need to verify once my flow is executed.
    // * Description: This method is used to create initial data for the test methods
    @TestSetup
    static void makeData() {
        List<Lead> leads = new List<Lead>();
        for(Integer i=1; i<=NUMBER_OF_RECORDS; i++) {
            leads.add(new Lead(LastName = 'Test Lead ' + i, Company='Test Company'));
        }
        insert leads;
    }
Next, I have the makeData() method which is going to create some lead records based on the number we specified in the NUMBER_OF_RECORDS constant.
    /*
    *   Description: This method is used to verify lead rating
    *   when the annual revenue is less than 25,000
    */
    @isTest
    public static void updateLeadBasedOnAnnualRevenueLessThan25kTest() {
        List<Lead> leads = [SELECT AnnualRevenue FROM Lead];
        Test.startTest();
        for(Lead lead : leads) {
            lead.AnnualRevenue = 24999;
        }
        update leads;
        List<Lead> updatedLeads = [SELECT Rating FROM Lead];
        for(Lead lead : updatedLeads) {
            System.assertEquals(RATING_COLD, lead.Rating, 'Lead rating should be: ' + RATING_COLD);
        }
        Test.stopTest();
    }
Once we have the records created, the first method that's specified above will test the scenario when we have the annual revenue of every lead less than 25,000. So, we updated all the leads with annual revenue as 24,999, we queried the updated leads and verified the lead rating. As per our flow, the lead rating should be Cold.

Let's run this test method once and see the results:

As you can see, the test executed successfully and passed. But Wait!! How can I check the code coverage? OR I should say the flow elements coverage?

We can do that using a simple soql query:
sfdx force:data:soql:query --query "SELECT Id, ApexTestClassId, TestMethodName, FlowVersionId, NumElementsCovered, NumElementsNotCovered FROM FlowTestCoverage WHERE FlowVersion.Definition.DeveloperName = 'Update_Lead_Rating_based_on_Annual_Revenue' AND TestMethodName = 'updateLeadBasedOnAnnualRevenueLessThan25kTest'" --usetoolingapi

As you can see above, I am querying the Id, ApexTestClassId, TestMethodName, FlowVersionId, NumElementsCovered and NumElementsNotCovered fields of FlowTestCoverage object and I have also added a where condition where I specified the API name of my flow as: FlowVersion.Definition.DeveloperName = 'Update_Lead_Rating_based_on_Annual_Revenue' and I also added a condition for my test method that I executed above as: TestMethodName = 'updateLeadBasedOnAnnualRevenueLessThan25kTest'. Note that I am using Tooling API for this query by adding a flag --usetoolingapi because we're performing a query on the flow metadata.

The output of the above query is provided below:
As you can see above, there are 2 elements of the flow which are covered and 2 elements which are not covered. As per the condition that we checked, we can say that the below two elements of the flow encircled in RED are covered:
and the other two elements are not covered. As we've verified that the flow is updating the Rating to Cold, therefore, we can say that this update element was covered. Let's jump onto the next method now!
    /*
    *   Description: This method is used to verify lead rating
    *   when the annual revenue is between 25,000 and 75,000.
    *   We're keeping the value at floor i.e. 25,000 for this test
    */
    @isTest
    public static void updateLeadBasedOnAnnualRevenueBetween25kAnd75kFloorTest() {
        List<Lead> leads = [SELECT AnnualRevenue FROM Lead];
        Test.startTest();
        for(Lead lead : leads) {
            lead.AnnualRevenue = 25000;
        }
        update leads;
        List<Lead> updatedLeads = [SELECT Rating FROM Lead];
        for(Lead lead : updatedLeads) {
            System.assertEquals(RATING_WARM, lead.Rating, 'Lead rating should be: ' + RATING_WARM);
        }
        Test.stopTest();
    }
In the next method that you can see above, we tested the scenario when the annual revenue is between 25,000 and 75,000. We can have 2 edge conditions here i.e. the annual revenue equal to 25,000 and the annual revenue equal to 75,000. We're testing the floor condition here i.e. the minimum value of AnnualRevenue which will satisfy this condition. Therefore, we've set the annual revenue to 25,000 and verified that the rating should be Warm.

The output when the above test method is executed is given below:
    /*
    *   Description: This method is used to verify lead rating
    *   when the annual revenue is between 25,000 and 75,000.
    *   We're keeping the value at ceiling i.e. 75,000 for this test
    */
    @isTest
    public static void updateLeadBasedOnAnnualRevenueBetween25kAnd75kCeilingTest() {
        List<Lead> leads = [SELECT AnnualRevenue FROM Lead];
        Test.startTest();
        for(Lead lead : leads) {
            lead.AnnualRevenue = 75000;
        }
        update leads;
        List<Lead> updatedLeads = [SELECT Rating FROM Lead];
        for(Lead lead : updatedLeads) {
            System.assertEquals(RATING_WARM, lead.Rating, 'Lead rating should be: ' + RATING_WARM);
        }
        Test.stopTest();
    }
Next we tested with the ceiling value or the second edge condition where the annual revenue is set to 75,000. As you can see above, we verified that the rating should be Warm in this case as well. 

The output when the above test method is executed is given below:

Let's see the test coverage for these methods as well. The updated query is given below:
sfdx force:data:soql:query --query "SELECT Id, ApexTestClassId, TestMethodName, FlowVersionId, NumElementsCovered, NumElementsNotCovered FROM FlowTestCoverage WHERE FlowVersion.Definition.DeveloperName = 'Update_Lead_Rating_based_on_Annual_Revenue' AND (TestMethodName = 'updateLeadBasedOnAnnualRevenueBetween25kAnd75kFloorTest' OR TestMethodName = 'updateLeadBasedOnAnnualRevenueBetween25kAnd75kCeilingTest')" --usetoolingapi
The result when the above query is executed is shown below:
As you can see above, for both the test method executions, two elements of the flow are covered and two are not covered. This time both the methods are dealing with the condition when annual revenue is between 25,000 and 75,000. Therefore, we can say that the below two elements of the flow encircled in RED are covered:
and the other two elements are not covered from this test method. As we've verified that the flow is updating the Rating to Warm, therefore, we can say that this update element was covered. Let's cover the last update element as well:
    /*
    *   Description: This method is used to verify lead rating
    *   when the annual revenue is greater than 75,000
    */
    @isTest
    public static void updateLeadBasedOnAnnualRevenueGreaterThan75kTest() {
        List<Lead> leads = [SELECT AnnualRevenue FROM Lead];
        Test.startTest();
        for(Lead lead : leads) {
            lead.AnnualRevenue = 75001;
        }
        update leads;
        List<Lead> updatedLeads = [SELECT Rating FROM Lead];
        for(Lead lead : updatedLeads) {
            System.assertEquals(RATING_HOT, lead.Rating, 'Lead rating should be: ' + RATING_HOT);
        }
        Test.stopTest();
    }

Finally, the last test condition can be, when the annual revenue is greater than 75,000. So, we updated all the leads with annual revenue as 75,001. We queried the updated leads and verified the lead rating. As per our flow, the lead rating should be Hot.

The output when the above test method is executed is given below:

As you can see above, the method executed successfully, let's see the code coverage for this method as well. I am sharing the updated query below:
sfdx force:data:soql:query --query "SELECT Id, ApexTestClassId, TestMethodName, FlowVersionId, NumElementsCovered, NumElementsNotCovered FROM FlowTestCoverage WHERE FlowVersion.Definition.DeveloperName = 'Update_Lead_Rating_based_on_Annual_Revenue' AND TestMethodName = 'updateLeadBasedOnAnnualRevenueGreaterThan75kTest'" --usetoolingapi
The output when this query is executed is given below:

As you can see above, once again, two elements of the flow are covered and two elements are not covered. This time our method is dealing with the condition when annual revenue is greater than 75,000. Therefore, we can say that the below two elements of the flow encircled in RED are covered:
and the other two elements are not covered from this test method. Again we've verified that the flow is updating the Rating to Hot, therefore, we can say that this update element was covered.

We've now covered all the flow elements using different test methods and the results that we verified in our test methods signify that the right elements were covered. You may be thinking that it would be great if we can cover all the flow elements once, just to be sure that we've covered everything. Well, we can do that as well. Let's have a look at the below method:
    /*
    *   Description: This method is used to cover all low elements and verify lead rating
    *   when the annual revenue is less than 25k, between 25k and 75k and also greater than 75k
    */
    @isTest
    public static void updateLeadBasedOnAnnualRevenueAllElementsTest() {
        List<Lead> leads = [SELECT AnnualRevenue FROM Lead];
        Test.startTest();
        for(Lead lead : leads) {
            lead.AnnualRevenue = 20000;
        }
        update leads;
        List<Lead> updatedLeadsWithRatingCold = [SELECT Rating FROM Lead];
        for(Lead lead : updatedLeadsWithRatingCold) {
            System.assertEquals(RATING_COLD, lead.Rating, 'Lead rating should be: ' + RATING_COLD);
        }
        for(Lead lead : leads) {
            lead.AnnualRevenue = 50000;
        }
        update leads;
        List<Lead> updatedLeadsWithRatingWarm = [SELECT Rating FROM Lead];
        for(Lead lead : updatedLeadsWithRatingWarm) {
            System.assertEquals(RATING_WARM, lead.Rating, 'Lead rating should be: ' + RATING_WARM);
        }
        for(Lead lead : leads) {
            lead.AnnualRevenue = 80000;
        }
        update leads;
        List<Lead> updatedLeadsWithRatingHot = [SELECT Rating FROM Lead];
        for(Lead lead : updatedLeadsWithRatingHot) {
            System.assertEquals(RATING_HOT, lead.Rating, 'Lead rating should be: ' + RATING_HOT);
        }
        Test.stopTest();
    }
As you can see above, this method is used to cover all the scenarios one by one by updating the leads and will also verify the results of the flow updates once all the lead records are updated.

The output when the above test method is executed is given below:

So, our test passed. Now let's see the code coverage for this method using the updated query shared below:
sfdx force:data:soql:query --query "SELECT Id, ApexTestClassId, TestMethodName, FlowVersionId, NumElementsCovered, NumElementsNotCovered FROM FlowTestCoverage WHERE FlowVersion.Definition.DeveloperName = 'Update_Lead_Rating_based_on_Annual_Revenue' AND TestMethodName = 'updateLeadBasedOnAnnualRevenueAllElementsTest'" --usetoolingapi
The output when this query is executed is given below:

As you can see above, this time the total number of elements covered are 4 and the total number of elements not covered are 0. Therefore, we can say that all the 4 elements of the flow were covered this time which are encircled in RED below:
So, this time, YOU HAVE COVERED THE WHOLE FLOW. CONGRATULATIONS!!!

This is how you can create a test class of the flow and verify the test coverage as well. I am sharing the combined results of all the methods below:
You can get these results by executing the SOQL query as shown below:
sfdx force:data:soql:query --query "SELECT Id, ApexTestClassId, TestMethodName, FlowVersionId, NumElementsCovered, NumElementsNotCovered FROM FlowTestCoverage WHERE FlowVersion.Definition.DeveloperName = 'Update_Lead_Rating_based_on_Annual_Revenue'" --usetoolingapi
We just removed the TestMethodName AND condition here because we want to query the results of all test methods.

Note: If you want to make sure that you deploy all the flows to your production environment with good test coverage, you can go to Setup --> Process Automation Settings and select the Deploy processes and flows as active option. Please note that this option will not be available in non-production orgs. If you turn this on, salesforce will make sure that your apex tests have at least 75% coverage of the total number of active processes and active autolaunched flows in your org. If the required percentage isn't met, the deployment will be rolled back. You can learn more about that here.

Now you can make sure that your flows are also covered while performing the deployments.

So, that's all for this tutorial everyone, I hope you liked it and understood how you can create test class for a flow. Let me know your feedback in the comments down below. 

Happy Trailblazing!!

Wednesday, 15 April 2020

100% Test code coverage for multiple dependent apex HTTP callouts without creating a mock class

Hello Trailblazers,

Welcome to the 5th tutorial in Simplifying the Callouts in Salesforce Tutorial Series. In this tutorial, we're going to Create a Test Class for Multiple Dependent Apex HTTP Callouts in a single transaction Without Creating a Mock Class. This is a Video-Only Tutorial Series. So, I am giving you a summary of the tutorial below and you can learn in detail by watching the video at the end of the blog.

Note:- This tutorial is using resources from previous tutorial. So, in case, you want to implement the same example on your own, make sure to have a look at the previous tutorial once.

Remember our OrgConnectService class from the previous tutorial ? In this tutorial, we're going to create a test class for that. Just to give a brief, our OrgConnectService class has a single method named:- createAccountAndContact() which is performing 3 dependent callouts using HTTPCalloutFramework. The first callout is responsible to create an Account in the connected org using standard API. The second callout will create a contact and link that contact with the account that was created in the previous callout and the third callout is going to query this contact and account from linked org. You can have a look at that class here.

Now, let's have a look at the test class below:-

As you can see above, we have 4 methods in this test class but we'll concentrate in detail on 1st method only as it's covering positive scenarios and is responsible for 76% code coverage. The rest of 3 methods are covering the negative scenarios and are similar. In createAccountAndContactTest() method, we're first of all Creating Individual Mocks for each callout that we're going to perform from the service class. Then, we created an instance of HTTPCalloutServiceMultiMock named as:- multiMock and we added all 3 individual mocks to this multi-mock using addCalloutMock() method.

This method takes the endpoint URL as the first parameter and the individual mock in the second parameter. To set the endpoint URL properly, we created an instance of HTTPCalloutService class named as destinationOrgService by passing the custom metadata name in constructor as we've done in previous tutorials. Finally, we set the multi mock using our Test.setMock() method in which we passed HTTPCalloutMock.class in the first parameter which is the type and in the second parameter we passed our multiMock instance.

Then we simply called our createAccountAndContact() method and passed the required parameters and it automatically used our multi mock setup to get the fake responses that we've set in individual mocks according to the URL it is hitting. Finally, we checked the returnValueMap we're getting from the method to make sure that the callout is successful.

Let's discuss one method with a negative scenario too. In createAccountAndContactTestWrongResponseAccount() method, you can see that I intentionally passed the QUERY_SUCCESS_CODE in the mock just because I want to cover the scenario when my response code from account callout is not 201. As I am testing negative scenario for first request now, I don't need to create a multi mock because I'll be getting a response code as 200 (set using QUERY_SUCCESS_CODE) during test run (first callout for account creation where expected response code is 201) and it'll return an error without executing further code.

In another method createAccountAndContactTestWrongResponseContact(), I am checking negative scenario for second callout. Because of this, I created a multi-mock where in accountMock I passed in CREATE_SUCCESS_CODE as I want this request to be successful. Whereas, in contactMock I passed in QUERY_SUCCESS_CODE as I want this request to be failed and finally asserted the ERROR_CODE and CONTACT_ERROR_MESSAGE for this request.

Want to learn in depth ? Have a look at the below video:-


In this tutorial, we learned how we can get 100% code coverage for multiple dependent apex HTTP callouts without creating a mock class as shown below:-


If you liked this tutorial, make sure to share it in your network and let me know your feedback in the comments down below.

Happy Trailblazing..!!

Saturday, 4 April 2020

100% code coverage for apex HTTP Callout in Salesforce without creating a mock class

Hello Trailblazers,

This is the second tutorial in Simplifying the Callouts in Salesforce Tutorial Series. In this tutorial we created a new class named as SFDCStopService which is responsible to perforn a callout to SFDCStop Blogs API :- https://sfdcstop.herokuapp.com/blogs 

You can have a look at the SFDCStopService class below:-


For this class, we created a test class so that we can cover the code and we were able to achieve 100% code coverage without creating a mock class using HTTPCalloutFramework. Let's have a look at the test class below:-


So, the question is How we're able to achieve 100% code coverage without creating a mock class ? The answer to this question is that HTTPCalloutFramework provides you an in-built mock class named as:- HTTPCalloutServiceMock. You can create an instance of that and in the mock class constructor you just need to pass the fake response code and the response body. That's it our in-built mock class will create a fake response for you when you're calling out during test.


As, this is a Video-Only Tutorial Series, In case you want to know in detail, you can have a look at the related video below:-


Do give this framework a try and let me know your feedback in the comments down below. You can find all the related code in the singlecallouttest branch of my HTTPCalloutFramework Tutorial Series github repository here. In the next tutorial, we're going to connect two salesforce orgs very easily and will fetch data from one salesforce org to another using HTTPCalloutFramework.

Happy Trailblazing..!!

Saturday, 15 February 2020

Salesforce Integration Tutorial Part 13 - Creating a Test Class for a SOAP Web Service in Apex

Hello Trailblazers,

Welcome to the 13th tutorial of the Salesforce Integration Tutorial Series. In the previous tutorial, we created a SOAP web service in apex. You can have a look at that tutorial by clicking here. In this tutorial, we're going to create a test class for a SOAP web service.

Let's have a look at the below code:-

As  you can see above, we have a webservice method in our ContactResource class. This method takes an integer which is the limit of contacts. Then, we query some contacts from our org using that limit and return the list of contacts in the response.

Now it's time to create a test class for the same. The test class for this web service will be exactly the same as we make a test class for a normal apex class. We just have a method which is accepting an integer as a parameter and returning a list of contacts. I created a new test class for our ContactResource class named as ContactResourceTest. Let's have a look at the code below:-

As you can see above, we have a TestSetup method which is creating 5 contacts with name Rahul Malhotra. This is our test data. Then, we have a testGetContactIdAndNames method which is simply calling the getContactIdAndNames method of our ContactResource class by giving the integer 1 in the parameter. That method is returning a list of contacts which we have stored in returnedContacts variable. Finally, we're just checking that our returnedContacts list is not null, has a size of 1 and the contact inside that list has a name of Rahul Malhotra. So, we just checked that our method is working as expected and when you'll run this test class, you'll find that our ContactResource class is covered with 100% coverage as shown below:-


That's all for this tutorial. You have successfully created a test class for a SOAP Web Service class in apex. You can find the code for the web service and test class in the soapapi branch of my SFDC-Integration-Tutorial github repository by clicking here.

Tired of reading or just scrolled down, don't worry, you can watch the video too.


Do checkout the other tutorials in this whole integration tutorial series by clicking here. If you liked this tutorial, make sure to share it in your network and let me know your feedback in the comments section down below.

Happy Trailblazing..!!

Friday, 31 January 2020

Salesforce Integration Tutorial Part 11 - Test class for SOAP API Callout

Hello Trailblazers,

Welcome to the 11th tutorial of the Salesforce Integration Tutorial series. In the previous tutorial, we performed a callout to a SOAP API by importing a WSDL file in Salesforce. You can find that tutorial by clicking here. In this tutorial, we're mainly going to create a test class for the same callout that we performed before. So, make sure you've completed the previous tutorial before you begin with this one.

If you remember, in case of REST APIs, when we have to create a test class for an api callout, we used to create a mock class that implements HTTPCalloutMock interface and that mock class was used to create a mock response for the API callout that is going to initiate from our test class. In this case, we're going to do the same.

This time, we're going to create a mock class and implement a different interface which is known as WebServiceMock. This interface consists of a doInvoke() method which we need to override in our mock class. The doInvoke() method will receive request and response in the parameters and we can set the response parameter with the fake response that we're going to send for our soap api callout while running a test class.

If you remember, we named our auto-generated class for SOAP API callout as CalculatorService. So, let's name our mock callout class as:- CalculatorServiceMock. The code for the mock class is given below:-

As you can see above, our calculator service soap api basically peforms 4 mathematical operations:- Addition, Subtraction, Multiplication and Division. So, we've setup 4 macros named as:- ADD_MODE, SUB_MODE, MUL_MODE, DIV_MODE. These 4 macros basically define 4 modes in which our mock class will run to generate different responses when different methods of CalculatorService class are called. We've also declared another string variable named as mode which is setup using a constructor of this mock class.

Inside our doInvoke() method, we're checking the mode of our callout and setting up the fake response by using the responsewrapper provided by our auto-generated calculatorservice class.For ex:- When we have to generate a response for addition, we're using AddResponse_element response wrapper from CalculatorService class to setup the result of addition and finally setting up the response using the response map in which we have the key as:- response_x and the value as the instance of AddResponse_element class which is addResponse. Each response wrapper has a result variable like:- AddResult in case of addition and SubtractResult in case of subtraction where we can set the result of operation.

We've setup the result of operations accordingly by assuming that our input elements are:- 6 and 3. We'll be sending these numbers from our test class to the api callout so that we get the correct response from the mock.

Now, it's time to create our test class for SOAP API callout. We've created a test class with name:- CalculatorServiceTest. The code for the same is given below:-

As you can see above, first of all we've setup two integers as x and y with values 6 and 3 as we know that our mock class will send the correct response for any operation that we call using the soap api for these inputs. After that we've 4 test methods defined, one for each operation i.e.:- Addition, Subtraction, Multiplication and Division that can be performed by our CalculatorService class. So, we basically need to cover the Add(), Subtract(), Multiply() and Divide() methods which are defined in the CalculatorSoap inner class of our CalculatorService class that we were using to make callouts in our previous tutorial.

Let's have a look at testAddCallout() method. In this method, first of all we set the mock using our Test.setMock() method. This time we pass the instance of WebServiceMock.class in the first parameter and an instance of our CalculatorServiceMock class in the second parameter with the mode as CalculatorServiceMock.ADD_MODE in the constructor. Remember, ADD_MODE was one of the macros that were defined in our mock class and is used to check the mode in order to define the addition response. That's why we're passing the same variable in the constructor to setup the correct response for our additon SOAP callout.

After that, we simply created an instance of our CalculatorService.CalculatorSoap class named as calculator. We called the Add() method and passed our x and y variables with values:- 6 and 3. You can checkout the mock class again to see that we've setup the mock response as 9 in AddResult which is the sum of 6 and 3. We got the result from add method i.e. the actual api callout and that result is stored in result integer variable. We've also setup another variable expectedResult which is x+y. So, this expectedResult also has a value 9 and the result variable also receives 9 from our mock api. At last, we check that our expectedResult and result variables have same value using System.assertEquals() method and our test method for addition is complete.

Similarly, we've made different methods to cover subtraction, multiplication and division operations in our test class. You can run this test class and you'll see that the CalculatorService class is covered with 100% coverage as shown below:-


Congratulations..!! You've successfully created a test class for SOAP API callout with 100% coverage.

Tired of reading or just scrolled down, don't worry, you can watch the video too.


All the code for this tutorial is present in our soapcallouttest branch of the SFDC-Integration-Tutorial github repository that can be accessed by clicking here. That's all for this tutorial, if you liked it, do share it in your network and let me know your feedback in the comments section down below.

Happy Trailblazing..!!

Monday, 9 December 2019

Salesforce Integration Tutorial Part 9 - Test class for Apex REST Callout

Hello Trailblazers,

Welcome to the 9th tutorial of the Salesforce Integration Tutorial series. In the previous tutorial, we performed a callout to an external REST API and learned about the concept of wrapper classes and remote site settings. In this tutorial, we're going to create a test class for our api callout. I have made a small update in our SFDCStopCallout class in which I returned the response which I got from the API and updated the return type of getBlogs() method to HTTPResponse. You can have a look at the updated SFDCStopCallout class below:-

As shown above, we've the updated class and we're going to create a test class for this API callout. Let's begin.

Create a Mock Class

The first step is to create a mock class for API callout. The mock class is nothing but a class that will generate a fake response for our API callout in the test class. As, we don't need to hit the actual API while testing, we should have a fake response that will be returned when a callout is performed. I created a mock class for my SFDCStop Blogs API named as SFDCStopMock:-

As you can see above, the mock class is also a test class with @isTest annotation that implements HTTPCalloutMock interface. This interface consist of a single method respond() which accepts an instance of HttpRequest class as a parameter and return an instance of HttpResponse which we'll construct inside the method itself. So, we've overriden this respond() method inside which we initialized a new instance of HttpResponse named as response. Then we set the fake response body using the setBody() method and we also set the fake response header with key as Content-Type and value as application/json using the setHeader() method. Finally, we set the status code of 200 for the response using setStatusCode() method. At the end, we returned the fake response.

Test class for API Callout

Now, we have our mock API. So, we're ready to create a test class for our SFDCStopCallout class. I have created a new class named SFDCStopCalloutTest which is given below:-

As you can see in the above test class, I have created some constants that are given below along with their purpose:-

  1. RESPONSE_CODE :- This constant consist of the response code of the response coming from API callout.
  2. RESPONSE_HEADER_KEY :- This constant consist of the key in the response header from API callout.
  3. RESPONSE_HEADER_VALUE :- This constant consist of the value in the response header from API callout.
  4. RESPONSE_BODY :- This constant consist of the body of the response from API callout.

All these constants are used in test methods to verify the response coming from the api callouts in the assert methods. As you can see, I have created two test methods:- testGetBlogs and tesGetBlogsUsingFramework. As both the methods are covering the same getBlogs method of SFDCStopCallout class, we're going to have a look at the testGetBlogs method first which is the standard approach.

Inside this method, I have first setup the mock API using Test.setMock() method in which the first parameter is the interface type which is always:- HTTPCalloutMock.class and the second parameter is the object of our mock class. Therefore, I have passed it as new SFDCStopMock() as my mock class is SFDCStopMock which will return a correct fake response for this callout. In the next line, I am performing the API callout by calling the getBlogs() method from SFDCStopCallout class. This method is returning an instance of HTTPResponse that I am storing in a variable named response. Finally, I am verifying the response code, response header and the response body which is returned by our callout method by using System.assertEquals() method.

You'll get 100% coverage of the SFDCStopCallout class using this testGetBlogs() method alone. Now, one question to consider is:-

Do I need to create mock callout classes for each callout ?

The answer is YES. You need to create a mock for each callout you're perfoming in your apex to have full test coverage of that callout. However, you can use the same callout class by adding some conditions to provide different responses for different callouts. The easy solution to this problem is given in our second method which is testGetBlogsUsingFramework().

testGetBlogsUsingFramework() is making use of HTTPCalloutServiceMock class present in HTTPCalloutFramework to test this callout. HTTPCalloutFramework is a framework that simplifies HTTP Callouts in apex. You can install it from the GitHub repository in one click by clicking on the Deploy to Salesforce button. Click this link to go to the repository and click on the button to install the framework.

Now let's have a look at the second method that's using the framework. In this method, first of all I created an instance of HTTPCalloutServiceMock class named as sfdcStopApiMock. Then I set the response code, response header and the response body of my fake response by passing the constants as the parameters in the the setter methods available in the class. In the Test.setMock() method, I have passed the instance of HTTPCalloutServiceMock i.e. sfdcStopApiMock as the second parameter. The rest of the code is the same as in the first method. You can test the SFDCStopCallout class with this second method alone once you have installed the framework and it'll give you 100% coverage. So, we got to a conclusion that by using the framework,

"We are doing the same work performed by creating a separate mock class that is perfomed by writing 4 lines of code using HTTPCalloutFramework"

And the good thing is, you can reuse the same framework class again and again for different callouts. So, it's a great time saver for any developer. Similar is the case while calling out using the framework. If you want to have a detailed look on the framework you can view another blog post by clicking here.

Tired of reading or just scrolled down, don't worry, you can watch the video too.


That's all for this tutorial. If you liked it, make sure to share it among your network and let me know your feedback in the comments section below.

Happy Trailblazing..!!

Tuesday, 3 December 2019

HTTPCalloutFramework - A light weight framework for Apex HTTP Callouts

Hello Trailblazers,

I recently launched a new framework for simplifying apex HTTP callouts known as HTTPCalloutFramework. I open sourced it on GitHub and it's freely available now. In this post, I am going to talk about the functionality and advantages of this framework.

Overview

HTTPCalloutFramework helps you to simplify your apex HTTP callouts by storing all the metadata required for the callout as a record in a custom metadata named as:- HTTPCalloutConfiguration. This metadata stores the following essential information:-
  1. API Endpoint
  2. Request Method (GET/POST...)
  3. URL Parameters
  4. Header Parameters
  5. Request Body
  6. Request Timeout
This framework also includes two reusable mock classes that can be used while writing test classes for callouts:-
  1. HTTPCalloutServiceMock:- This mock class is used when there is a single callout within the code that's covered by the test method.
  2. HTTPCalloutServiceMultiMock:- This mock class is used when there are multiple callouts within the code that's covered by the test method.
These mock classes consists of constructors and methods that can be used to setup a mock response. For an example implementation you can have a look at HTTPCalloutServiceTest class that is used to cover the code in our service class.

Installation

To install this framework in your org, you need to go to the github repository here. Click on the Deploy to Salesforce button as shown below:-


As you click on that button, you'll be taken to a screen as shown below:-

Choose the correct environment and click on the Login to Salesforce button on the top right side. If you're using this tool for the first time, you'll see a screen asking for necessary permissions for deployment as below:-


Click on allow. You will see another screen as shown below:-


This screen is displaying all the metadata that will be deployed to your org. Click on the Deploy at the top right corner. Clicking on this button will deploy the framework to your org. You'll see the messages on the page on clicking deploy button as shown below:-


As you can see above, the deployment is successfully completed, in case there is an error, it'll be shown and the deployment will fail.

Congratulations..!! You have successfully installed HTTPCalloutFramework in your org

Usage

This metadata is mainly used in a service class known as HTTPCalloutService. While creating an instance of this class you can pass the developer name of custom metadata in the constructor and it will automatically fetch the data from HTTPCalloutConfiguration record and set it in the HTTP request.

Suppose, you need to add a request body yourself each time you're making a request as it's dynamic, you can do that easily by using the getter and setter methods in the service class. For ex:- For request body, we have setRequestBody() and getRequestBody() methods that can be used.

While using this framework You should only focus on the stuff that's dynamic while making a callout as the static data can be stored easily in the custom metadata and will be picked automatically by our service class.

Let's have a look at the example code and learn how by using this framework, we can reduce code. In this example, I am going to connect to another Salesforce Org - Playful Bear Org from my Salesforce Org - Curious Racoon Org and query contacts.

There are better ways to do this like:- Using named credentials etc. However, I am doing it solely by writing code for demo purposes.

So, if you want to connect to a different salesforce environment from apex you'll do something as shown below:-

As you can see above, I have simply created a wrapper for the token response in order to get the access token. The code in line no. 10 to 18 is used to hit the token URL and get the response from it. However, the code in line no. 20 to 26 is used to get the actual response by querying the contact from other org.

The other way around can be by using the HTTPCalloutFramework. Let's have a look at the below code:-

As you can see above, I can get the token very easily by using the code shown in line no. 10 to 11. I can query the contacts from other org and get the response from line no. 13 to 18. I have made two custom metadata records, one for authentication and other for querying as shown below:-


If I don't consider the wrapper, the total no. of lines of code a developer has to write without using the framework:- 16 and while using the framework its:- 8. So, we got to know that you can reduce your code to half along with the additional benefits like:- there will be minimal or no change in code in future as most of the details are stored in the custom metadata itself.

Not only this, if multiple developers are working on integrations to connect with the same systems, they can do the authentication stuff in just two lines of code which is common to all of them, there is no need to create a common method or anything like that. Also, for any change in the headers, or metadata we don't need to go to the code and change that you can simply do that in the custom metadata itself. Therefore, the advantages can be summarized as:-


  1. Lines of code are reduced.
  2. Request metadata can be updated without any change in code.
  3. Code reusability is implemented automatically.
  4. Data from static APIs can be fetched using two lines of code.
  5. Getter and setter methods make it easy for us to update the request before sending.
  6. Mock classes are available for handling single and multiple requests in the code covered by a test method while working on test classes.
  7. Named credentials support.

Even if you're using named credentials for the authentication part, it's easy to setup the request in the custom metadata. Let's have a look at the below code that's using named credentials for authentication and is making the same request:-


As you can see above, I have just given my metadata developer name in the constructor i.e. :- PlayfulBearQueryAPIWithNamedCredentials, updated the request URL with my query and displayed the response in debug. It's working fine. Now let's have a look at the custom metadata record for the same:-


You can see that I have specified the request method as GET and the request timeout in miliseconds. However, you can see that the request URL is:- http://callout:Playful_Bear_2/services/data/v47.0/query/?q=

As it's starting from callout: we got to know that it's using named credentials for authentication. The named credential record for playful bear org is given below:-


So, in this way, using both the named credentials and framework, I can even reduce my code more and perform my callouts more easily.

With this blog, I hope you got an idea of how can the HTTPCalloutFramework helps you in managing your REST callouts from Salesforce and how you can install and use it. There are two mock classes also present in the framework that I wanted to describe about but it'll be a very long post in that case. I recommend you to have a look at the test class for my service class here. In this test class, I have used both the mock classes:- HTTPCalloutServiceMock.cls and HTTPCalloutServiceMultiMock.cls for covering single and multiple callouts in the code covered by test methods. You can use these classes too while creating a test class as these are generic mocks. If you still need an example of using these mocks, let me know in the comments down below.

If you liked this framework, make sure to bookmark it on GitHub and show your support by clicking on the Star button present here. Also, share this post among your network and let me know your feedback in the comments section.

Happy Trailblazing..!!

Salesforce Integration Tutorial Part 8 - Apex REST Callouts

Hello Trailblazers,

Welcome to the 8th tutorial of the Salesforce Integration Tutorial series. In previous tutorials, we created a test class for our custom API in salesforce and we've gone through different methods that are available while creating our custom APIs.

In this tutorial, we're not going to create an API in salesforce instead, we'll be calling out an API hosted on an external system from our salesforce org and will get the response from that API. For this purpose, mainly 3 predefined classes are used:-

  1. HttpRequest:- This class is used to create a new HTTP Request to be sent to the external system. It has methods like:- setMethod(), setHeader(), setBody() which are used to set the parameters of HTTP Request.
  2. HttpResponse:- This class is used to store the HTTP Response which is returned from the external system. It has methods like:- getBody(), getStatus(), getStatusCode() which are used to get the data returned in the response.
  3. Http:- This class is used to send an HTTP request to an external API and get the response from that API. It has just two methods:- send() and toString() out of which send() is mostly used. This method takes an instance of HttpRequest as a parameter and return an instance of HttpResponse in the response.

I have created a custom API and deployed it to Heroku, you can have a look at the same here:- https://sfdcstop.herokuapp.com/blogs

This API is simply returning a response as below:-


As you can see above, the response of this API consists of an author as Rahul Malhotra and a list of blogs written by me in the Salesforce Integration Tutorial Series along with the URL of each blog. Now, our task is to call this API from Salesforce and get the response. For this, we first need to create a wrapper class that can parse this JSON response in apex. Fortunately, we have a great tool available for this and it's free. The tool is called JSON2Apex and is available at:- https://json2apex.herokuapp.com/

In this tool, you just need to paste the json which is returned by the API, specify the wrapper class name and click on the Create Apex button. This will download the zip file in your system which consists of a wrapper class that can be used to parse the input json and a test class for that wrapper class. In our case, I am pasting the json returned by my api below:-


As I clicked on Create Apex button, I got the below apex classes that I created in my salesforce org after minor modifications (Added comments and removed _ from the name of test class. Updated SFDCStopBlogsWrapper_Test to SFDCStopBlogsWrapperTest).

You can see above that the wrapper class SFDCStopBlogsWrapper has two data members:- author of type string and blogs of type List<Blogs> where Blogs is the inner class that consists of id, title, and url as string. It can be used to parse the input json which we got in the response as the json consits of author which is a string and list of blogs that are objects consisting of id, title and url which are again strings. The wrapper class also consists of parse() method that is taking the json string as an input and will return an instance of the same wrapper class. It's using JSON.deserialize() method to deserialize the json string. Similarly, you can have a look at the test class code for this wrapper below:-

As you can see above, it consists of a single testmethod that's parsing the same json string that was used in the input while downloading the auto-generated apex classes. This method is just calling the parse() method of wrapper class as it's the only method in the wrapper class. Then it's checking whether the JSON string is parsed properly or not by confirming that the instance of wrapper class is not null.

To make an HTTP callout to an external API, we need to add an entry to the Remote Site Settings in Salesforce where we need to store the base URL of the api. We need to do this to tell Salesforce that we trust this external API/Endpoint URL and thereby, allowing salesforce to use this endpoint to interact with the external system.

For this, go to setup and search for remote site settings:-


You'll see the below page:-


 Click on New Remote Site and add the following data:-


You can see above that I have added only the base URL i.e. https://sfdcstop.herokuapp.com for the remote site setting and not the actual blogs api url i.e. https://sfdcstop.herokuapp.com/blogs. I have done this so that I don't need to create multiple entries for each API in future as Salesforce will be allowed to interact with anything following this base URL. Click on Save.

You'll see that a new remote site record is created. Now, we're ready to create our callout class that will send a request to the external api, get the response and will use the wrapper class to parse that JSON response. I created a new class named SFDCStopCallout. It's code is given below:-

As you can see above, I have a single method in this class named as getBlogs() which will hit the blogs API and get the response from there. Inside this method, I have created and initialized an instance of Http class and HttpRequest class. I used the instance of HTTPRequest class named as:- request and called it's setEndpoint() method in which I passed the endpoint url of our blogs api. Then I called the setMethod() method of request and passed the value GET as we need to send a GET request to the api endpoint. Finally, I used the send() method from the instance of  Http class that will take request (instance of HttpRequest) as a parameter and return an instance of HttpResponse class. The response is assigned to an instance of HttpResponse class named as response. The send() method will actually send the request to the endpoint URL and get the response from there. Finally, I checked if the response status code is 200 by using the getStatusCode() method of response. If it is, I got the response body which is a json string using getBody() method of response. I used the parse() method from my SFDCStopBlogsWrapper class to parse the json string that I got in the response body.

Finally, I used the author variable of my wrapper class to display the author in logs and then I checked if the blogs variable is not null and not empty. If I have the blogs in the response, I iterated those blogs one by one and displayed the id, title and url of each blog.

You can execute this callout in the developer console by calling the getBlogs() method of SFDCStopCallout class as:- SFDCStopCallout.getBlogs(). Then you can check the debug logs to see the response as given below:-


Tired of reading or just scrolled down, don't worry, you can watch the video too.


That's all for this tutorial. We learned how to make a callout to external API from Salesforce and get the response in apex. We also learned about the concept of wrapper classes and got to know about remote site settings. In case you need to pass the data to the external system, you can either pass it in the URL itself or set the data in the request body using the setBody() method of HttpRequest class. In that case you should also set the appropriate method like:- POST, PUT etc. as GET doesn't support the request body. You can have a look at all the methods of HttpRequest class here.

In the next tutorial, we'll create a test class for this api callout. If you liked this tutorial, make sure to share it in your network and let me know your feedback in the comments below.

Happy Trailblazing..!!