SFDC Stop - Always the latest about Salesforce


Full Tutorial Series with videos, free apps, live sessions, salesforce consulting and much more.


Telegram logo   Join our Telegram Channel

Friday, 25 November 2022

Simplifying SOQL with Polymorphic Relationships

Hello Trailblazers,

In this post, we're going to learn about TYPEOF clause in SOQL using which we can query data that contains polymorphic relationships. I recently came across this Stackoverflow Question which was asked 7 years 3 months ago considering the time I am writing this post where the user has asked about "Unable to query FederationIdentifier on case owner" The question is pretty old but is still valid. You cannot query case owner's FederationIdentifier using a simple SOQL query on case object. Let's see why?

The Problem

I have a case record in my org as shown below:

Let's say you want to query the case subject, as well as the case owner's FederationIdentifier field. As you can see above, the owner of case is a person named User User and as we open this user's record, you can see below that the Federation ID field has a value 12345.

Well, if I tell you to write a SOQL query in order to get this federation id from case, maybe the first query that comes to your mind is something like this:
SELECT Subject, Owner.FederationIdentifier FROM Case WHERE Id = '5005D000008nxIkQAI'
Now, let's run this SOQL query and see the results:
As you can see above, we're getting this error:
SELECT Subject, Owner.FederationIdentifier FROM
                ^
ERROR at Row:1:Column:17
No such column 'FederationIdentifier' on entity 'Name'. If you are attempting to use a custom field, be sure to append the '__c' after the custom field name. Please reference your WSDL or the describe call for the appropriate names.
This error is coming because the OwnerId field on Case is a polymorphic relationship field which can refer to a Group or a User. In case of a User, we'll have the FederationIdentifier field but in case of a Group, we won't have it. Therefore, we can say that, while you're executing this query, salesforce is not sure if the owner is a Group or a User and therefore, the query could not be executed.

Ok, got the issue now but how to resolve it? Should I create a formula field on case to get the case owner's federation id? You can do it, but let's also see how we can query it!

The Solution

Salesforce has provided an optional TYPEOF clause that can be used in a SOQL query including polymorphic relationships. TYPEOF clause is available in API version 46.0 or LATER. Let's solve our issue first and then we'll see the format of TYPEOF clause in detail. In order to query FederationIdentifier from case owner we can write a query as follows:
SELECT Id, TYPEOF Owner WHEN User Then FederationIdentifier END FROM Case WHERE Id = '5005D000008nxIkQAI' AND Owner.Type = 'User'
As you can see above, I've included the statement TYPEOF Owner WHEN User Then FederationIdentifier END. It's basically saying that when the Case Owner's type is User, then query FederationIdentifier field. I've also added a Type filter for case owner at the end of query: AND Owner.Type = 'User'.  The result for this query is given below:
Starting SFDX: Execute SOQL Query...

07:30:06.358 sfdx force:data:soql:query --query SELECT Id, TYPEOF Owner WHEN User Then FederationIdentifier END FROM Case WHERE Id = '5005D000008nxIkQAI' AND Owner.Type = 'User'
Querying Data... done
 ID                 OWNER                                                              
 ────────────────── ────────────────────────────────────────────────────────────────── 
 5005D000008nxIkQAI {                                                                  
                      "attributes": {                                                  
                        "type": "User",                                                
                        "url": "/services/data/v56.0/sobjects/User/0055D000005BiagQAC" 
                      },                                                               
                      "FederationIdentifier": "12345"                                  
                    }                                                                  
Total number of records retrieved: 1.
07:30:10.900 sfdx force:data:soql:query --query SELECT Id, TYPEOF Owner WHEN User Then FederationIdentifier END FROM Case WHERE Id = '5005D000008nxIkQAI' AND Owner.Type = 'User'
 ended with exit code 0
As you can notice above, we're getting the related Owner record with FederationIdentifier field in response. Let's say you want to get the FederationIdentifier using this query in apex, you can refer to the below code:
List<Case> caseList = [SELECT Id, TYPEOF Owner WHEN User Then FederationIdentifier END FROM Case WHERE Id = '5005D000008nxIkQAI' AND Owner.Type = 'User'];
User caseOwner = caseList[0].Owner;
System.debug(caseOwner.FederationIdentifier);
You'll get the FederationIdentifier from case owner in the debug as shown below:
Awesome! Now that we've solved the issue, let's learn more about the TYPEOF clause. The TYPEOF statement in SOQL is of the format:

TYPEOF <PrimarySObjectField> WHEN <PossibleRelatedObject1APIName> THEN < PossibleRelatedObject1FieldsListToQuery> WHEN <PossibleRelatedObject2APIName> THEN < PossibleRelatedObject2FieldsListToQuery>.... ELSE <LisfOfFieldsToQueryWhenAllAboveWHENConditionsAreFalse> END

It's similar to switch case in apex. For example, we can understand our TYPEOF clause as: TYPEOF Owner WHEN User Then FederationIdentifier END, here we checked if the TYPEOF Owner (primary sObject field) WHEN (is equal to) User (possible related object) THEN FederationIdentifier (field to query) END

Notice that the ELSE part is optional and we can have multiple WHEN-THEN combinations to check for multiple objects that are possible considering our polymorphic relationship field.

Another example can be WhatId field of Task object. We know that this field can be linked with multiple sObjects. Let's consider Account, Opportunity and Case for now and query different fields from each of these objects. If the task is not linked to any of the Account, Opportunity or Case object, I'll just query the name field of that related object's record.

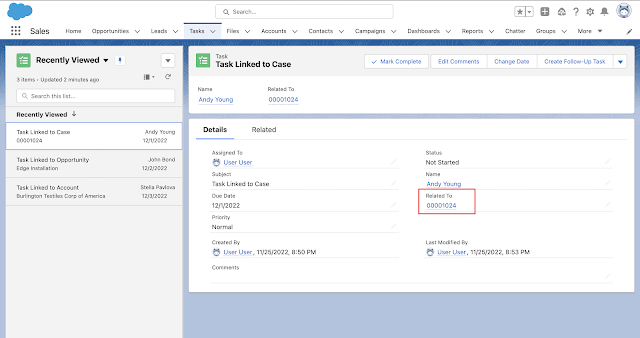
Let's create 4 tasks: First one related to an account, second one related to an opportunity, third one related to a case and fourth one related to a product. Have a look at the tasks I created below:
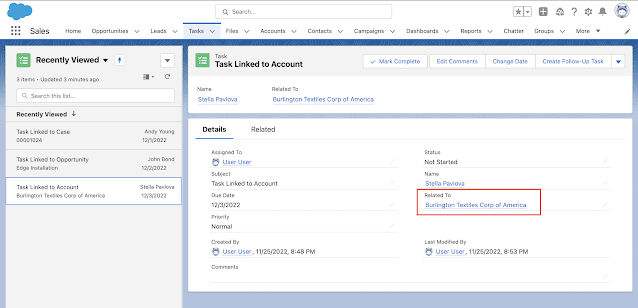
Task linked to account
Task linked to opportunity
Task linked to case
Task linked to case
Task linked to product
My apex code with the SOQL query is as follows:
List<Task> taskList = [SELECT Subject, 
    TYPEOF What 
    	WHEN Account THEN Type, NumberOfEmployees 
    	WHEN Opportunity THEN Amount, CloseDate 
    	WHEN Case THEN Subject, CaseNumber 
    	ELSE Name 
    END 
FROM Task];
for(Task taskRecord: taskList) {
    System.debug(taskRecord.Subject + ' -> ' + taskRecord.What);
}
As you can see above, I am querying Type and NumberOfEmployees when the related object is Account, Amount and CloseDate when the related object is Opportunity, Subject and CaseNumber when the related object is Case, otherwise, I'm just querying Name of the related record. The result when the above apex code is executed is shown below:
As you can see above, we're getting all the tasks with relevant related fields from each of Account, Opportunity and Case. In case of product, we're getting the Name field. 

If you remember, in our initial query on Case (SELECT Id, TYPEOF Owner WHEN User Then FederationIdentifier END FROM Case WHERE Id = '5005D000008nxIkQAI' AND Owner.Type = 'User'), we also added WHERE condition on Type field as: AND Owner.Type = 'User'. This is another good way to filter records while dealing with the specific type of related objects we would like to consider. You can even skip the ELSE part if you've already added WHEN-THEN for each related object and the corresponding conditions in WHERE clause.

So that's how you can Simplify SOQL with Polymorphic Relationships. You can have a look at this detailed article from salesforce official documentation to learn more about TYPEOF clause. Before coming to the end of this blog, let's talk about some of the important considerations of TYPEOF clause as well.

Considerations for TYPEOF

I am highlighting some of the considerations of TYPEOF clause here, you can checkout the full list in official documentation.
  • TYPEOF cannot be used with with queries that don't return objects such as COUNT() and aggregate queries
  • TYPEOF cannot be used in SOQL used in Bulk API
  •  TYPEOF cannot be used in semi-join query. Semi Join query is a query used to filter the original query - For example: SELECT Name FROM Contact WHERE AccountId IN (SELECT Id FROM Account), here the text in bold is semi-join query
  • TYPEOF cannot be used with a relationship field whose relationshipName or namePointing attribute is false.
You can checkout the namePointing and relationshipName attribute of a field very easily. For example, consider the below code:
System.debug(Case.OwnerId.getDescribe());
Here, we're getting the DescribeFieldResult for OwnerId field of Case object. The output for the same is provided below:
Schema.DescribeFieldResult[
    getByteLength=18;
    getCalculatedFormula=null;
    getCompoundFieldName=null;
    getController=null;
    getDataTranslationEnabled=null;
    getDefaultValue=null;
    getDefaultValueFormula=null;
    getDigits=0;
    getFilteredLookupInfo=null;
    getInlineHelpText=null;
    getLabel=Owner ID;
    getLength=18;
    getLocalName=OwnerId;
    getMask=null;
    getMaskType=null;
    getName=OwnerId;
    getPrecision=0;
    getReferenceTargetField=null;
    getRelationshipName=Owner; // <---- Relationship Name
    getRelationshipOrder=null;
    getScale=0;
    getSoapType=ID;
    getSobjectField=OwnerId;
    getType=REFERENCE;
    isAccessible=true;
    isAggregatable=true;
    isAiPredictionField=false;
    isAutoNumber=false;
    isCalculated=false;
    isCascadeDelete=false;
    isCaseSensitive=false;
    isCreateable=true;
    isCustom=false;
    isDefaultedOnCreate=true;
    isDependentPicklist=false;
    isDeprecatedAndHidden=false;
    isDisplayLocationInDecimal=false;
    isEncrypted=false;
    isExternalId=false;
    isFilterable=true;
    isFormulaTreatNullNumberAsZero=false;
    isGroupable=true;
    isHighScaleNumber=false;
    isHtmlFormatted=false;
    isIdLookup=false;
    isNameField=false;
    isNamePointing=true; // <---- Name Pointing
    isNillable=false;
    isPermissionable=false;
    isQueryByDistance=false;
    isRestrictedDelete=false;
    isSearchPrefilterable=false;
    isSortable=true;
    isUnique=false;
    isUpdateable=true;
    isWriteRequiresMasterRead=false;
]
If you notice, the relationshipName for this field is Owner and namePointing attribute is also true. A smaller documentation on TYPEOF clause is also available here.

That's all for this tutorial. I hope you liked it, let me know your feedback in the comments down below. You can connect with my on Connections app by scanning the QR code given below:
Or search in the code scanner screen using my username: rahulmalhotra

Happy Trailblazing!!

Saturday, 19 November 2022

Create modals using the new LightningModal component (Winter '23 Release)

Hello Trailblazers,

In this post we're going to learn about the new LightningModal component that can be extended by any lwc which you would like to use as a modal. Salesforce has provided 3 helper components to create a modal:

  1. lightning-modal-header
  2. lightning-modal-body
  3. lightning-modal-footer

Let's create a testModal component and try to use these 3 tags to see what we get as a result.

Creating a simple testModal LWC

testModal.js-meta.xml

I am specifying the meta file first of all so that we can focus on our html and js files throughout this tutorial. Our meta file is pretty simple as shown below:
<?xml version="1.0" encoding="UTF-8"?>
<LightningComponentBundle xmlns="http://soap.sforce.com/2006/04/metadata">
    <apiVersion>55.0</apiVersion>
    <isExposed>true</isExposed>
    <targets>
        <target>lightning__HomePage</target>
    </targets>
</LightningComponentBundle>

As you can see above, I've specified lightning__HomePage as a target so that we can embed this component in our homepage. This is NOT REALLY REQUIRED as we're going to use our component as a modal, but I'm just keeping this for now, so that we can see what the helper components render for us. I've also marked isExposed as true to make this component available in our app builder.

testModal.html

The simplest HTML content for our modal is shown below:
<template>
    <lightning-modal-header>Test Modal Header</lightning-modal-header>
    <lightning-modal-body>Test Modal Body</lightning-modal-body>
    <lightning-modal-footer>Test Modal Footer</lightning-modal-footer>
</template>

We've only called the header body and footer tags with some content in them. I embedded our component on the homepage. Let's see the output below:


As you can see above, we're having 3 different sections: Header, Body and Footer coming from our lightning-modal-header, lighnting-modal-body and lightning-modal-footer tags.

It's better and easier to use label attribute of lightning-modal-header to specify the heading for our modal header. You can just update the lightning-modal-header tag as shown below:
<lightning-modal-header label="Test Modal Label">Test Modal Header</lightning-modal-header>
Let's see the output of this change as well:
You might not see any difference here but it'll be more clear as we'll start using this component as a modal.

Okay that's fine but how do I actually use this as a modal?

In order to open it as a modal, we'll create another lwc named: useModal but first of all let's update the js file of this testModal as well:

testModal.js

import LightningModal from 'lightning/modal';

export default class TestModal extends LightningModal {}
Notice the two changes I did above which makes it different from other LWCs:

  1. Instead of the statement, import { LightningElement } from 'lwc'; it's importing LightningModal from lightning/modal.
  2. Instead of extending LightningElement, our component is extending LightningModal using extends LightningModal.

That's all for our testModal for now, let's create our useModal component now:

useModal.js-meta.xml

Starting with the meta file, it's the exact same as we had above because we'll be embedding this component as well in our homepage:
<?xml version="1.0" encoding="UTF-8"?>
<LightningComponentBundle xmlns="http://soap.sforce.com/2006/04/metadata">
    <apiVersion>55.0</apiVersion>
    <isExposed>true</isExposed>
    <targets>
        <target>lightning__HomePage</target>
    </targets>
</LightningComponentBundle>
Note: You can remove the lightning__HomePage target from your testModal now and remove it from the hompage, as we'll be using it as a modal now

Now, let's move on to the HTML part of useModal LWC:

useModal.html

<template>
    <lightning-card title="Use Modal">
        <p class="slds-var-p-horizontal_small">
            <lightning-button label="Open Modal" onclick={openModal}></lightning-button>
        </p>
    </lightning-card>
</template>
As you can see above, the code is pretty simple. We have a lightning-card (for better UI) and inside it, we have a paragraph which contains a lightning-button with label Open Modal. This button will call our js function openModal as it's clicked by the user. It's time to move on to our js file now!

useModal.js

For now, we'll just try to open our testModal:
import { LightningElement } from 'lwc';
import TestModal from 'c/testModal';

export default class UseModal extends LightningElement {

    openModal() {
        TestModal.open();
    }
}
As you can see above, we've imported our TestModal using the import statement and called open() on it in order to open our modal component. Let's see how it works!

This is how our useModal component looks like on the homepage:
I just embedded it before our testModal component. As we click on Open Modal button, we get the modal as shown below:
I hope that the usage of label attribute in lightning-modal-header component is clear now. You should use label attribute to specify a label for your modal. If you want to have any custom HTML like: a button or something else, that can come between our lightning-modal-header tags.

Isn't it amazing? just a few lines of code and you have your modal ready. The close button that you see on the top right works perfectly and your modal will be closed automatically as you click on that button.

Note: You can also close the modal by pressing the ESC key.

Resizing our modal

There are some properties that you can pass in the open function. One of the property is size which supports small, medium and large values. By default, the size is medium. You can pass any sizes out of small, medium or large. The output of all 3 are shown below.

To have a small sized modal, you can just do:
    TestModal.open({
        size: 'small'
    });
And you'll have the below output:
For a medim sized modal, you can just do nothing (as the default size is medium) or pass in the medium value as shown below:
    TestModal.open({
        size: 'medium'
    });
And you'll have the below output:
Similarly, for a large modal, you can just do:
    TestModal.open({
        size: 'large'
    });
And you'll have the below output:

Defining a Custom Close Button for our Lightning Modal

A very common requirement is to have two buttons: Cancel and Save in our modal footer. If someone clicks on Cancel, we'll just close the modal and if someone clicks on Save, we'll save the information and then close our modal. Let's see how we can implement that. It's time to update our testModal.html
<template>
    <lightning-modal-header>Test Modal Header</lightning-modal-header>
    <lightning-modal-body>Test Modal Body</lightning-modal-body>
    <lightning-modal-footer>
        <lightning-button label="Cancel" onclick={closeModal} class="slds-var-p-right_x-small"></lightning-button>
        <lightning-button label="Save" variant="brand" onclick={save}></lightning-button>
    </lightning-modal-footer>
</template>
As you can see above, I've removed the Test Modal Footer text which was present in between lightning-modal-footer tags and I added two lightning buttons instead: one for cancel and another for save. The Cancel button is calling closeModal() from our js and have an extra small right padding so that the two buttons don't stick to each other. The Save button is having a variant as brand and is calling save() from our js file. The updated testModal.js file is given below:
import LightningModal from 'lightning/modal';

export default class TestModal extends LightningModal {

    closeModal() {
        this.close();
    }

    save() {
        console.log('We will save the data and then close modal');
    }
}

You might have noticed above that I added two methods here:
  1. closeModal() which is calling close() here as this.close(). This close() is defined in the LightningModal component which we're extending and it'll close the modal.
  2. save() which is doing nothing as of now but adding a statement to the console that: We'll save the data and then close modal.

The updated modal is shown below:
As you can see, we have two buttons now: Cancel and Save. As you click on Cancel button, the modal will be closed. If you click on Save button, there will be a message in console but the modal will not close.

Let's say the user clicks on save and then while the information is being saved, the user clicks on Close button at the top right and the modal is closed, how do you ensure that the information was saved successfully? In this scenario, preventing the user from accidentally closing the modal is important, let's see how we can do that!

Prevent the user from closing Lightning Modal using disableClose attribute

For now, we'll consider a scenario that our save operation takes 5 seconds. So, we'll disable the Close operation for 5 seconds when the save button is clicked. We're not dealing with apex in this tutorial, so we'll just use setTimeout() to simulate our server call. Our testModal.js is updated as shown below:
import LightningModal from 'lightning/modal';

export default class TestModal extends LightningModal {

    closeModal() {
        this.close();
    }

    save() {
        console.log('We will save the data and then close modal');
        this.disableClose = true;
        const that = this;
        setTimeout(() => {
            console.log('Information saved! You can now close the modal');
            that.disableClose = false;
        }, 5000);
    }
}
Inside the save(), we're setting disableClose to true. Then we're calling setTimeout() (you can consider it similar to calling any apex method and waiting for the response). In setTimeout(), we can pass a function and specify the time (in milliseconds) after which that function will be called. Here, we've specified the time as 5000 milliseconds i.e. 5 seconds and after 5 seconds the function passed will be called. That function will print the text Information saved! You can now close the modal in the console and set disableClose to false again. This can be considered - as our save operation is successful and we want to allow the user to close the modal now.
Notice the above image, this is how our modal looks like. Have a look at the cross in the red rectangle, it's enabled for now. As I click Save button the modal will look like as shown below:
As you can see above, the cross icon is disabled, this means we cannot close our modal and it'll automatically be enabled after 5 seconds. Even if you click on Cancel button the modal will not close because the call this.close() will not work. It's even better if we can disable the Save and Cancel buttons as well, until the save operation is performed, so that the user doesn't click these buttons again and again. Let's do that quickly!

For this, I am going to add disabled={disableClose} to both Save and Cancel buttons of my modal so that these buttons are disabled when disableClose is true. Below is the updated testModal.html:
<template>
    <lightning-modal-header label="Test Modal Label">Test Modal Header</lightning-modal-header>
    <lightning-modal-body>Test Modal Body</lightning-modal-body>
    <lightning-modal-footer>
        <lightning-button label="Cancel" onclick={closeModal} class="slds-var-p-right_x-small" disabled={disableClose}></lightning-button>
        <lightning-button label="Save" variant="brand" onclick={save} disabled={disableClose}></lightning-button>
    </lightning-modal-footer>
</template>
Notice the disabled attribute applied to both the buttons above. The updated output as I click on Save button of my modal is given below:
As you can see above, all my buttons are disabled now when I clicked Save, they'll be enabled back together after 5 seconds (OR you can do it after your apex call is successful in a real implementation). You can also call the close() again once your apex call is successful so that the modal get closed automatically. In our case, it can be after 5 seconds when we set disableClose back to false as shown below:
import LightningModal from 'lightning/modal';

export default class TestModal extends LightningModal {

    closeModal() {
        this.close();
    }

    save() {
        console.log('We will save the data and then close modal');
        this.disableClose = true;
        const that = this;
        setTimeout(() => {
            console.log('Information saved! Closing the modal...');
            that.disableClose = false;
            that.close();
        }, 5000);
    }
}
Notice that we called close() after we set disableClose to false in our save(). Now, the modal will close automatically after 5 seconds as we click on the save button.

So that's how you can create modals using the new LightningModal component. I hope you have a good idea of how it works and you can go ahead and create your own modals now. Some of the information that we didn't cover here are:
  • Custom styling of modal's header, footer and body
  • Passing information to modal while opening the modal (Just create an @api attribute in your testModal and provide value to it in the TestModal.open() like we did for size attribute)
  • Passing information back to component that called the modal when the modal is closed (You can pass the value inside close() as a parameter and have a then() linked to TestModal.open() which will receive the return value as: TestModal.open({...params}).then((valuePassedToCloseFunction) => {})
  • Firing an event from modal and capturing it in parent.
You can refer to the official documentation or comment below and let me know if you would like to learn about these in detail and I'll create another post. You can also find my contact details on Connections (username: rahulmalhotra)

So that's all for this tutorial. I hoped you liked it, let me know your feedback in the comments down below.

Happy Trailblazing!!