SFDC Stop - Always the latest about Salesforce


Full Tutorial Series with videos, free apps, live sessions, salesforce consulting and much more.


Telegram logo   Join our Telegram Channel
Showing posts with label JavaScript. Show all posts

Monday, 14 August 2023

Lifecycle Hooks in LWC

Hello Trailblazers,


In this post we'll understand different lifecycle hooks of lightning web components.


What is a Lifecycle Hook?

A lifecycle hook is a callback method which is called automatically at some point during a lightning web component's lifecycle. In simple words, I can say: From the moment a component is initialized, till the moment it's removed from the page, there are various important instances that can be used by developers to perform various actions. So, in order to allow the developers to perform those actions, some callback methods are automatically called during these instances.

What are the different lifecycle hooks of lightning web components?

There are mainly 5 lifecycle hooks in lightning web components. They are:

  1. constructor()

  2. connectedCallback()

  3. renderedCallback()

  4. disconnectedCallback()

  5. errorCallback()

There is a great diagram present in the salesforce official documentation showcasing the lifecycle flow or in other words: the order in which these lifecycle hooks are being called. Let's take a look at that below:


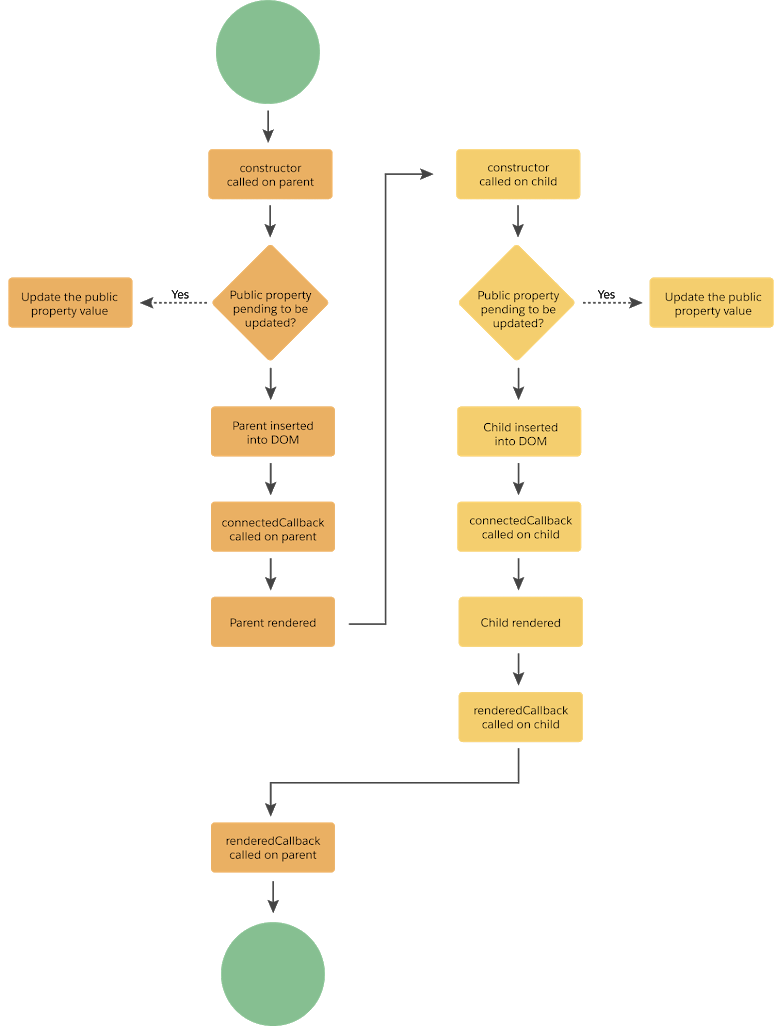
This basically means that whenever a parent and child component is rendered on the page, the order of lifecycle hooks will be as follows:

  1. constructor() called on parent
  2. connectedCallback() called on parent
  3. constructor() called on child
  4. connectedCallback() called on child
  5. renderedCallback() called on child
  6. renderedCallback() called on parent

In case of an error in child component, the errorCallback() of parent component will be called after the first 4 callbacks mentioned above i.e. before calling the renderedCallback() for child + parent component. The updated order in case of an error in child will be:

  1. constructor() called on parent
  2. connectedCallback() called on parent
  3. constructor() called on child
  4. connectedCallback() called on child
  5. errorCallback() called on parent
  6. renderedCallback() called on child
  7. renderedCallback() called on parent

Now it's time to get into action and verify whatever we specified above

constructor()

This callback method is called as a component is constructed. The first statement inside a constructor should always be super(). Calling super() will provide the correct value for this keyword which we can use in our lwc. Some more important points about constructor are:

  1. You cannot access public properties (i.e. the properties annotated with @api) within a component's constructor. If you try to refer anything, it'll come as undefined

  2. You cannot access any html tag/element inside the component's constructor as the component is not rendered yet.

  3. You can access private properties of a component inside a constructor

Now the question is: What should we use constructor() for?

Like a normal javascript class, this lwc class constructor can also be used to initialize some private variables you may have. It can be used to perform an operation like: calling your apex method (or any javascript method) to retrieve information or perform a particular action.

Let's have a look at an example lightning component named Child below:

child.js

import { LightningElement, api } from 'lwc';

export default class Child extends LightningElement {

    count = 0;
    @api
    message = 'default';

    constructor() {
        super();
        console.log('Child constructor called');
        console.log(this.count);
        console.log(this.message);
        console.log(this.template.querySelector('lightning-button'));
    }
}
As you can see in the above js file, a constructor is defined. Inside the constructor, first of all calling super(), then we are displaying a text - Child constructor called, then displaying value of private variable count, after that we're displaying value of public variable message and finally we're trying to display the reference to a lightning-button element present in our html.

child.html

We have a lightning-button with label Increase Count in our html file which will call a js method increaseCount() as the button is clicked:
<template>
    <lightning-button label="Increase Count" onclick={increaseCount}></lightning-button>
    <br /><br />
</template>

We'll use this button later in the tutorial. For now, let's see the console logs as this component is rendered:

First we have the message Child constructor called, the value of private variable count is coming as 0 inside the constructor, the value of public variable message is coming as undefined and finally, the reference to lightning-button is also coming as null inside the constructor, because the component is not rendered yet.

connectedCallback()

This callback method is called when a lwc component is inserted into the dom. It establishes communication of the lwc component with the current document or container where it is inserted. Some important points about connected callback are:

  1. connectedCallback() on the parent component will be called before connectedCallback() on the child component is called. This is the reason that you cannot access child components from connectedCallback() of parent, as the child components are not inserted into the dom yet

  2. This callback is invoked after all the public properties are set. This means that whatever initial values are being passed to the public properties of component, the component will have those values assigned when the connectedCallback() is called

  3. This also means that connectedCallback() can only access the INITIAL VALUES OF PUBLIC PROPERTIES i.e. if you're updating the public property after the component is inserted, connectedCallback() will not be called again with the new value of public property. So, if you've a method which should be called based on the value of public property, it's better to call that method in a setter instead of connectedCallback() as the setter will be called again and again whenever the value of public property is set/updated

  4. You can perform some initialization tasks in the connectedCallback() like: listening for events or getting some initial data from the server

  5. connectedCallback() can be called more than 1 time as well. An example scenario can be: when a component is removed from the DOM and inserted again

Let's add connectedCallback() to our Child lwc component now. The updated code is provided below:

child.js

import { LightningElement, api } from 'lwc';

export default class Child extends LightningElement {

    count = 0;
    @api
    message = 'default';

    constructor() {
        super();
        console.log('Child constructor called');
        console.log(this.count);
        console.log(this.message);
        console.log(this.template.querySelector('lightning-button'));
    }

    connectedCallback() {
        console.log('Child connected callback called');
        console.log(this.count);
        console.log(this.message);
        console.log(this.template.querySelector('lightning-button'));
    }
}
As you can see above, I'm trying to access the private property count, public property message and lightning-button again in my connectedCallback(), if you remember in our constructor, we were only able to access the value of private property i.e. count, message was coming as undefined and lightning-button reference was coming as null. Let's see if we're able to access anything else now out of these.
As you can see in the output above, message is coming as default this time instead of undefined. However, the reference to lightning-button is still coming as null. This is because the public properties of our lwc component are now having the initial value assigned to them. As lightning-button is a child component with respect to our child lwc component, it's still not connected to the DOM and therefore is coming as null (remember the first point specified above: connectedCallback() on the parent is called before connectedCallback() on the child and here child component is lightning-button).

Let's create a parent component as well and pass the value to our message (public property) from there to ensure it gets reflected in our connectedCallback() as well. Our parent component's name is Parent and the code for the same is provided below:

parent.html

<template>
    <c-child message="hello"></c-child>
</template>
As you can see above, we're passing the value of message variable as hello. Let's take a look at the js file as well

parent.js

import { LightningElement } from 'lwc';

export default class Parent extends LightningElement {

    constructor() {
        super();
        console.log('Parent constructor called');
    }

    connectedCallback() {
        console.log('Parent connected callback called');
        console.log(this.template.querySelector('c-child'));
    }

    renderedCallback() {
        console.log('Parent rendered callback called');
        console.log(this.template.querySelector('c-child'));
    }
}
Here also, I've defined a constructor and a connectedCallback() as well to see in which order the parent child lifecycle hooks are being called. I also added a renderedCallback(). This renderedCallback() method should be called post connectedCallback() is called on child as per the order. We'll learn more about renderedCallback() in a bit, I've added this here for a reason. Let's have a look at the updated console.log() now:


The order of events is shown below:

  1. Parent constructor() is called

  2. Parent connectedCallback() is called and the reference to child component c-child is coming as null inside it

  3. Child constructor() is called. Value of count is 0, message is undefined and reference to lightning-button is coming as null as it's further a child component for our child lwc.

  4. Child connectedCallback() is called where value of count is 0. Notice that the value of message is hello instead of default this time because this is the value which is passed from our parent lwc to child lwc for this public property, reference to lightning-button is still coming as null

  5. Finally, our renderedCallback() method is called in our parent component as per the order and as it's called after the child's connectedCallback() method, this means that the child lwc is now connected to the DOM. Therefore, reference to child lwc is not coming as null this time, as it was coming in the parent's connectedCallback() method.

I hope all of this is clear. Now, let's move on to the renderedCallback() method.

renderedCallback()

As the name suggests, this callback method is called once the component has rendered. As the component can render multiple times, this callback method will also be called each time the component is re-rendered. Some important points about renderedCallback() are:

  1. renderedCallback() on the child component is called before it's called on the parent component

  2. Whenever the component renders, the expressions used in a template are re-evaluated. This means that if we've created a getter method which is used in our html file and that getter is returning a dynamic value based on some properties, it'll be re-evaluated as well

  3. Whenever the component's state is changed, the component will be re-rendered

  4. When a component is re-rendered, the lwc engine attempts to reuse the existing elements. For example: if you update something in the parent component due to which the parent re-renders, it'll not re-render the child component. Another example can be: if you're displaying a list of child components and if you re-order the list, then although the components are placed at different positions now, they're not re-rendered. The engine assumes that the same components are being used and just placed at a different positions now, so they're not re-rendered

    However, if you use a different key/update the key of child component, it might get re-rendered - I'm not going to show a demo of this, this is your homework. Try and let me know how it works in the comments down below!

  5. As I specified in point 3, whenever the component's state is changed, the component will be re-rendered. Therefore, we need to make sure that we don't update the state of the component (for example: a property which is being displayed in component's html) in the renderedCallback() itself as it'll re-render the component and will call renderedCallback() again. In this case, the renderedCallback() will be called again and again recursively which will result in an infinite loop

We've already defined renderedCallback() in our parent component as specified in the connectedCallback() section. Let's define renderedCallback() in our child lwc as well.

child.js

import { LightningElement, api } from 'lwc';

export default class Child extends LightningElement {

    count = 0;
    @api
    message = 'default';

    constructor() {
        super();
        console.log('Child constructor called');
        console.log(this.count);
        console.log(this.message);
        console.log(this.template.querySelector('lightning-button'));
    }

    connectedCallback() {
        console.log('Child connected callback called');
        console.log(this.count);
        console.log(this.message);
        console.log(this.template.querySelector('lightning-button'));
    }

    renderedCallback() {
        console.log('Child rendered callback called');
        console.log(this.template.querySelector('lightning-button'));
    }
}
Let's have a look at the updated logs now:


The order  of events is provided below:

  1. Parent constructor called

  2. Parent connected callback called where reference to child lwc is coming as null

  3. Child constructor called where count is 0, message is undefined and reference to lightning-button is coming as null

  4. Child connected callback called where count is 0, message is hello and reference to lightning-button is again coming as null

  5. Child rendered callback called where reference to lightning-button is coming properly as the lightning-button is connected to the DOM now

  6. At last, parent rendered callback is called where reference to child lwc is coming properly as the child lwc is connected to DOM now

We are now going to re-render the parent lwc to see when renderedcallback() is called in parent and child LWCs. Let's add some more code!

If you remember, our child lwc html is calling a method increaseCount() when the lightning-button is clicked, let's add that method to our child lwc js file as shown below:
increaseCount() {
    this.dispatchEvent(new CustomEvent('increasecount', {
        detail: {
            message: 'Increased count to ' + (++this.count)
        }
    }));
}
This method will fire an event named increasecount whenever the button is clicked which will contain a message with the value of count variable increased by 1. The full code of child.js is provided below:

child.js

import { LightningElement, api } from 'lwc';

export default class Child extends LightningElement {

    count = 0;
    @api
    message = 'default';

    constructor() {
        super();
        console.log('Child constructor called');
        console.log(this.count);
        console.log(this.message);
        console.log(this.template.querySelector('lightning-button'));
    }

    connectedCallback() {
        console.log('Child connected callback called');
        console.log(this.count);
        console.log(this.message);
        console.log(this.template.querySelector('lightning-button'));
    }

    renderedCallback() {
        console.log('Child rendered callback called');
        console.log(this.template.querySelector('lightning-button'));
    }

    increaseCount() {
        this.dispatchEvent(new CustomEvent('increasecount', {
            detail: {
                message: 'Increased count to ' + (++this.count)
            }
        }));
    }
}
Notice the increaseCount() added at the end. Let's update our parent.html file as well now:

parent.html

<template>
    <lightning-card title={message}>
        <p class="slds-var-p-around_small">
            <c-child onincreasecount={updateMessage} message="hello"></c-child>
        </p>
    </lightning-card>
</template>
As you can see above, I've covered my child lwc with a lightning card which is displaying the value of message variable as title. I'm also capturing the increasecount event and calling another method in my parent.js named updateMessage() which will update the value of message variable displayed in the card title. Finally, let's take a look at our updateMessage() defined in parent.js as well:
updateMessage(event) {
    this.message = event.detail.message;
}
As you can see above, it's updating the message variable with the value of message coming from the event. This message variable will be displayed as the title of lightning-card. Let's have a look at the full code below:

parent.js

import { LightningElement, track } from 'lwc';

export default class Parent extends LightningElement {

    message = 'Updated count will appear here!';

    constructor() {
        super();
        console.log('Parent constructor called');
    }

    connectedCallback() {
        console.log('Parent connected callback called');
        console.log(this.template.querySelector('c-child'));
    }

    renderedCallback() {
        console.log('Parent rendered callback called');
        console.log(this.template.querySelector('c-child'));
    }

    updateMessage(event) {
        this.message = event.detail.message;
    }
}
Notice the default value of message variable as: Updated count will appear here!. I've defined the updateMessage() method at the end which is updating the value of this message variable. Let's take a look at the component in action:


As we click the Increase Count button present in child lwc, it fires an event with updated value of count. This increasecount event is captured by parent lwc and it'll update the value of message variable shown as a title of lightning-card as shown above.

The thing to notice here is that, each time we click the button and the event is fired, it re-renders the parent component as shown below:


Notice that only the parent lwc's rendered callback is called again and again and not the child one as I increased count from 1 to 5. This means that even though the parent is rendered multiple times, the child LWC is just reused as there's no change in the state of child lwc. It's still showing the same Increase Count button. This covers our point 3 and 4  under important points about renderedCallback(). It's time to move on to the next callback method now i.e. disconnectedCallback()

disconnectedCallback()

disconnectedCallback() will be called whenever the component is disconnected from the DOM, it's mainly useful to clean up the work done in connectedCallback(). You can use it for simple purposes like to remove cache or event listeners. Let's define disconnectedCallback() on our child component js. You can simply add the below method:
disconnectedCallback() {
    console.log('Child disconnected callback called');
}

Our updated child.js file is shown below:

child.js

import { LightningElement, api } from 'lwc';

export default class Child extends LightningElement {

    count = 0;
    @api
    message = 'default';

    constructor() {
        super();
        console.log('Child constructor called');
        console.log(this.count);
        console.log(this.message);
        console.log(this.template.querySelector('lightning-button'));
    }

    connectedCallback() {
        console.log('Child connected callback called');
        console.log(this.count);
        console.log(this.message);
        console.log(this.template.querySelector('lightning-button'));
    }

    renderedCallback() {
        console.log('Child rendered callback called');
        console.log(this.template.querySelector('lightning-button'));
    }

    disconnectedCallback() {
        console.log('Child disconnected callback called');
    }

    increaseCount() {
        this.dispatchEvent(new CustomEvent('increasecount', {
            detail: {
                message: 'Increased count to ' + (++this.count)
            }
        }));
    }
}
Notice the disconnectedCallback() added above the increaseCount() and below renderedCallback(). Let's update our parent component a little bit as well to make sure we're able to disconnect child lwc from the DOM.

Updated parent.html file is provided below:

parent.html

<template>
    <lightning-card title={message}>
        <p class="slds-var-p-around_small">
            <template if:true={show}>
                <c-child onincreasecount={updateMessage} message="hello"></c-child>
            </template>
            <lightning-button label="Toggle Child" onclick={toggleChild}></lightning-button>
        </p>
    </lightning-card>
</template>

As you can see above, I've added a template tag with if:true condition which is checking a boolean variable named show. Only when this variable is true, our child component will be displayed to us. I'm going to create this variable in our parent.js file. I've added another lightning-button with label Toggle Child which is calling the toggleChild() when clicked. On click of this button, I'm going to toggle the value of show variable from true -> false or from false -> true which will hide/show the child lwc component. This will utlimately call our disconnectedCallback() on our child lwc as well. Let's take a look at the updated parent.js now:

parent.js

import { LightningElement, track } from 'lwc';

export default class Parent extends LightningElement {

    message = 'Updated count will appear here!';
    show = true;

    constructor() {
        super();
        console.log('Parent constructor called');
    }

    connectedCallback() {
        console.log('Parent connected callback called');
        console.log(this.template.querySelector('c-child'));
    }

    renderedCallback() {
        console.log('Parent rendered callback called');
        console.log(this.template.querySelector('c-child'));
    }

    updateMessage(event) {
        this.message = event.detail.message;
    }

    toggleChild() {
        this.show = !this.show;
    }
}
As you can see above, I've added show variable below message variable whose default value is true. I've also added another method named toggleChild() at the end. This method will be called when we click the Toggle Child lightning button and it'll toggle the value of show variable from true to false and from false to true.

This toggling will automatically hide/show the child lwc or I can say connect/disconnect child lwc from the DOM. Let's take a look at the component in action first:
As you can see in the above demo, first of all I increased the count using Increase Count lightning-button in the child component to 2. Then I clicked on Toggle Child button which removed the child component from the DOM. I brought it back by clicking the Toggle Child button again and then I clicked on Increase Count button again which increased the value of count starting from 1 to 5. It started from 1 again as the child lwc is reinitialized and therefore is having the default value of count as 0. Let's take a look at related logs now.

After the components were loaded initially and I clicked on Increase Count button twice and then the Toggle Child button which removed the child lwc from DOM. The console.log statements for these 3 operations are shown below:


As you can see, for the first two operations, when count is increased, parent renderedCallback() is called and I can refer the child lwc easily as it's connected to the DOM. Then I clicked Toggle Child button, it called child's disconnectedCallback() and we have the statement: Child disconnected callback called printed to the console. It also called parent's renderedCallback() as the child is removed from the DOM so the parent is also re-rendered. Notice that this time, the child lwc reference in the parent's renderedCallback() is coming as null as the child component is no more connected to the DOM.

Let's click the Toggle Child button again now:


As you can see above, as I clicked on Toggle Child button again, the child lwc is again connected to DOM. Therefore, the child constructor() is called again, then child connectedCallback() is called, then renderedCallback() and finally parent's renderedCallback() is called once again and this time the reference to child lwc is not coming as null.

Post that, I clicked on Increase Count button 5 more times, the count is increased from 1 to 5 and the parent lwc is rendered 5 times as shown below:

errorCallback()

Now, let's take a look at our last method in the lwc lifecycle i.e. errorCallback(). This callback method will be called whenever an error occurs in lifecycle hook and it captures errors in all the child (descendent) components in it's tree. Let's understand with an example. I'm going to throw error from the connectedCallback() of my child.js file. I'll also define errorCallback() methods in both child and parent lwc to understand which method is being called and the information received in the errorCallback() method. Let's update our child lwc first.

child.js

import { LightningElement, api } from 'lwc';

export default class Child extends LightningElement {

    count = 0;
    @api
    message = 'default';

    constructor() {
        super();
        console.log('Child constructor called');
        console.log(this.count);
        console.log(this.message);
        console.log(this.template.querySelector('lightning-button'));
    }

    connectedCallback() {
        console.log('Child connected callback called');
        console.log(this.count);
        console.log(this.message);
        console.log(this.template.querySelector('lightning-button'));
        let error = {
            code: 100,
            message: 'Error from child connected callback!'
        };
        throw error;
    }

    renderedCallback() {
        console.log('Child rendered callback called');
        console.log(this.template.querySelector('lightning-button'));
    }

    disconnectedCallback() {
        console.log('Child disconnected callback called');
    }

    errorCallback(error, stack) {
        console.log('Child error callback called, error = ' + JSON.stringify(error) + ', stack = ' + JSON.stringify(stack));
    }

    increaseCount() {
        this.dispatchEvent(new CustomEvent('increasecount', {
            detail: {
                message: 'Increased count to ' + (++this.count)
            }
        }));
    }
}
As you can see above, I've updated the connectedCallback(). I'm also showing this update again below:
connectedCallback() {
    console.log('Child connected callback called');
    console.log(this.count);
    console.log(this.message);
    console.log(this.template.querySelector('lightning-button'));
    let error = {
        code: 100,
        message: 'Error from child connected callback!'
    };
    throw error;
}
I've added 4 more lines after console.log statements where I'm defining an error object with two properties, code and message. Then I'm throwing that error object. I also defined errorCallback() method as shown in the below snippet:
errorCallback(error, stack) {
    console.log('Child error callback called, error = ' + JSON.stringify(error) + ', stack = ' + JSON.stringify(stack));
}

errorCallback() has two parameters:
  1. error: This is the JavaScript native error object. It's the error which was thrown by component where it occured. In our case it'll be the error object we're throwing which is having two properties: code and message.

  2. stack: This is a string specifying - in which component the error occured. It'll show path from the component whose errorCallback() was called till the child component where error was thrown

Let's add the errorCallback() in parent lwc as well. I'm going to add the below method to parent.js:
errorCallback(error, stack) {
    console.log('Parent error callback called, error = ' + JSON.stringify(error) + ', stack = ' + stack);
    console.log(this.template.querySelector('c-child'));
}
Let's take a look at the full parent.js file as well after updates:

parent.js

import { LightningElement, track } from 'lwc';

export default class Parent extends LightningElement {

    message = 'Updated count will appear here!';
    show = true;

    constructor() {
        super();
        console.log('Parent constructor called');
    }

    connectedCallback() {
        console.log('Parent connected callback called');
        console.log(this.template.querySelector('c-child'));
    }

    renderedCallback() {
        console.log('Parent rendered callback called');
        console.log(this.template.querySelector('c-child'));
    }

    errorCallback(error, stack) {
        console.log('Parent error callback called, error = ' + JSON.stringify(error) + ', stack = ' + stack);
        console.log(this.template.querySelector('c-child'));
    }

    updateMessage(event) {
        this.message = event.detail.message;
    }

    toggleChild() {
        this.show = !this.show;
    }
}
Notice the errorCallback() added below renderedCallback(). Now, let's take a look at the console statements as the components are loaded to understand how errorCallback() is being called:


A couple of things to notice above:

  1. Only the parent errorCallback() is called and not the errorCallback() present in the child lwc

  2. Error object is received in the errorCallback() which is exactly the same as thrown by the child lwc. The stack string received in the errorCallback() is showing the stack/path from the parent lwc (the component whose errorCallback() is called) to child lwc (where the error was thrown) as: <c-parent> <c-child>

  3. I am trying to display a reference to child lwc in the errorCallback() as well and it's working fine. This means that once the child lwc is connected to the DOM it can be referred in any of the callback methods be it errorCallback() or renderedCallback()

Let's take a look at the order in which the callback methods are executed as well:

  1. Parent: constructor() called

  2. Parent: connectedCallback() called (reference to child lwc is null)

  3. Child: constructor() called (count is coming as 0, message as undefined and reference to lightning-button is coming as null)

  4. Child: connectedCallback() called (count is coming as 0, message as hello and reference to lightning-button is still null as lightning-button is not connected to DOM yet). This callback method is also throwing error now

  5. Parent: errorCallback() called (child lwc can now be referenced as it's now connected to DOM)

  6. Child: renderedCallback() called (reference to lightning-button is coming properly now as lightning-button is now connected to DOM)

  7. Parent: renderedCallback() called (child lwc can now be referenced here as well because it's now connected to DOM)

So that's the final series of events/callbacks we have for this post in our demo components.

We covered all the callback methods/lifecycle hooks of lwc in this post.

That's all for this tutorial everyone, I hope you liked it. Let me know your feedback in the comments down below.

Happy Trailblazing!!

Saturday, 19 November 2022

Create modals using the new LightningModal component (Winter '23 Release)

Hello Trailblazers,

In this post we're going to learn about the new LightningModal component that can be extended by any lwc which you would like to use as a modal. Salesforce has provided 3 helper components to create a modal:

  1. lightning-modal-header
  2. lightning-modal-body
  3. lightning-modal-footer

Let's create a testModal component and try to use these 3 tags to see what we get as a result.

Creating a simple testModal LWC

testModal.js-meta.xml

I am specifying the meta file first of all so that we can focus on our html and js files throughout this tutorial. Our meta file is pretty simple as shown below:
<?xml version="1.0" encoding="UTF-8"?>
<LightningComponentBundle xmlns="http://soap.sforce.com/2006/04/metadata">
    <apiVersion>55.0</apiVersion>
    <isExposed>true</isExposed>
    <targets>
        <target>lightning__HomePage</target>
    </targets>
</LightningComponentBundle>

As you can see above, I've specified lightning__HomePage as a target so that we can embed this component in our homepage. This is NOT REALLY REQUIRED as we're going to use our component as a modal, but I'm just keeping this for now, so that we can see what the helper components render for us. I've also marked isExposed as true to make this component available in our app builder.

testModal.html

The simplest HTML content for our modal is shown below:
<template>
    <lightning-modal-header>Test Modal Header</lightning-modal-header>
    <lightning-modal-body>Test Modal Body</lightning-modal-body>
    <lightning-modal-footer>Test Modal Footer</lightning-modal-footer>
</template>

We've only called the header body and footer tags with some content in them. I embedded our component on the homepage. Let's see the output below:


As you can see above, we're having 3 different sections: Header, Body and Footer coming from our lightning-modal-header, lighnting-modal-body and lightning-modal-footer tags.

It's better and easier to use label attribute of lightning-modal-header to specify the heading for our modal header. You can just update the lightning-modal-header tag as shown below:
<lightning-modal-header label="Test Modal Label">Test Modal Header</lightning-modal-header>
Let's see the output of this change as well:
You might not see any difference here but it'll be more clear as we'll start using this component as a modal.

Okay that's fine but how do I actually use this as a modal?

In order to open it as a modal, we'll create another lwc named: useModal but first of all let's update the js file of this testModal as well:

testModal.js

import LightningModal from 'lightning/modal';

export default class TestModal extends LightningModal {}
Notice the two changes I did above which makes it different from other LWCs:

  1. Instead of the statement, import { LightningElement } from 'lwc'; it's importing LightningModal from lightning/modal.
  2. Instead of extending LightningElement, our component is extending LightningModal using extends LightningModal.

That's all for our testModal for now, let's create our useModal component now:

useModal.js-meta.xml

Starting with the meta file, it's the exact same as we had above because we'll be embedding this component as well in our homepage:
<?xml version="1.0" encoding="UTF-8"?>
<LightningComponentBundle xmlns="http://soap.sforce.com/2006/04/metadata">
    <apiVersion>55.0</apiVersion>
    <isExposed>true</isExposed>
    <targets>
        <target>lightning__HomePage</target>
    </targets>
</LightningComponentBundle>
Note: You can remove the lightning__HomePage target from your testModal now and remove it from the hompage, as we'll be using it as a modal now

Now, let's move on to the HTML part of useModal LWC:

useModal.html

<template>
    <lightning-card title="Use Modal">
        <p class="slds-var-p-horizontal_small">
            <lightning-button label="Open Modal" onclick={openModal}></lightning-button>
        </p>
    </lightning-card>
</template>
As you can see above, the code is pretty simple. We have a lightning-card (for better UI) and inside it, we have a paragraph which contains a lightning-button with label Open Modal. This button will call our js function openModal as it's clicked by the user. It's time to move on to our js file now!

useModal.js

For now, we'll just try to open our testModal:
import { LightningElement } from 'lwc';
import TestModal from 'c/testModal';

export default class UseModal extends LightningElement {

    openModal() {
        TestModal.open();
    }
}
As you can see above, we've imported our TestModal using the import statement and called open() on it in order to open our modal component. Let's see how it works!

This is how our useModal component looks like on the homepage:
I just embedded it before our testModal component. As we click on Open Modal button, we get the modal as shown below:
I hope that the usage of label attribute in lightning-modal-header component is clear now. You should use label attribute to specify a label for your modal. If you want to have any custom HTML like: a button or something else, that can come between our lightning-modal-header tags.

Isn't it amazing? just a few lines of code and you have your modal ready. The close button that you see on the top right works perfectly and your modal will be closed automatically as you click on that button.

Note: You can also close the modal by pressing the ESC key.

Resizing our modal

There are some properties that you can pass in the open function. One of the property is size which supports small, medium and large values. By default, the size is medium. You can pass any sizes out of small, medium or large. The output of all 3 are shown below.

To have a small sized modal, you can just do:
    TestModal.open({
        size: 'small'
    });
And you'll have the below output:
For a medim sized modal, you can just do nothing (as the default size is medium) or pass in the medium value as shown below:
    TestModal.open({
        size: 'medium'
    });
And you'll have the below output:
Similarly, for a large modal, you can just do:
    TestModal.open({
        size: 'large'
    });
And you'll have the below output:

Defining a Custom Close Button for our Lightning Modal

A very common requirement is to have two buttons: Cancel and Save in our modal footer. If someone clicks on Cancel, we'll just close the modal and if someone clicks on Save, we'll save the information and then close our modal. Let's see how we can implement that. It's time to update our testModal.html
<template>
    <lightning-modal-header>Test Modal Header</lightning-modal-header>
    <lightning-modal-body>Test Modal Body</lightning-modal-body>
    <lightning-modal-footer>
        <lightning-button label="Cancel" onclick={closeModal} class="slds-var-p-right_x-small"></lightning-button>
        <lightning-button label="Save" variant="brand" onclick={save}></lightning-button>
    </lightning-modal-footer>
</template>
As you can see above, I've removed the Test Modal Footer text which was present in between lightning-modal-footer tags and I added two lightning buttons instead: one for cancel and another for save. The Cancel button is calling closeModal() from our js and have an extra small right padding so that the two buttons don't stick to each other. The Save button is having a variant as brand and is calling save() from our js file. The updated testModal.js file is given below:
import LightningModal from 'lightning/modal';

export default class TestModal extends LightningModal {

    closeModal() {
        this.close();
    }

    save() {
        console.log('We will save the data and then close modal');
    }
}

You might have noticed above that I added two methods here:
  1. closeModal() which is calling close() here as this.close(). This close() is defined in the LightningModal component which we're extending and it'll close the modal.
  2. save() which is doing nothing as of now but adding a statement to the console that: We'll save the data and then close modal.

The updated modal is shown below:
As you can see, we have two buttons now: Cancel and Save. As you click on Cancel button, the modal will be closed. If you click on Save button, there will be a message in console but the modal will not close.

Let's say the user clicks on save and then while the information is being saved, the user clicks on Close button at the top right and the modal is closed, how do you ensure that the information was saved successfully? In this scenario, preventing the user from accidentally closing the modal is important, let's see how we can do that!

Prevent the user from closing Lightning Modal using disableClose attribute

For now, we'll consider a scenario that our save operation takes 5 seconds. So, we'll disable the Close operation for 5 seconds when the save button is clicked. We're not dealing with apex in this tutorial, so we'll just use setTimeout() to simulate our server call. Our testModal.js is updated as shown below:
import LightningModal from 'lightning/modal';

export default class TestModal extends LightningModal {

    closeModal() {
        this.close();
    }

    save() {
        console.log('We will save the data and then close modal');
        this.disableClose = true;
        const that = this;
        setTimeout(() => {
            console.log('Information saved! You can now close the modal');
            that.disableClose = false;
        }, 5000);
    }
}
Inside the save(), we're setting disableClose to true. Then we're calling setTimeout() (you can consider it similar to calling any apex method and waiting for the response). In setTimeout(), we can pass a function and specify the time (in milliseconds) after which that function will be called. Here, we've specified the time as 5000 milliseconds i.e. 5 seconds and after 5 seconds the function passed will be called. That function will print the text Information saved! You can now close the modal in the console and set disableClose to false again. This can be considered - as our save operation is successful and we want to allow the user to close the modal now.
Notice the above image, this is how our modal looks like. Have a look at the cross in the red rectangle, it's enabled for now. As I click Save button the modal will look like as shown below:
As you can see above, the cross icon is disabled, this means we cannot close our modal and it'll automatically be enabled after 5 seconds. Even if you click on Cancel button the modal will not close because the call this.close() will not work. It's even better if we can disable the Save and Cancel buttons as well, until the save operation is performed, so that the user doesn't click these buttons again and again. Let's do that quickly!

For this, I am going to add disabled={disableClose} to both Save and Cancel buttons of my modal so that these buttons are disabled when disableClose is true. Below is the updated testModal.html:
<template>
    <lightning-modal-header label="Test Modal Label">Test Modal Header</lightning-modal-header>
    <lightning-modal-body>Test Modal Body</lightning-modal-body>
    <lightning-modal-footer>
        <lightning-button label="Cancel" onclick={closeModal} class="slds-var-p-right_x-small" disabled={disableClose}></lightning-button>
        <lightning-button label="Save" variant="brand" onclick={save} disabled={disableClose}></lightning-button>
    </lightning-modal-footer>
</template>
Notice the disabled attribute applied to both the buttons above. The updated output as I click on Save button of my modal is given below:
As you can see above, all my buttons are disabled now when I clicked Save, they'll be enabled back together after 5 seconds (OR you can do it after your apex call is successful in a real implementation). You can also call the close() again once your apex call is successful so that the modal get closed automatically. In our case, it can be after 5 seconds when we set disableClose back to false as shown below:
import LightningModal from 'lightning/modal';

export default class TestModal extends LightningModal {

    closeModal() {
        this.close();
    }

    save() {
        console.log('We will save the data and then close modal');
        this.disableClose = true;
        const that = this;
        setTimeout(() => {
            console.log('Information saved! Closing the modal...');
            that.disableClose = false;
            that.close();
        }, 5000);
    }
}
Notice that we called close() after we set disableClose to false in our save(). Now, the modal will close automatically after 5 seconds as we click on the save button.

So that's how you can create modals using the new LightningModal component. I hope you have a good idea of how it works and you can go ahead and create your own modals now. Some of the information that we didn't cover here are:
  • Custom styling of modal's header, footer and body
  • Passing information to modal while opening the modal (Just create an @api attribute in your testModal and provide value to it in the TestModal.open() like we did for size attribute)
  • Passing information back to component that called the modal when the modal is closed (You can pass the value inside close() as a parameter and have a then() linked to TestModal.open() which will receive the return value as: TestModal.open({...params}).then((valuePassedToCloseFunction) => {})
  • Firing an event from modal and capturing it in parent.
You can refer to the official documentation or comment below and let me know if you would like to learn about these in detail and I'll create another post. You can also find my contact details on Connections (username: rahulmalhotra)

So that's all for this tutorial. I hoped you liked it, let me know your feedback in the comments down below.

Happy Trailblazing!!

Monday, 11 April 2022

Lightning Datatable in LWC | How to create a lightning-datatable in LWC?

Hello Trailblazers,


In this post we're going to learn how we can create a lightning datatable in lwc. In order to create a lightning datatable we use the lightning-datatable tag where we need to specify 3 attributes:


key-field: To specify a unique identifier for each row of the table. It'll be a string specifying the key column in the data that we need to use to identify each row.

data: Information to be displayed in the datatable. The value passed to this attribute should be a javascript array.

columns: Information about columns of the datatable. This include column name and other metadata associated with it like: type, fieldName, icon details etc. The value passed to this attribute should be a javascript array as well.


Now let's see how we can create a very simple datatable to display employees information. Each employee will have some attributes including: Employee Id, First Name, Last Name, Phone Number and Email Address. We're going to consider these 5 attributes for now and will create a datatable showcasing the data with these columns. Let's create a lightning web component now!!


We're going to name our component: employeeDatatable. First things first, we're going to display this component at the homepage, so let's setup that:

employeeDatatable.js-meta.xml

<?xml version="1.0" encoding="UTF-8"?>
<LightningComponentBundle xmlns="http://soap.sforce.com/2006/04/metadata">
    <apiVersion>54.0</apiVersion>
    <isExposed>true</isExposed>
    <masterLabel>Employee Datatable</masterLabel>
    <description>This datatable is used to display employee records.</description>
    <targets>
        <target>lightning__HomePage</target>
    </targets>
</LightningComponentBundle>

As you can see in the above code snippet, I have specified a target as lighting__Homepage as we want to include this datatable in homepage and the isExposed tag has a value as true because we want to search that component in the lightning app builder. The masterLabel and description attributes are optional but nice to have. You can search the component by it's masterLabel if it's provided, otherwise, you'll search it by it's actual name. Let's move onto html now.

employeeDatatable.html

<template>
    <div style="height: 250px;">
        <lightning-datatable
            key-field="employeeId"
            data={employeeData}
            columns={employeeColumns}>
        </lightning-datatable>
    </div>
</template>
Above you can see the full html code for our datatable. You don't need anything else to display the data. No tr, td, thead or any more tags. As you can see above, key-field attribute has a value as employeeId because our employeeId will be unique and we can use it to uniquely identify each row. Next our data attribute has a value as employeeData and the columns attribute has the value as employeeColumns. Remember, employeeData will be a javascript array and employeeColumns will also be a javascript array.

Note: You may have seen code specifying data={data} and columns={columns}. Don't get confused by this. In data={data} the data before the "=" sign is the attribute name and the {data} after the "=" sign is the attribute value which is nothing but an array defined in our js file which will store the data. Similarly, in columns={columns}, the columns before the "=" sign is the attribute name and the {columns} after the "=" sign is the attribute value which is again an array defined in our js file which will store the columns information. This is the reason I am using different names for my variables above.

Now, let's see the js part!

employeeDatatable.js

import { LightningElement } from 'lwc';

export default class EmployeeDatatable extends LightningElement {

    employeeColumns = [
        { label: 'Employee Id', fieldName: 'employeeId' },
        { label: 'First Name', fieldName: 'firstName' },
        { label: 'Last Name', fieldName: 'lastName' },
        { label: 'Phone Number', fieldName: 'employeePhone', type: 'phone' },
        { label: 'Email Address', fieldName: 'employeEemail', type: 'email' }
    ];

}

As you can see above, I've defined a javascript array named employeeColumns which we have referred in our html. This is an array of objects where each object is going to have a label and a fieldName. The value of the label will be displayed as the column heading and the value of the fieldName is used to identify what information should be displayed under this column, we'll see this in detail as we define employeeData. For now, let's focus on the columns.

By default, each column will have a datatype as text. You can also specify a type attribute to specify the datatype of a particular column. Lightning Datatable will automatically apply the formatting according to the type of the column defined. Isn't it great?

Note: The fieldName can be anything and doesn't depend on the label or type of the data.

In our employeeColumns array above, we've kept the first 3 columns as text and the next two columns have a datatype of phone and email respectively. You can now go to your salesforce homepage. Click on Setup -> Edit Page and you can search for the Employee Datatable component in the lightning appbuilder as shown below: 


This is coming because we've exposed our lwc component: <isExposed>true</isExposed> tag in the .js-meta.xml file. You just need to drag and drop this component into the homepage and save it (activate as org default if necessary).

Once you've embedded this component in the homepage. It'll look as shown below:


As you can see above, we've defined the columns of our datatable here. The labels are the column names and we don't have any data because we haven't defined the employeeData variable yet in our js file. We have defined a height for this datatable as we've specified <div style="height: 250px;"> in our html code. div is the parent of our lightning-datatable here and is used to restrict the datatable expansion to a specified height.

Now, let's add the data to our datatable as well. For this, we'll define another js array named employeeData as shown below:
    employeeData = [
        {
            employeeId: '1',
            firstName: 'Richard',
            lastName: 'Hendricks',
            employeePhone: '(158) 389-2794',
            employeeEmail: 'richard@piedpiper.com'
        },
        {
            employeeId: '2',
            firstName: 'Jared',
            lastName: 'Dunn',
            employeePhone: '(518) 390-2749',
            employeeEmail: 'jared@piedpiper.com'
        },
        {
            employeeId: '3',
            firstName: 'Erlich',
            lastName: 'Bachman',
            employeePhone: '(815) 391-2974',
            employeeEmail: 'erlich.bachman@piedpiper.com'
        }
    ];
As you can see above, I have added 3 employee records to my employeeData array. Notice that In each record, the key is exactly the "fieldName" that we mentioned in employeeColumns array before, namely: employeeId, firstName, lastName, employeePhone and employeeEmail. This is most important to understand how the data is mapped to columns. Sharing the below image which should clarify the mappings in a better way:


The output of the above code is given below:


As you can see we have 3 entries in our datatable based on the 3 objects (records) in our employeeData array. Notice that the phone number and email address values are formatted automatically as we have mentioned the correct type for those. I am sharing the full js code below for your convinience:
import { LightningElement } from 'lwc';

export default class EmployeeDatatable extends LightningElement {

    employeeColumns = [
        { label: 'Employee Id', fieldName: 'employeeId' },
        { label: 'First Name', fieldName: 'firstName' },
        { label: 'Last Name', fieldName: 'lastName' },
        { label: 'Phone Number', fieldName: 'employeePhone', type: 'phone' },
        { label: 'Email Address', fieldName: 'employeeEmail', type: 'email' }
    ];

    employeeData = [
        {
            employeeId: '1',
            firstName: 'Richard',
            lastName: 'Hendricks',
            employeePhone: '(158) 389-2794',
            employeeEmail: 'richard@piedpiper.com'
        },
        {
            employeeId: '2',
            firstName: 'Jared',
            lastName: 'Dunn',
            employeePhone: '(518) 390-2749',
            employeeEmail: 'jared@piedpiper.com'
        },
        {
            employeeId: '3',
            firstName: 'Erlich',
            lastName: 'Bachman',
            employeePhone: '(815) 391-2974',
            employeeEmail: 'erlich.bachman@piedpiper.com'
        }
    ];
}
Once, we add a lot of data to our datatable by filling up employeeData array, it'll look as shown below:


In this tutorial, we learned about the basics of lightning datatable and how we can implement our own lightning datatable in lwc. I hope you liked the post, let me know your feedback in the comments down below.

Happy Trailblazing!!

Monday, 16 August 2021

Call External API from Lightning Web Component | Fetch API in JavaScript

Hello Trailblazers,


In this post, we're going to learn how we can call an External System API from a Lightning Web Component. We're going to use Fetch API which provides an interface for fetching resources. You can consider it as an advanced version of XMLHttpRequest. This API is more powerful and easy to use. The Fetch Web API provides a global fetch() method which can be used in JavaScript to perform any kind of callout to an external system across the network and get the data.


The Promise returned from fetch() method won’t reject on HTTP error status even if the response is an HTTP 404 or 500. Instead, the Promise will resolve normally. The ok property of the response is set to true if the callout is successful and it's set to false if the response isn’t in the range 200–299 and it will only reject on network failure or if anything prevented the request from completing.

Tutorial Video


To learn about fetch(), we're going to create a lwc component to get the details of a user from GitHub as shown below:


Let's have a look at the below code snippets of this component along with the explanation:

githubInfo.html

<template>
    <lightning-card title="Show Github Stats">
        <div class="slds-var-m-around_large">
            <!-- * Input Username -->
            <lightning-layout vertical-align="end">
                <lightning-layout-item flexibility="grow">
                    <lightning-input type="search" value={username} onchange={updateUsername} label="Enter Username"></lightning-input>
                </lightning-layout-item>
                <lightning-layout-item class="slds-var-p-left_small">
                    <lightning-button label="Search" variant="brand" onclick={getGithubStats}></lightning-button>
                </lightning-layout-item>
            </lightning-layout>
            <br />
            <!-- * Display User Details -->
            <div if:true={userPopulated}>
                <img src={user.image} height="200" width="200" />
                <div class="slds-var-p-vertical_xxx-small slds-text-heading_large">{user.name}</div>
                <br />
                <div class="slds-var-p-vertical_xxx-small slds-text-heading_small"><b>Github Profile:</b><a href={githubURL} target="_blank"> {githubURL}</a></div>
                <div class="slds-var-p-vertical_xxx-small slds-text-heading_small"><b>Website:</b><a href={user.blog} target="_blank"> {user.blog}</a></div>
                <div class="slds-var-p-vertical_xxx-small slds-text-heading_small"><b>About:</b> {user.about}</div>
                <div class="slds-var-p-vertical_xxx-small slds-text-heading_small"><b>Repos:</b> {user.repos}</div>
                <div class="slds-var-p-vertical_xxx-small slds-text-heading_small"><b>Gists:</b> {user.gists}</div>
                <div class="slds-var-p-vertical_xxx-small slds-text-heading_small"><b>Followers:</b> {user.followers}</div>
            </div>
        </div>
    </lightning-card>    
</template>
The above HTML code is fairly simple as it's only the design and layout. We have an input field of type search where we're accepting the github username. This input field is binded with username variable which we're going to define in js and it's going to call updateUsername() method whenever we're typing something in this input field so that we can update the username accordingly.

We also have a button here which is going to call getGithubStats() method from js whenever this button is clicked. The getGithubStats() will be used to fetch data from github using the Fetch API and the details will be displayed in the user details section.

To display the details of user, we've created a user object in js and we're checking if the userPopulated boolean variable is true or not. We're going to define it as a getter in js, which will return true or false depending upon whether the user object has details or not. We're going to display the details about the user by using the user object such as: user.about, user.blog, user.repos etc.

Now, let's have a look at the js code quickly:

githubInfo.js

import { LightningElement } from 'lwc';

// * GitHub API Base URL
const GITHUB_URL = 'https://api.github.com/users/';

export default class GithubInfo extends LightningElement {

    username;
    user = {};

    // * This method will return if the user object is populated or not
    get userPopulated() {
        return this.user && this.user.id;
    }

    // * This method will return the github url for the searched user
    get githubURL() {
        return 'https://www.github.com/' + this.username;
    }

    // * This method will set the username as the user is typing the text in the input field
    updateUsername(event) {
        this.username = event.target.value;
    }

    // * This method is used to call GitHub API using fetch method and get the user details
    getGithubStats() {
        if(this.username) {
            this.user = {};
            fetch(GITHUB_URL + this.username)
            .then(response => {
                console.log(response);
                if(response.ok) {
                    return response.json();
                } else {
                    throw Error(response);
                }
            })
            .then(githubUser => {
                this.user = {
                    id: githubUser.id,
                    name: githubUser.name,
                    image: githubUser.avatar_url,
                    blog: githubUser.blog,
                    about: githubUser.bio,
                    repos: githubUser.public_repos,
                    gists: githubUser.public_gists,
                    followers: githubUser.followers
                };
            })
            .catch(error => console.log(error))
        } else {
            alert('Please specify a username');
        }
    }

}
The above code consist of a GITHUB_URL constant which is basically storing our base URL for GitHub API. Inside the class, we have two data members: username and user as discussed before. We also have a userPopulated() method defined which is a getter and will return true if user record is present with an id, otherwise, it'll return false. Based on this value we'll display/hide the user details section in HTML.

After that, we also have a githubURL() getter which is going to form the profile URL of user, based on the username entered. Then we have an updateUsername() method, which is called automatically while updating text in the username input field, it's updating the username data member with the latest value. Finally, we have a getGithubStats() method which is performing the callout in order to get the user details from github on click of a button.


getGithubStats() - In this method, first of all we're checking if the username field is populated, then only we'll proceed ahead, otherwise, we're going to throw an error specifying: Please specify a username in the alert. You can also use a toast here, I have just added an alert to keep it simple.

If we have the username populated, we're first of all resetting the user object to a blank object in order to clear the previous user response (if any). Then, we're using the fetch() method to hit the GitHub API. The fetch method accept the URL as the first parameter which is constructed by appending username to the base url as: GITHUB_URL + this.username. After that, we've two then() followed by a catch(). The first then() is going to receive a Response object from the Fetch API. We are using it's ok property to check if the response is successful or not. If it's successful, we're returning the response body by converting it into a JSON object using response.json() which will be received by subsequent then(). If we receive an error, we're throwing an instance of Error by passing the response in the constructor. The subsequent then() will store the JSON result in githubUser object which is used to populate the user data member of the class in order to display the user's data.

In case of an error, we're simply displaying it using console.log().

To give you a reference of the Github API response, I am displaying it below:
{
  "login": "rahulmalhotra",
  "id": 16497903,
  "node_id": "MDQ6VXNlcjE2NDk3OTAz",
  "avatar_url": "https://avatars.githubusercontent.com/u/16497903?v=4",
  "gravatar_id": "",
  "url": "https://api.github.com/users/rahulmalhotra",
  "html_url": "https://github.com/rahulmalhotra",
  "followers_url": "https://api.github.com/users/rahulmalhotra/followers",
  "following_url": "https://api.github.com/users/rahulmalhotra/following{/other_user}",
  "gists_url": "https://api.github.com/users/rahulmalhotra/gists{/gist_id}",
  "starred_url": "https://api.github.com/users/rahulmalhotra/starred{/owner}{/repo}",
  "subscriptions_url": "https://api.github.com/users/rahulmalhotra/subscriptions",
  "organizations_url": "https://api.github.com/users/rahulmalhotra/orgs",
  "repos_url": "https://api.github.com/users/rahulmalhotra/repos",
  "events_url": "https://api.github.com/users/rahulmalhotra/events{/privacy}",
  "received_events_url": "https://api.github.com/users/rahulmalhotra/received_events",
  "type": "User",
  "site_admin": false,
  "name": "Rahul Malhotra",
  "company": null,
  "blog": "https://rahulmalhotra.github.io/",
  "location": null,
  "email": null,
  "hireable": true,
  "bio": "I am a developer and I love to Code. I am an independent Salesforce Consultant. Blogger and YouTuber at SFDC Stop (https://www.sfdcstop.com/)",
  "twitter_username": "rahulcoder",
  "public_repos": 58,
  "public_gists": 101,
  "followers": 71,
  "following": 2,
  "created_at": "2015-12-31T07:03:03Z",
  "updated_at": "2021-07-23T11:30:20Z"
}
As you can see above, we've properties like: name, avatar_url, public_repos, public_gists etc. That's why we've have used the same properties to map it to the properties of user object:
.then(githubUser => {
    this.user = {
        id: githubUser.id,
        name: githubUser.name,
        image: githubUser.avatar_url,
        blog: githubUser.blog,
        about: githubUser.bio,
        repos: githubUser.public_repos,
        gists: githubUser.public_gists,
        followers: githubUser.followers
    };
})

It's time to look at the meta file now:

githubInfo.js-meta.xml

<?xml version="1.0" encoding="UTF-8"?>
<LightningComponentBundle xmlns="http://soap.sforce.com/2006/04/metadata">
    <apiVersion>52.0</apiVersion>
    <isExposed>true</isExposed>
    <targets>
        <target>lightning__HomePage</target>
    </targets>
</LightningComponentBundle>
We've exposed this component by setting up isExposed as true and added a single target named as: lightning__HomePage as we want to embed this component in the home page.

Setting up CSP Trusted Sites

So, we embedded our component on the homepage and tried to execute this code to get the details from github by entering the username and clicking on Search button.


However, we received the below error in console:


This error is coming because we haven't notified salesforce that we're going to call this external api and by default salesforce will not allow us to call the external url from lwc. In order to resolve this, we need to tell salesforce that we're going to hit GitHub API from our lightning components. We can do this by creating a record of CSP Trusted Sites. Follow the below steps to add a record of the same:

1. Go to setup and search for CSP Trusted Sites


2. Click on New Trusted Site button and fill up the information as shown below:


Trusted Site Name: GithubAPI
Trusted Site URL: https://api.github.com
Description: GitHub API
Active: true
Context: LEX
Allow site for connect-src: true
Allow site for img-src: true

3. Click on Save button.

A new record will be created as shown below:


Now, refresh the page and try to get the information from GitHub API again by entering a username. This time, you should get a correct response as shown below:


and the information will be displayed in the component as follows:

Conclusion

You can use the fetch() method to hit any external API from lwc component. We can also add more data in the fetch request, for example, in case of a POST request, you may need to send a request body as well along with some headers. You can also send the request data as an object which can be passed as the 2nd parameter of the fetch() method. The basic syntax for that is shown below:
fetch('<request-url>', {
    method: '<method-name>', // * Like: GET, POST
    headers: {
        'Content-Type': '<content-type-passed-in-body>' // * Like: application/json, application/x-www-form-urlencoded
    },
    body: JSON.stringify(data) // * Please note that body data type must match "Content-Type" header
});
The then() and catch() methods followed by this fetch() method will remain the same.

That's all for this tutorial everyone, I hope you understood how you can call an external api from lwc using Fetch API. If you want to learn more about Fetch API in detail you can learn about it here. Let me know your feedback in the comments down below. You can find the full code for this tutorial in the fetch-api branch of salesforce-lwc-concepts github repository here.

Happy Trailblazing..!!