
 Join our Telegram Channel
Hello Trailblazers,
In this tutorial, we're going to learn how we can very easily extract, update and then deploy metadata to a Salesforce Org by executing a single command from SFDX Deploy Tool for Windows.
Use Case:- In real life projects, when we're actually working in Salesforce, it usually happens that we need to deploy some metadata from one Salesforce Environment to another, let's say you've completed a feature in developer environment and you need to push all the changes to a QA sandbox, while pushing the changes it usually happens that we face some deployment issues, and we need to update some metadata and then try to deploy again and again. This can be very hectic specifically if you're using change sets which take time to upload and then you need to wait for it to be available in the destination org where you want to deploy.
We'll learn how we can make those deployments very easy using SFDX Deploy Tool for Windows
SFDX Deploy Tool can be downloaded from the github repository here:- https://github.com/rahulmalhotra/SFDX-Deploy-Tool
For this tutorial, we need SFDX Deploy Tool to be already setup with you. If you want to know more about how to setup SFDX Deploy Tool, have a look at the README file of the GitHub repository or have a look at this blog post or the tutorial below:-
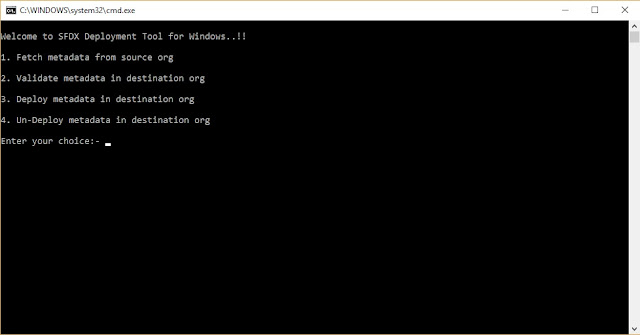
Once you've setup SFDX Deploy Tool, i.e. the source and destination orgs, where you have to pull and push the metadata respectively. You can open the tool and you'll see the below screen:-

As you can see in the above image, I have updated this tool and added 3 more options at number:- 2, 5 and 6. These options are:-
Once you've setup the tool, the first step you need to do is to fetch the metadata from the source org. That you can do by setting up the package.xml present under the metadata folder. After you have the package.xml ready, open the deploy tool, choose option 1 and press the Enter key. A sample package.xml is shown below:-


In case you don't have powershell in your windows you can use any other tool to extract that zip file. Now, we can simply open any metadata and update it. Once, we've updated the metadata, it's time to validate and deploy the extracted metadata.
To Validate Extracted Metadata:- Open SFDX Deploy Tool and choose option 5 with the name:- Validate extracted metadata in destination org
To Deploy Extracted Metadata:- Open SFDX Deploy Tool and choose option 6 with the name:- Deploy extracted metadata in destination org. This option will automatically pick the updated files in the extracted folder and deploy them to your destination org.
If you face errors while deployment, you can simply update the extracted files in VSCode and use SFDX Deploy Tool to deploy the metadata again and again in a single command.
Tired of reading or just scrolled down ? Don't worry, you can watch the video too:-
That's all for this tutorial everyone. I hope you liked it, give a try to SFDX Deploy Tool and let me know your feedback in the comments down below.
Happy Trailblazing..!!
In this tutorial, we're going to learn how we can very easily extract, update and then deploy metadata to a Salesforce Org by executing a single command from SFDX Deploy Tool for Windows.
Use Case:- In real life projects, when we're actually working in Salesforce, it usually happens that we need to deploy some metadata from one Salesforce Environment to another, let's say you've completed a feature in developer environment and you need to push all the changes to a QA sandbox, while pushing the changes it usually happens that we face some deployment issues, and we need to update some metadata and then try to deploy again and again. This can be very hectic specifically if you're using change sets which take time to upload and then you need to wait for it to be available in the destination org where you want to deploy.
We'll learn how we can make those deployments very easy using SFDX Deploy Tool for Windows
SFDX Deploy Tool can be downloaded from the github repository here:- https://github.com/rahulmalhotra/SFDX-Deploy-Tool
For this tutorial, we need SFDX Deploy Tool to be already setup with you. If you want to know more about how to setup SFDX Deploy Tool, have a look at the README file of the GitHub repository or have a look at this blog post or the tutorial below:-
Once you've setup SFDX Deploy Tool, i.e. the source and destination orgs, where you have to pull and push the metadata respectively. You can open the tool and you'll see the below screen:-

As you can see in the above image, I have updated this tool and added 3 more options at number:- 2, 5 and 6. These options are:-
- Extract fetched metadata at option 2
- Validate extracted metadata in destination org at opton 5
- Deploy extracted metadata in destination org at option 6
Once you've setup the tool, the first step you need to do is to fetch the metadata from the source org. That you can do by setting up the package.xml present under the metadata folder. After you have the package.xml ready, open the deploy tool, choose option 1 and press the Enter key. A sample package.xml is shown below:-

Once you've fetched the metadata from the source org, you'll see an unpackaged.zip file automatically created in the base folder as shown in the above image. This zip file mainly consists of all the metadata that you've fetched using the package.xml. Our next step is to extract and update this metadata before deploying it to the destination org.
To extract the metadata, open SFDX Deploy Tool and choose option 2 with the name:- Extract fetched metadata this option will extract the fetched metadata using windows powershell, once the metadata is successfully extracted, you'll see an output as shown below:-

In the base folder, you can see that the unpackaged.zip file is extracted automatically and a new folder named unpackaged is created which consist of all the metadata that we fetched from the source org as shown below:-

In case you don't have powershell in your windows you can use any other tool to extract that zip file. Now, we can simply open any metadata and update it. Once, we've updated the metadata, it's time to validate and deploy the extracted metadata.
To Validate Extracted Metadata:- Open SFDX Deploy Tool and choose option 5 with the name:- Validate extracted metadata in destination org
To Deploy Extracted Metadata:- Open SFDX Deploy Tool and choose option 6 with the name:- Deploy extracted metadata in destination org. This option will automatically pick the updated files in the extracted folder and deploy them to your destination org.
If you face errors while deployment, you can simply update the extracted files in VSCode and use SFDX Deploy Tool to deploy the metadata again and again in a single command.
Tired of reading or just scrolled down ? Don't worry, you can watch the video too:-
That's all for this tutorial everyone. I hope you liked it, give a try to SFDX Deploy Tool and let me know your feedback in the comments down below.
Happy Trailblazing..!!




 Posts
Posts

