SFDC Stop - Always the latest about Salesforce


Full Tutorial Series with videos, free apps, live sessions, salesforce consulting and much more.


Telegram logo   Join our Telegram Channel
Showing posts with label VSCode. Show all posts

Friday, 13 May 2022

How to setup prettier for apex in VSCode?

Hello Trailblazers,


In this post, we're going to learn how to setup prettier for apex in VSCode. We're going to use a plugin named as prettier-plugin-apex. Once you've created a salesforce project, the first step is to install Prettier - Code formatter extension.

Click on the Extensions Tab in the left sidebar in your VSCode and search for prettier as shown below:

The first option that you'll see is for Prettier - Code Formatter open that and click on the Install button.

Once you have installed prettier, now it's time to install prettier-plugin-apex. You can install the plugin in your project only by running the command given below:

npm install --save-dev --save-exact prettier prettier-plugin-apex

The output of the above command is given below:

Please note that this will install prettier-plugin-apex locally in your project. If you want to install it globally so that you can use it in all the projects, you can use the below command:

npm install --global prettier prettier-plugin-apex

If you've installed it locally, it'll the package.json file in your salesforce project and you'll find the entry for prettier under scripts as shown below:

So, if you want to run prettier for your project, you can run it by executing the below command:
npm run prettier

I tried this command in my project, so you can see the sample output below:
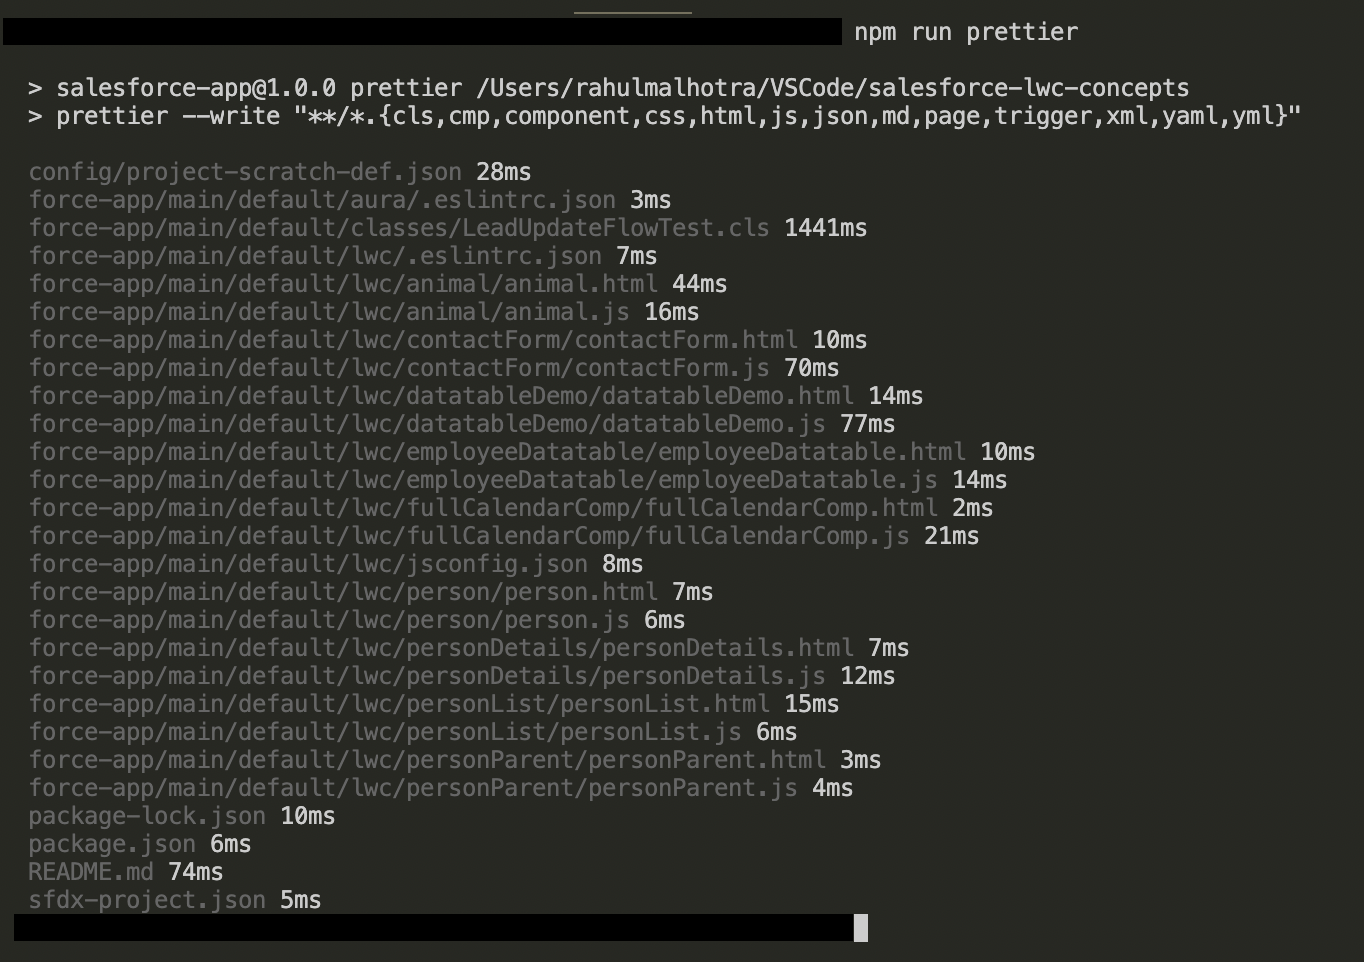
You'll see that the apex files are also formatted. Let's have a look at the test class formatted using prettier, that we created for salesforce flow in the previous post:

As you've formatted the whole project once, a better option is to setup prettier so that it formats the file automatically as you save it. You can do that by following the below steps:

1. Open the command pallette (Ctrl + Shift + P for Windows, Command + Shift + P for Mac) and search for User settings.
2. Click on Preferences:Open User Settings as shown above and search for format on save
Click the Editor: Format On Save checkbox under the User tab as shown above. Also click the same checkbox under the Workspace tab as shown in the below screenshot:
Now your apex file will format automatically using prettier as you save it. Congratulations!! You've successfully setup prettier for apex in VSCode and it's ready for use.

That's all for this tutorial. I hope you liked it. Let me know your feedback in the comments down below.

Happy Trailblazing!!

Tuesday, 30 June 2020

Extract Update and Deploy Metadata to Salesforce Org | SFDX Deploy Tool | Deploy Extracted Metadata

Hello Trailblazers,

In this tutorial, we're going to learn how we can very easily extract, update and then deploy metadata to a Salesforce Org by executing a single command from SFDX Deploy Tool for Windows.

Use Case:- In real life projects, when we're actually working in Salesforce, it usually happens that we need to deploy some metadata from one Salesforce Environment to another, let's say you've completed a feature in developer environment and you need to push all the changes to a QA sandbox, while pushing the changes it usually happens that we face some deployment issues, and we need to update some metadata and then try to deploy again and again. This can be very hectic specifically if you're using change sets which take time to upload and then you need to wait for it to be available in the destination org where you want to deploy.

We'll learn how we can make those deployments very easy using SFDX Deploy Tool for Windows

SFDX Deploy Tool can be downloaded from the github repository here:- https://github.com/rahulmalhotra/SFDX-Deploy-Tool

For this tutorial, we need SFDX Deploy Tool to be already setup with you. If you want to know more about how to setup SFDX Deploy Tool, have a look at the README file of the GitHub repository or have a look at this blog post or the tutorial below:-


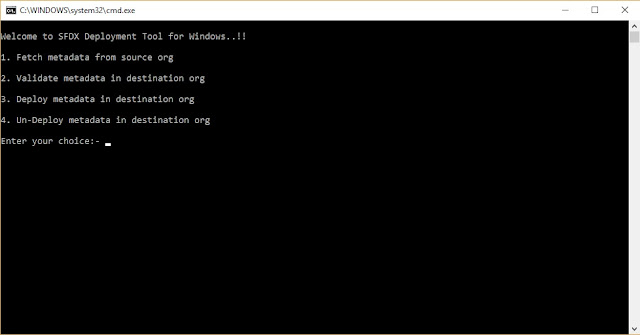
Once you've setup SFDX Deploy Tool, i.e. the source and destination orgs, where you have to pull and push the metadata respectively. You can open the tool and you'll see the below screen:-


As you can see in the above image, I have updated this tool and added 3 more options at number:- 2, 5 and 6. These options are:-
  • Extract fetched metadata at option 2
  • Validate extracted metadata in destination org at opton 5
  • Deploy extracted metadata in destination org at option 6

Once you've setup the tool, the first step you need to do is to fetch the metadata from the source org. That you can do by setting up the package.xml present under the metadata folder. After you have the package.xml ready, open the deploy tool, choose option 1 and press the Enter key. A sample package.xml is shown below:-


Once you've fetched the metadata from the source org, you'll see an unpackaged.zip file automatically created in the base folder as shown in the above image. This zip file mainly consists of all the metadata that you've fetched using the package.xml. Our next step is to extract and update this metadata before deploying it to the destination org.

To extract the metadata, open SFDX Deploy Tool and choose option 2 with the name:- Extract fetched metadata this option will extract the fetched metadata using windows powershell, once the metadata is successfully extracted, you'll see an output as shown below:-


In the base folder, you can see that the unpackaged.zip file is extracted automatically and a new folder named unpackaged is created which consist of all the metadata that we fetched from the source org as shown below:-


In case you don't have powershell in your windows you can use any other tool to extract that zip file. Now, we can simply open any metadata and update it. Once, we've updated the metadata, it's time to validate and deploy the extracted metadata.

To Validate Extracted Metadata:- Open SFDX Deploy Tool and choose option 5 with the name:- Validate extracted metadata in destination org

To Deploy Extracted Metadata:- Open SFDX Deploy Tool and choose option 6 with the name:- Deploy extracted metadata in destination org. This option will automatically pick the updated files in the extracted folder and deploy them to your destination org.

If you face errors while deployment, you can simply update the extracted files in VSCode and use SFDX Deploy Tool to deploy the metadata again and again in a single command.

Tired of reading or just scrolled down ? Don't worry, you can watch the video too:-


That's all for this tutorial everyone. I hope you liked it, give a try to SFDX Deploy Tool and let me know your feedback in the comments down below.

Happy Trailblazing..!!

Sunday, 7 June 2020

How to connect VSCode Salesforce Project to GitHub ? | Getting Started with Version Control System

Hello Trailblazers,

In this post, we're going to learn how we can connect VSCode Saleforce Project to GitHub. We're going to create a new GitHub repository, commit our changes and push it to our GitHub repository. Let's Begin.

Download Git

The first step is to download and install git in your system. In order to download git, go to this link:-  https://git-scm.com/downloads and you'll see the below screen.


Git is available for Mac, Windows and Linux. Download by clicking on the button as shown in the above image and follow simple steps to install git in your system.

Initialize git in VSCode

Now, as you've installed git in your system, move on to your Salesforce Project in VSCode and click on Initialize Repository button available on the 3rd section in the left side bar as shown below:-


As you click on this button, it will automatically initialize the repository for you as shown below:-


If you want to initialize repository using command, you can just open terminal and write git init and press enter in order to initialize a new repository in the project folder. You can see in the above image, in the left sidebar, we're having all the files with an indicaton U where U means Untracked i.e. these files are currently not being tracked by git.

Commiting the files

Just to give you a brief overview:-  Git is a version control system which basically tracks all the changes that you're doing. Any new file that you create is initially Untracked. Each file in a git repository can be in one of the below state:-

1. Untracked:- When a new file is created by the user, it is untracked or we can say that this file is unknown to git.

2. Tracked / Index Added:- When we specify or tell git that this is a newly created file and you've to track this file (particularly known as staging the file), the status of the file is changed to tracked or we can say that a particular index (number) is given to the file so that it can be identified by git.

3. Committed:- When we're done with the required changes, we commit that file. Git mark that file as committed and add an entry in  it's internal changelog which has the required updates with a Commit Message.

4. Untracked / Modified:- When a previously commited file is updated, the status of the file is changed to untracked / modified. We need to stage this file again to tell git that this file is ready to be committed.

5. Tracked / Index Modified:- When a modified file is staged by the user, it's status is again changed to tracked. At this point the index of the file is modified with recent changes and the file is again ready to be committed.

The basic flow for new files will be:-

Untracked -> Index Added (Tracked) -> Committed

and for existing files that are committed before, the flow will be:-

Untracked -> Index Modified (Tracked) -> Committed

So, we've just initialized a git repository and all our files are untracked by default. The next step is to stage the files. This basically tells git that these are the files in which the changes are completed and these files are now ready to be committed.

You can manually stage each file one by one or only some of the files by clicking on the + icon after that file name as shown below:-


Once you've marked even a single file as staged, you can see the staged files under the Staged Changes heading and unstaged files under the Changes heading in VSCode as shown below:-


If you want to stage all the files at once, click on the + icon on the Changes heading as shown below:-


Once all your files are staged, the next step is to commit these files. In order to commit the files you need to specify a Commit Message. As you can see in the below image, you can specify a Commit Message in the message box in VSCode and click on the right (tick) icon to make a commit.


As you can see in the above image, I have specified a commit message as Initial Commit as it's the first time I am committing all the changes to git. You can give any commit message of your choice. Once you've committed all the files, your git changes sidebar will become empty as there is no further change made by you after the last commit.


After committing, if you do even a single change, your git bar will show you that file as Modified and you need to stage and commit that file again to mark the change as done.


As you can see in the above image, I have removed opening brace { from my setRequestMap() method and as I saved this file, it's specified as modified by the git in sidebar. After I am done with all the changes, I need to follow the same procedure as we did above to stage and commit the file. You can click on the filename in the git sidebar to review the change you've done as shown below:-


You can revert one or all the changes by clicking on the Undo icon which says (Discard Changes), on the left of the + icon for single file as shown in the above image or it'll show Discard All Changes if you see on the Changes heading.

Creating a GitHub repository

Now, we've done our first commit locally, it's time to create a new GitHub repository and push our changes here. To do that, first create an account on https://github.com/ 

After you created an account and you're logged in on github, the next step is to create a new repository. Go to the top menu bar and click on the + icon there and choose New repository as shown below:-


You'll see a new page as shown below:-


As you can see in the above image, first of  all you need to add a repository name, then you can give a description of your choice. After that you need to specify if your repository is public or private.

Public Repository:- Visible to everyone. Anyone can have a look at the code, clone your repository or submit a pull request.

Private Repository:- Visible only to you and the collaborators. You can invite people to collaborate on a private repository on github and they'll have access to this repository.

We don't need to initialize  this repository with a README as our project in VSCode already has a readme file as shown in the below image, so keep it unchecked.


Click on the Create Repository button to create a new repository as shown below:-


Once a new repository is created you'll be taken to a new screen as you can see in the below image:-


As you can see in the above image, I have a HTTPS URL automatically generated which is:- https://github.com/rahulmalhotra/ci-cd-tutorial.git

Adding origin to local repository in VSCode

Our next step is to tell VSCode git repository that it has to push the changes to this repository URL that we got from GitHub. So, we need to specify a remote server by giving this URL to our local git repo. In order to do that, open the terminal in your VSCode and execute the below command:-

git remote add origin <YOUR-REPOSITORY-URL>

As you can see in the below image, I have given my repo URL that I got from github after the git remote add origin command. This will basically tell my local git that this is the remote origin (server url with the name or alias origin) where I am going to push my code. You can also run a git remote -v  command to verify the remote URLs as shown below:-


I have also executed git status command to check the status and make sure that everything is clean and ready to be pushed.

Pushing our changes to GitHub

To push your changes, you need to execute the git push command from your terminal as shown below:-


As you can see above, as I executed git push I got a message that this branch has no upstream branch set. This message basically means that we haven't mapped our local git branch to the git branch on github server. By default, when you create a new git repo. You have a master branch automatically created. Similarly, on github when we created a new repository, a master branch is automatically created. But our next task is to tell git that you need to push our code in the local master branch to the remote master branch on github. In order to do that execute the command as specified by git in the above image which is:-

git push --set-upstream origin master

The above command will tell git to set the upstream (remote) branch as master for the current local branch which is also master by default and push the code. The shortcut for the above command is git push -u origin master where -u stands for --set-upstream


As you can see above, as I executed this command, the command asked for my github username and password that I entered and everything is pushed onto my github repository and I got a message that Branch master set up to track remote branch master from origin.

If you now go to your github repository and refresh that page, you can see that the code is pushed and is available on your github repository as shown below:-


Note:- Any empty folders in your project are automatically not tracked by git and will not be pushed to your github repository as well.

You can also push to your github repository by using the push option in VSCode as shown below, but make sure that you've set the remote origin first which is a one time effort that we did above.


Now it's your time. Make some changes, commit them and push them again to GitHub. Explore your commits in the GitHub repository and see what information you can see from there. You can have a look at the CI/CD Tutorial github repository that I used in this tutorial by clicking here.

Tired of reading or just scrolled down, don't worry, you can watch the video too.


That's all for this tutorial everyone, If you liked it, make sure to share it in your network and let me know your feedback in the comments down below.

Happy Trailblazing..!!

Saturday, 30 May 2020

Getting Started with Scratch Orgs | DevHub | Link VSCode project to a New Scratch Org

Hello Trailblazers,

In this post we're going to learn how we can enable devhub to create a scratch org and we'll also create a new VSCode project and link it with scratch org. Let's begin.

Enabling DevHub

In order to enable DevHub in your developer edition / trial / production org / business org, follow the below steps:-

1. Login as a System Administrator

2. Go to Setup and search for DevHub

3. You'll see a screen as shown below:-

Enable DevHub

Toggle the button which says Enable Dev Hub to enable the dev hub (Please note that you cannot disable a DevHub once you've enabled it in your org).

Once you've enabled the devhub, you'll have some objects automatically visible in your org like:- Active Scratch Orgs, Scratch Org Infos etc.

Active Scratch Org object basically consist of information about all the scratch orgs that are currently Active.

Scratch Org Info object consist of information about all scratch orgs that you created using this DevHub no matter whether they're currently active or expired. It basically have the metadata of your scratch orgs like:- Edition, Created Date, Expiration Date, Status etc.

When you've enabled DevHub, you can just refresh the page once and search for Active Scratch Orgs in the app launcher. You can open Active Scratch Orgs as shown below:-

Active Scratch Orgs

It is currently empty because we haven't created any scratch org yet. Let's create a new scratch org, but before that, we need to create a new VSCode Project.

Create a new VSCode Project

Go to your VSCode and create a new project like we did in our How to setup Visual Studio Code for Salesforce tutorial. This time you can select Create Project instead of Create Project with Manifest opton as we don't need a manifest while working with Scratch Orgs as shown below:-


You can use the standard template itself


and add a project name you like to create a new project. I am using ScratchOrg1 here.


Once you've created a new project. The next step is to Authorize Our DevHub. So, let's see how we can do that.

Authorize DevHub

In order to authorize DevHub, open a terminal in VSCode and enter the below command:-

sfdx force:auth:web:login -d -a <Alias of your DevHub>

In the above command,

-d is used to specify Default Dev Hub. We're setting this DevHub as the default devhub for scratch org creation in future

-a is used to specify the Alias of your DevHub. An alias is nothing but friendly name for your devhub. Like in the below screenshot you can see that I am setting my devhub alias as CuriousFoxDevHub so that in future I can simply refer to this org using the alias I have given.


Once you press Enter, It'll automatically open your browser where you can login and it'll ask you for permissions after logging in as shown below:-


Click on Allow. You've now successfully authorized your DevHub and you'll see the below message in your CLI:-


Create a New Scratch Org

Now we need to create a new scratch org. As we've already created a new VSCode project. Inside that project only, open the command palette and type Create a Default Scratch Org as shown below:-


When you choose Create a Default Scratch Org, it automatically creates a scratch org for the current project you're working on. Choose this option and you'll see another option where you need to select the scratch org definition file as given below:-


Select the default scratch org definition file which is already created for you unless you want some extra features automatically enabled in your scratch org like:- MultiCurrency, Person Accounts etc. The default config file is stored in the config folder as shown below:-


You can add a number of features as shown above, to learn more about the scratch org definiton file, click here

Once you've selected a definition file, you need to enter an alias for your scratch org as shown below:-


SFDC Stop Tip:- Give the same alias as the name of your project so that you remember it easily. I am giving the same alias here i.e. ScratchOrg1

Next, you need to specify the number of days between 1-30 for which your scratch org is active as shown below:-


Press Enter and your scratch org will be created automatically using the default DevHub that we set before. You can open the sfdx-config.json file where you can see the defaultdevhubusername as well as the defaultusername of your org which is linked with the current project as shown below:-


Once your scratch org is created, you can open that by opening the command palette and writing the command:- Open Default Org and pressing Enter as shown below:-


This command will automatically open your newly created Scratch Org in your browser. You can also go to your DevHub where you can see a new record under the Active Scratch Orgs section as shown below:-


Congratulations..!! You've created a New Scratch Org Succesfully and linked it with VSCode.

Now it's your turn, create a new scratch org and try updating data in Scratch Org and pull it down in VSCode. Also, create a new Apex Class or any other stuff in VSCode and push it into your scratch org.

That's all for this tutorial everyone, if you liked it, make sure to share it in your network and let me know your feedback in the comments down below.

Tired of reading or just scrolled down ? Don't worry, you can watch the video too..!!


Happy Trailblazing..!!