Join our Telegram Channel
About a week back, I added a tweet and a facebook post asking for the favorite extensions for VSCode IDE and luckily, I got some good replies like:-
here are few which I use, would love to hear from others...— Rajiv Bhatt (@rajivbhatt) June 11, 2019
- ApexPMD
- Bracket Pair Colorizer
- Bookmarks
- Uncrustify
So, I decided to research more on this and I formed a list of 10 VSCode Extensions I found most helpful for Salesforce Developers. Some of these extensions are focused primarily for Salesforce Development however, many of these can be generally used by all the developers who use VSCode whether they're Salesforce or Non-Salesforce Developers. So, let's begin.
1. Salesforce Extension Pack
If you read my post above, you'll see that I want to know about the extensions apart from Salesforce Extension Pack because, Salesforce Extension Pack is the required and No.1 extension to use if you're a Salesforce Developer.
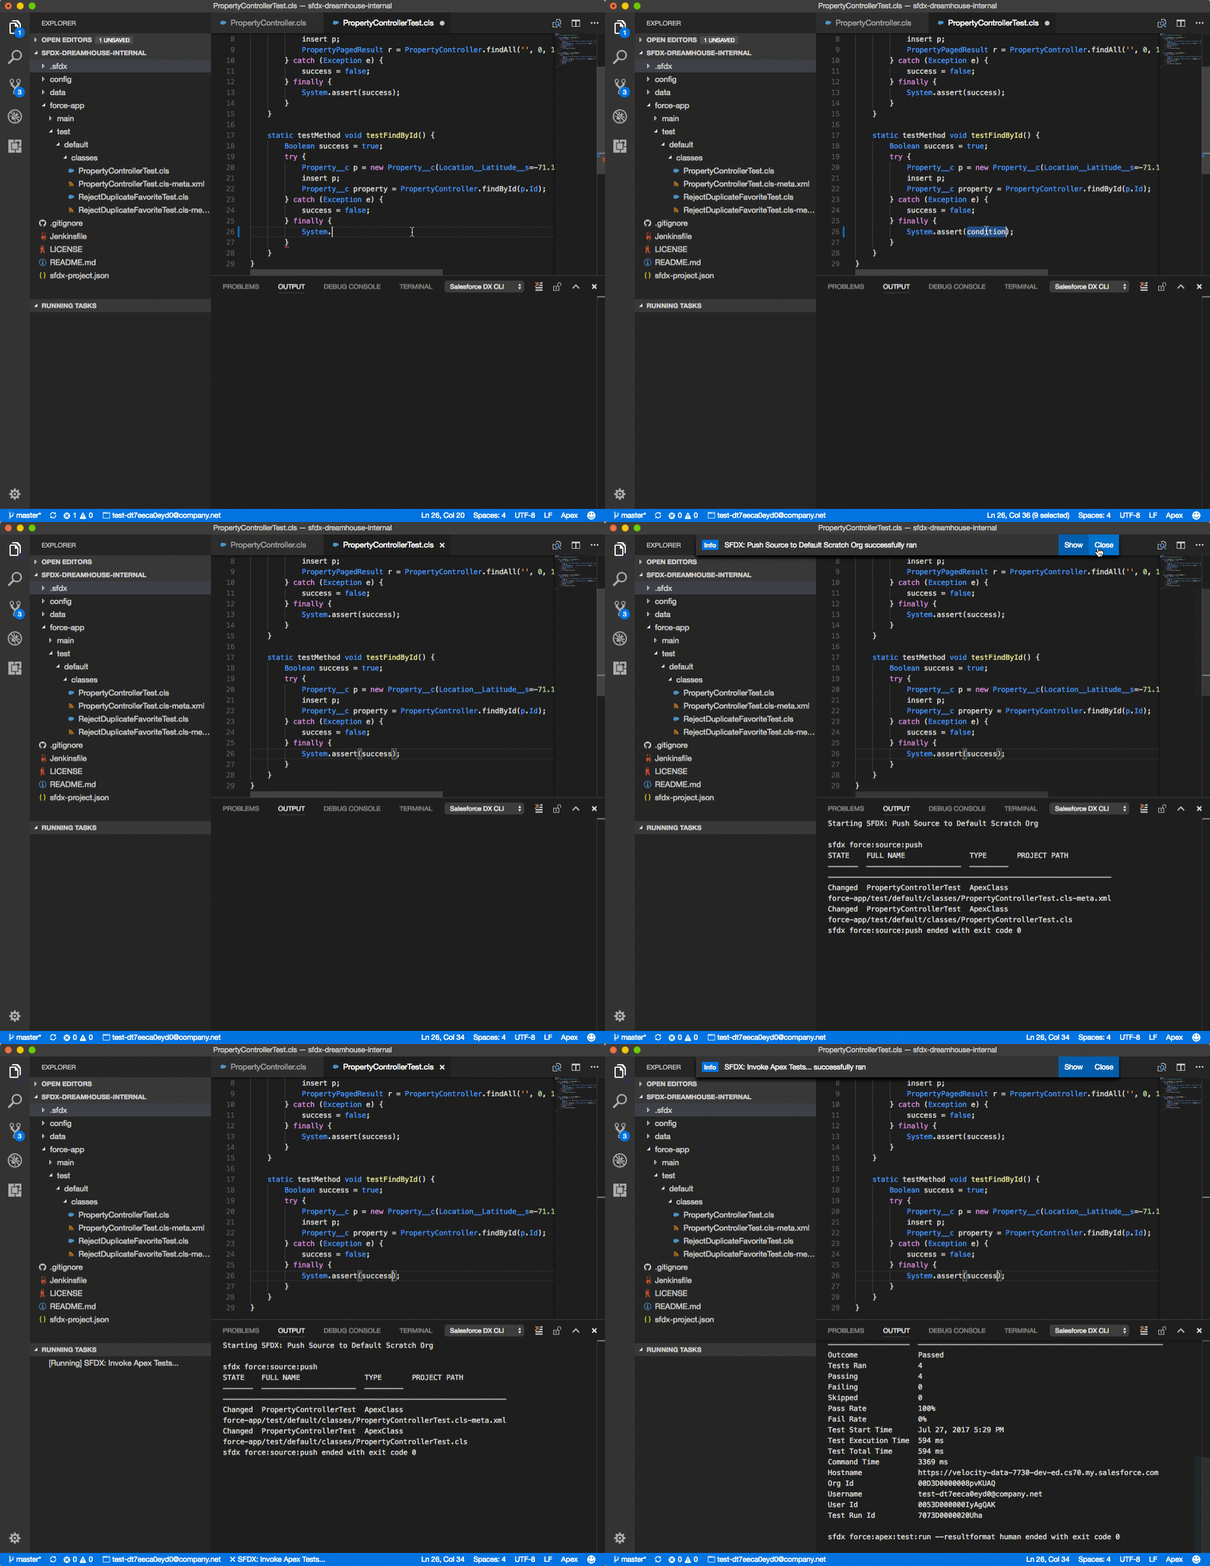
As the name suggests, it is an extension pack, so it primarily consists of 6 extensions which are as follows:-
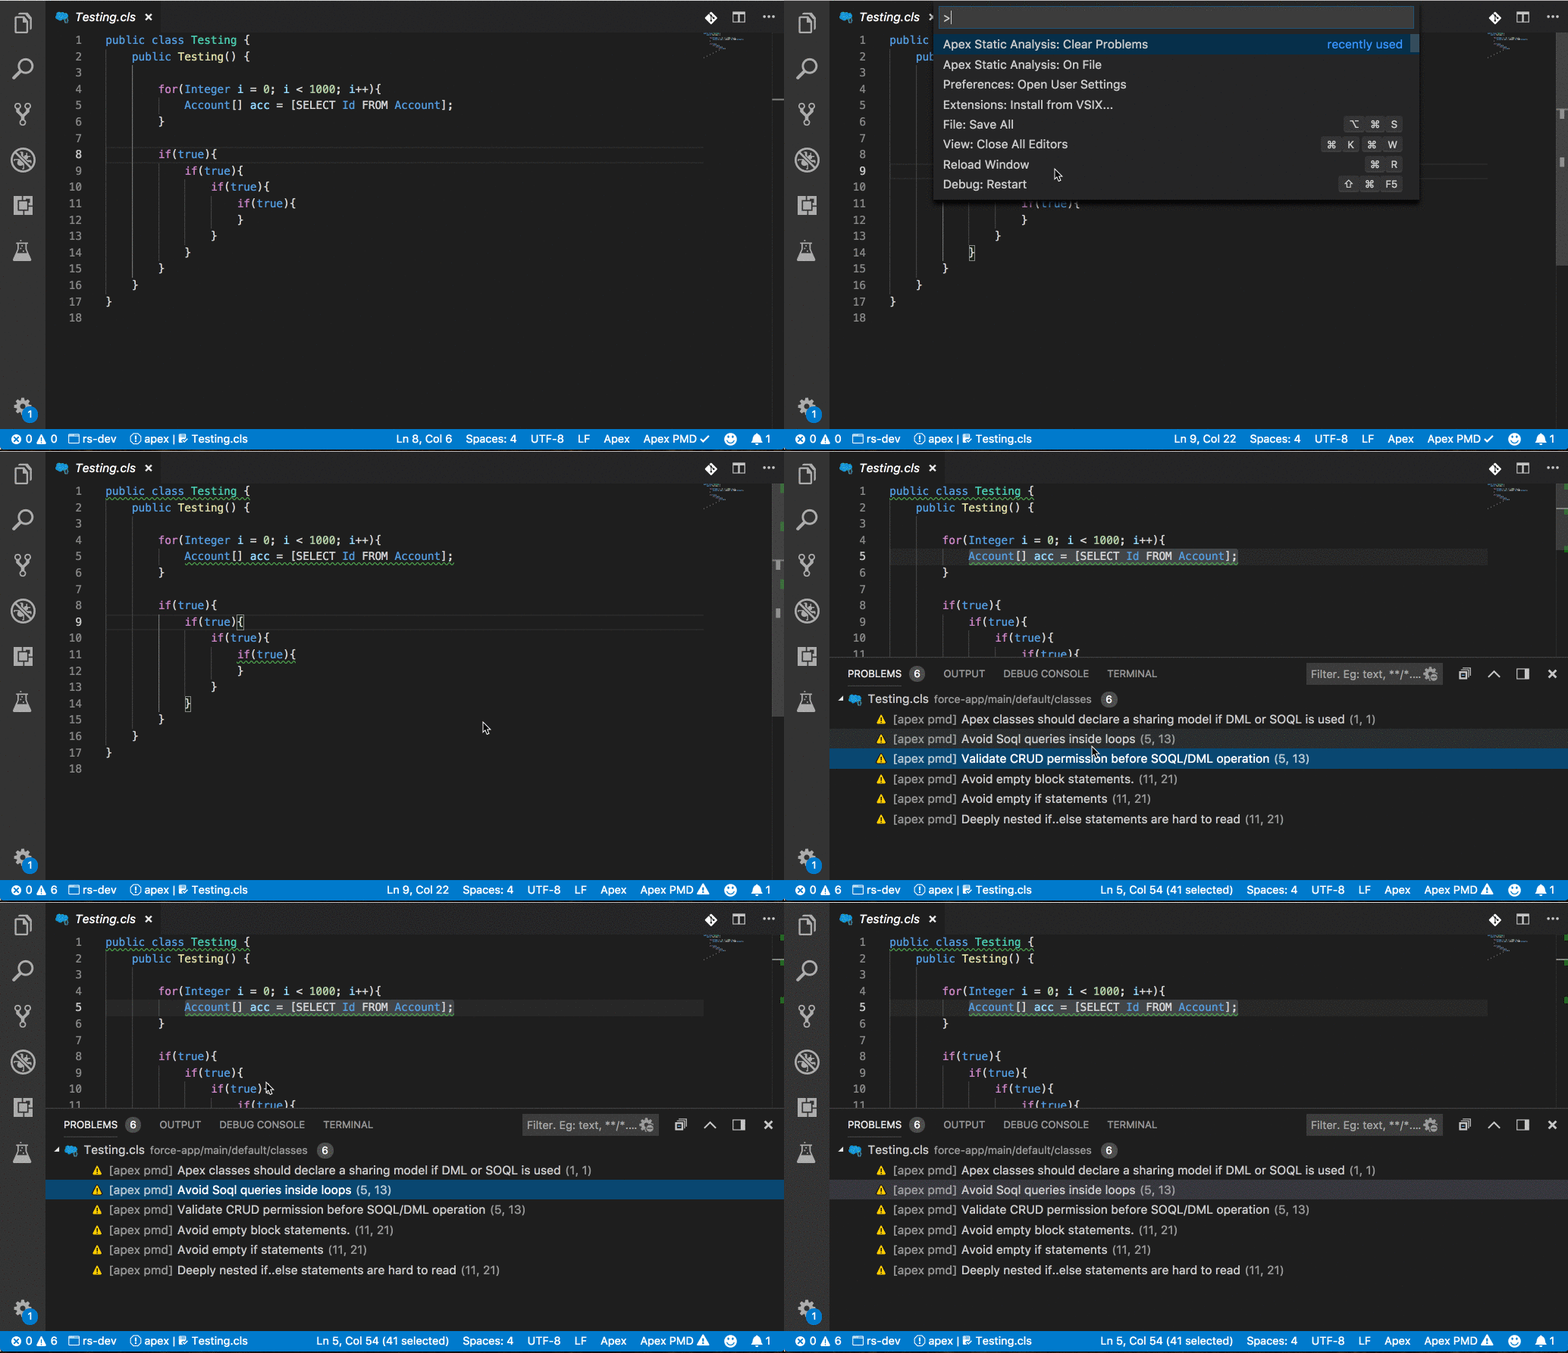
As you can see in the above image, Apex PMD will do the static code analysis on your apex code and will report the errors right away, you can also manage when to run code analysis in your user settings as shown below:-

You can run Apex PMD on file open, on file save and there are a lot of other options that you can configure. I personally prefer running it on file save so that you can view the errors each time you make any changes to your code and you're saving your file. You can also setup your custom rule-sets for Apex PMD.
Git is the base of CI/CD. Visual Studio Code has built in source control functionality which allows you to view the difference, perform commits, switch branches and push + pull from remote repository. Git Lens provides the next level of insights right in your IDE using which, you can better understand your code.
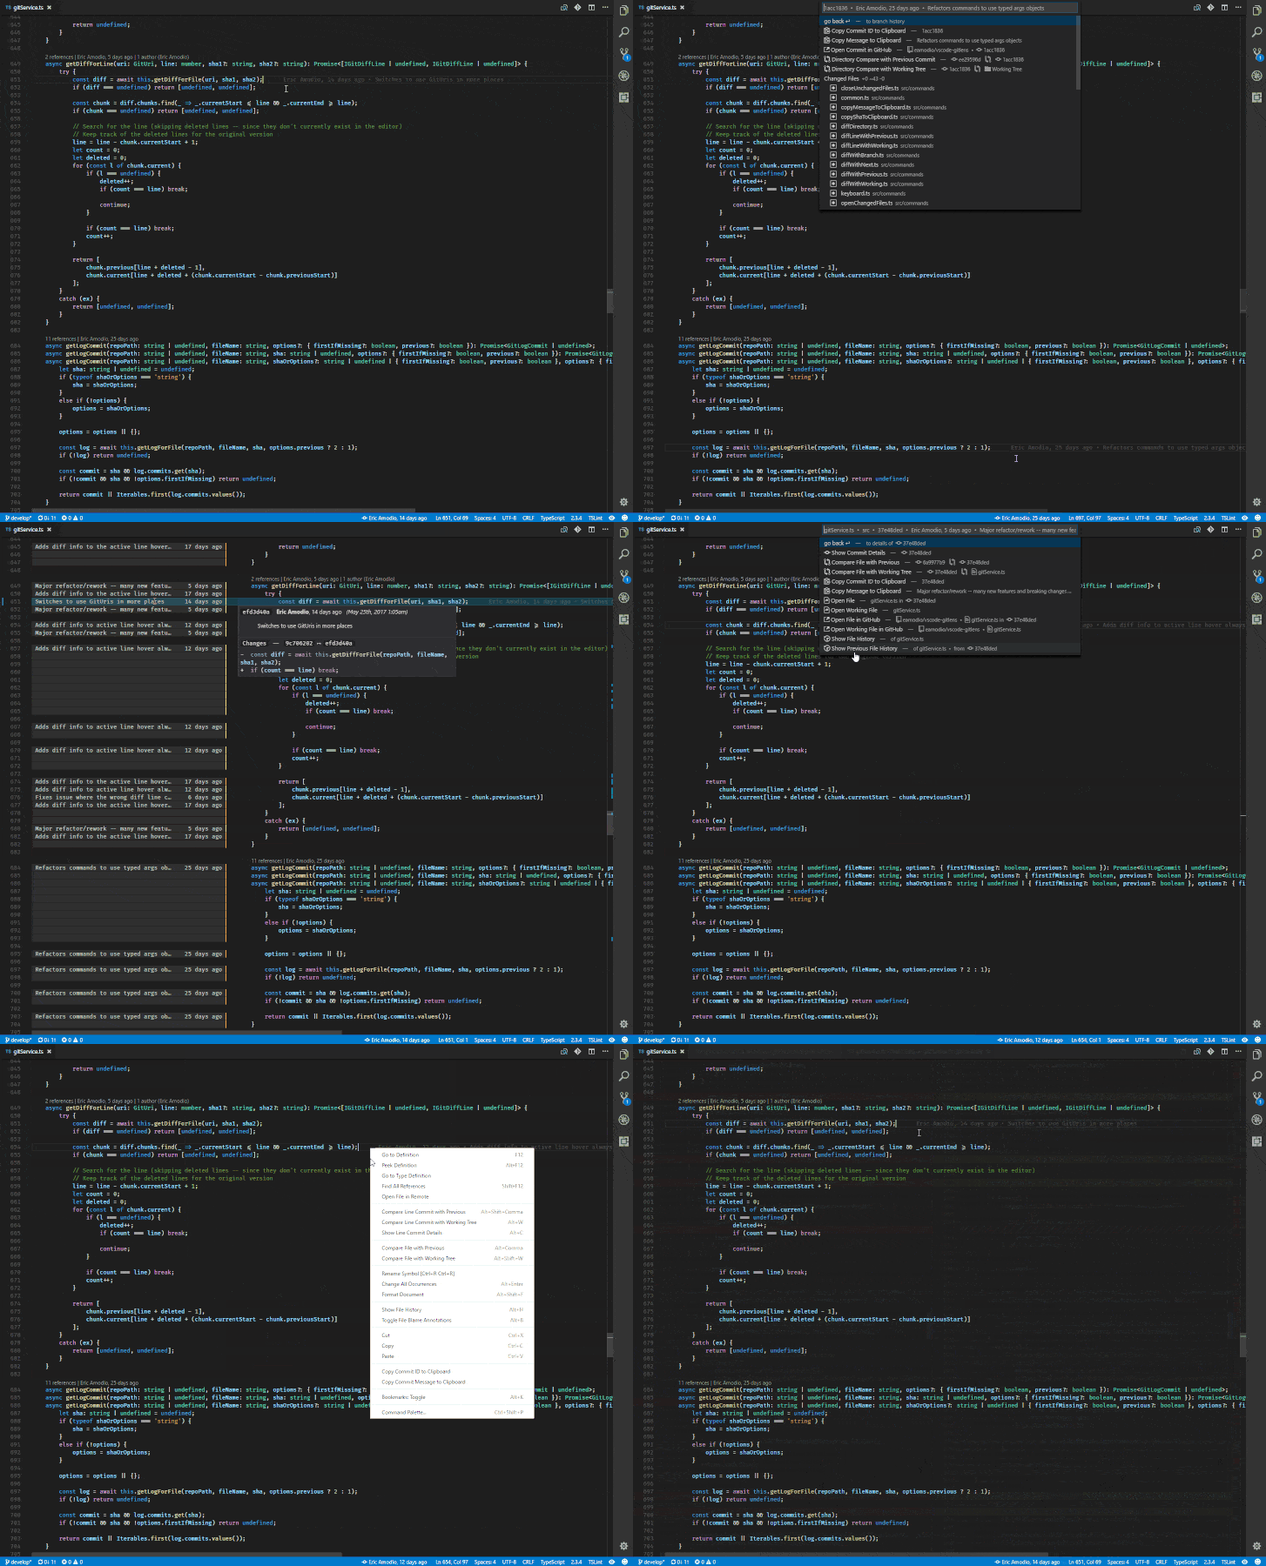
With Git Lens, you can directly see within a file, when a single line or a code block was changed and who changed it along with the commit message. You can also view it's history to understand how the code evolved. Git Lens provides a number of features, some of which includes:- Code Lens, Current Line Blame, Repositories View, File History View etc. You can learn about all the features in detail by visiting the official marketplace page.
Official Link to Marketplace:- https://marketplace.visualstudio.com/items?itemName=eamodio.gitlens


Official Link to Marketplace:- https://marketplace.visualstudio.com/items?itemName=alefragnani.Bookmarks
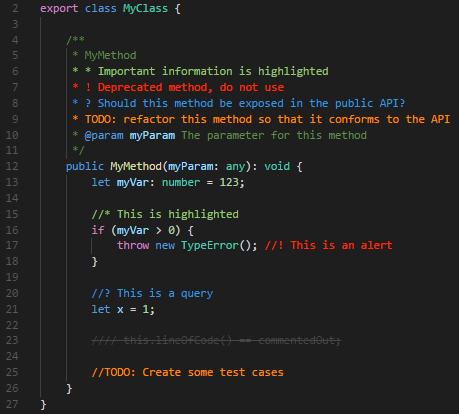
The thing I love about Better Comments is that you can also form your custom rules by simply editing it in the settings, you just need to specify the tag you'll start your line with, the color you want to use to highlight that, whether you want a strikethrough or not and the background color if you want one, as shown below:-

Official Link to Marketplace:- https://marketplace.visualstudio.com/items?itemName=aaron-bond.better-comments

Official Link to Marketplace:- https://marketplace.visualstudio.com/items?itemName=formulahendry.auto-rename-tag
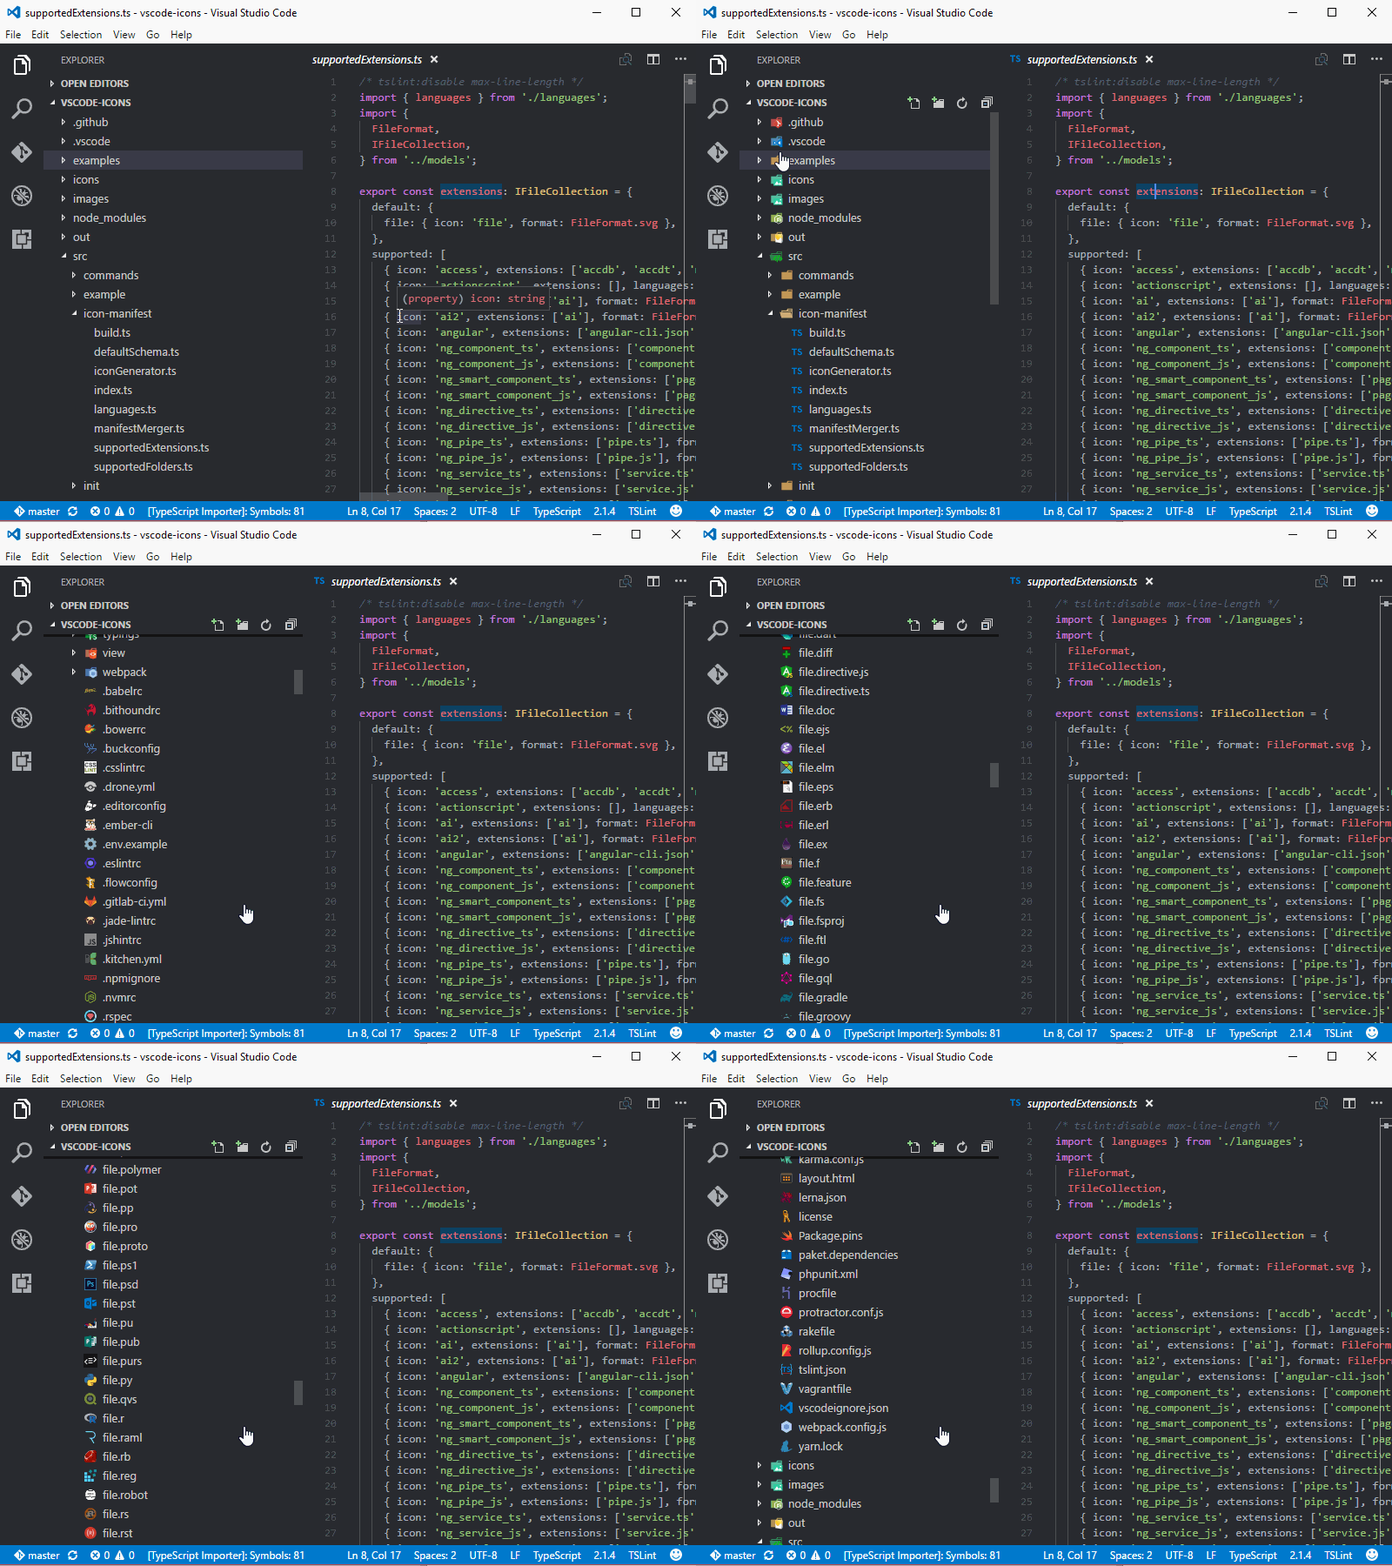
It automatically identifies the type of file based on the extension and link it with a unique icon.
Official Link to Marketplace:- https://marketplace.visualstudio.com/items?itemName=vscode-icons-team.vscode-icons
So, these were the Top 10 VSCode Extensions I believe are most useful for Salesforce Developers. However, there are a lot of other amazing extensions that you can try, some of them are a replacement of one of the above extensions as it provides the same functionality and others may make your lives more easier by giving you more features. I am listing some of them below:-
If you liked this post, make sure to write your opinion in the comments down below and if you think I missed any extension which is of use feel free to write your suggestions also.
Happy Trailblazing..!!
As the name suggests, it is an extension pack, so it primarily consists of 6 extensions which are as follows:-
- Salesforce CLI Integration :- This extension primarily link with your Salesforce CLI and helps you to connect with your Salesforce Environment using Salesforce DX commands.
- Apex :- This extension provided syntax highlighting and code completion for Apex.
- Apex Interactive Debugger :- This extension enables you to debug your apex code right from your IDE.
- Apex Replay Debugger :- This extension replays the apex execution from a debug log reference and helps in debugging the error in your apex code.
- Lightning Web Components :- This extension enables you to create and work on lightning web components. You can create, edit and deploy lightning web components right from your IDE to Salesforce.
- Aura Components :- This extension enables you to work on normal lightning components that uses the aura framework.
- Visualforce :- This extension enables you to work on Visualforce Pages and Components right from your IDE.
If you want to know more about using these extensions and setting up Salesforce CLI which is a pre-requisite for connecting with your Salesforce Org you can have a quick look about Setting up VSCode with your Salesforce Org here. However, if you want me to explain about each extension in this pack in detail, let me know in the comments down below.
Official Link to Marketplace:- https://marketplace.visualstudio.com/items?itemName=salesforce.salesforcedx-vscode
2. Apex PMD
As developers, we all want to write quality code right ? Apex PMD allows you to run static analysis on your Apex and Visualforce files.As you can see in the above image, Apex PMD will do the static code analysis on your apex code and will report the errors right away, you can also manage when to run code analysis in your user settings as shown below:-

You can run Apex PMD on file open, on file save and there are a lot of other options that you can configure. I personally prefer running it on file save so that you can view the errors each time you make any changes to your code and you're saving your file. You can also setup your custom rule-sets for Apex PMD.
Official Link to Marketplace:- https://marketplace.visualstudio.com/items?itemName=chuckjonas.apex-pmd
3. Salesforce Package.xml Generator Extension for VS Code
Have you ever tried deployment using Salesforce DX or ANT deployment tool ? It's quite easy and handy but the only tough task is to create a package.xml manually which consists of the names of all the metadata components we're going to deploy. There are some online tools available that connect with your org and allow you to dynamically create a package.xml. Using Salesforce Package.xml Generator extension you can create a package.xml right inside the IDE you're working on and that too dynamically without writing a single line yourself.
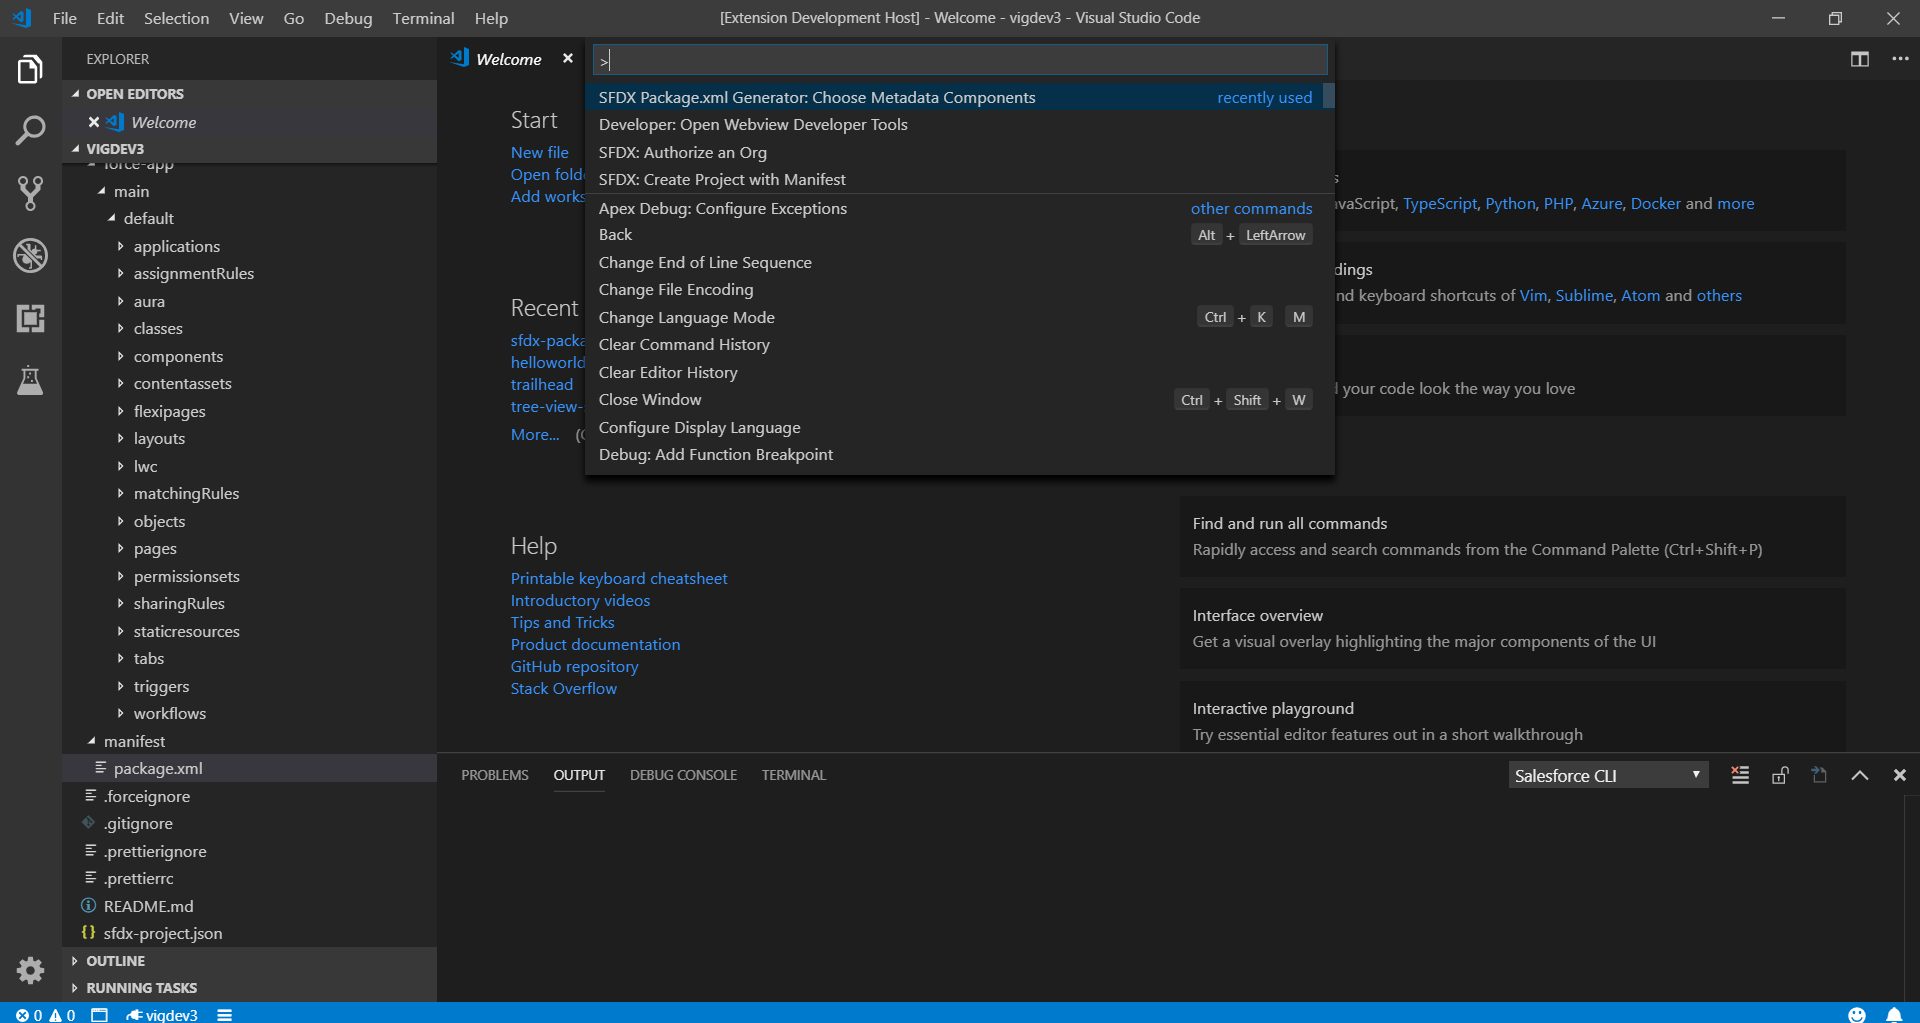 |
| Opening the extension using Command Palette |
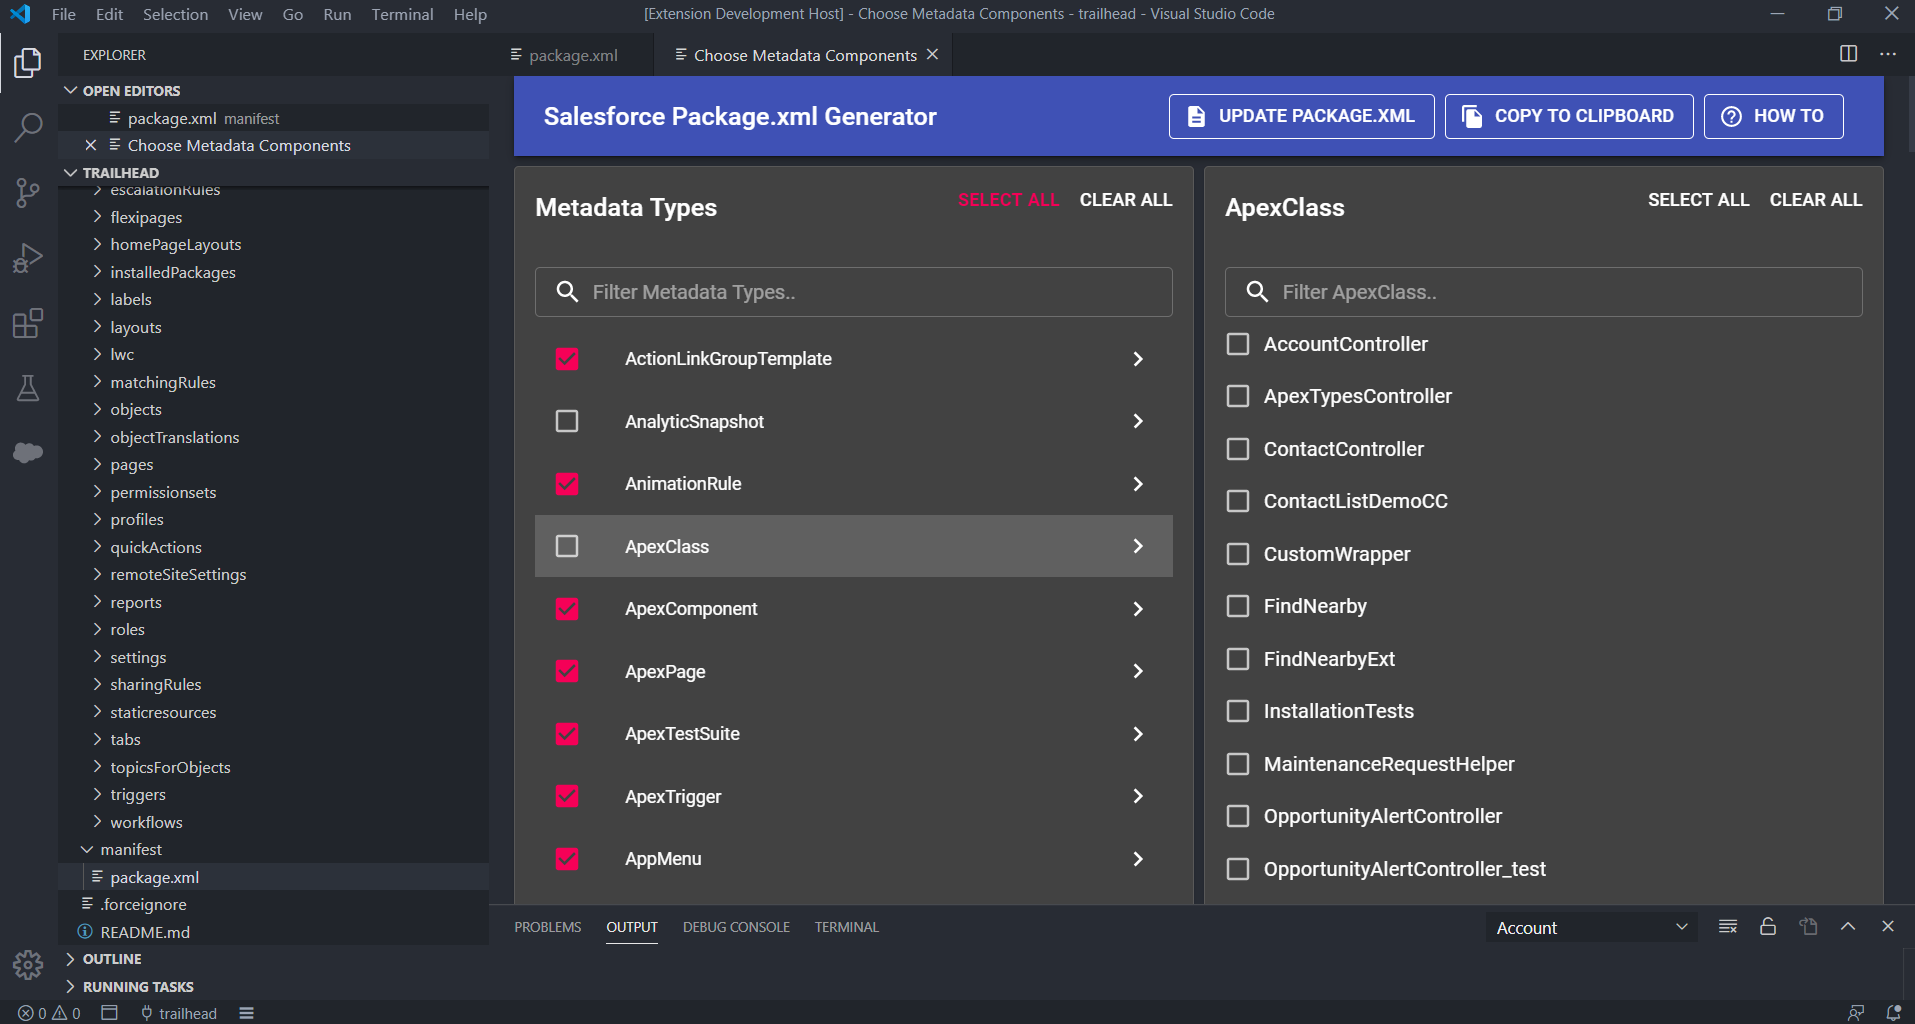 |
| Selecting the metadata components dynamically to generate package.xml |
Official Link to Marketplace:- https://marketplace.visualstudio.com/items?itemName=VignaeshRamA.sfdx-package-xml-generator&ssr=false
4. Git Lens - Git supercharged
With Git Lens, you can directly see within a file, when a single line or a code block was changed and who changed it along with the commit message. You can also view it's history to understand how the code evolved. Git Lens provides a number of features, some of which includes:- Code Lens, Current Line Blame, Repositories View, File History View etc. You can learn about all the features in detail by visiting the official marketplace page.
Official Link to Marketplace:- https://marketplace.visualstudio.com/items?itemName=eamodio.gitlens
5. Bookmarks
Another powerful extension we can use in VS Code is Bookmarks. As the name suggests, bookmarks simply allow us to mark/unmark positions in our code and we can also give it a friendly name.

We can also see and navigate through all the bookmarks using a dedicated sidebar, jump through bookmarks, select all the bookmarked lines and select region within bookmarks. With bookmarks, you don't need to search for a code if you need to refer to or edit it later, you can simply bookmark it and give it a friendly name to refer it later.

Official Link to Marketplace:- https://marketplace.visualstudio.com/items?itemName=alefragnani.Bookmarks
6. Settings Sync
How often do you need to change your system ? and each time you have to setup VSCode again and again because your themes, extensions, key-bindings and everything that you use again and again is not configured properly ?
Well, you don't need to worry now because Settings Sync will take care of that. Settings Sync as the name suggests keep your VSCode settings in sync. It includes themes, keybindings, workspaces, extensions and many other configurations which are uploaded to a GitHub Gist so that it can be used across multiple machines. After setting it up, you can upload or download all your settings directly in your VSCode using one command.
 |
| Setting up and uploading your settings to a GitHub Gist |
It also allows provides you an option to auto update using which all your local changes in settings will be updated as a revised version of GitHub Gist automatically.
Official Link to Marketplace:- https://marketplace.visualstudio.com/items?itemName=Shan.code-settings-sync
7. Better Comments
With Better Comments you can classify and write more human friendly comments in your code. It classifies your comments into:- Alerts, Queries, TODOs and Highlights by giving each a specific color.The thing I love about Better Comments is that you can also form your custom rules by simply editing it in the settings, you just need to specify the tag you'll start your line with, the color you want to use to highlight that, whether you want a strikethrough or not and the background color if you want one, as shown below:-

Official Link to Marketplace:- https://marketplace.visualstudio.com/items?itemName=aaron-bond.better-comments
8. Bracket Pair Colorizer
Bracket Pair Colorizer identifies the related opening and closing brackets with a unique color. You can define which characters will be matched and which colors will be used, in settings.
There is also a new extension being developed named as:- Bracket Pair Colorizer 2 which is the better version of Bracket Pair Colorizer but it's in beta mode right now.
Official Link to Marketplace:- https://marketplace.visualstudio.com/items?itemName=CoenraadS.bracket-pair-colorizer
9. Auto Rename Tag
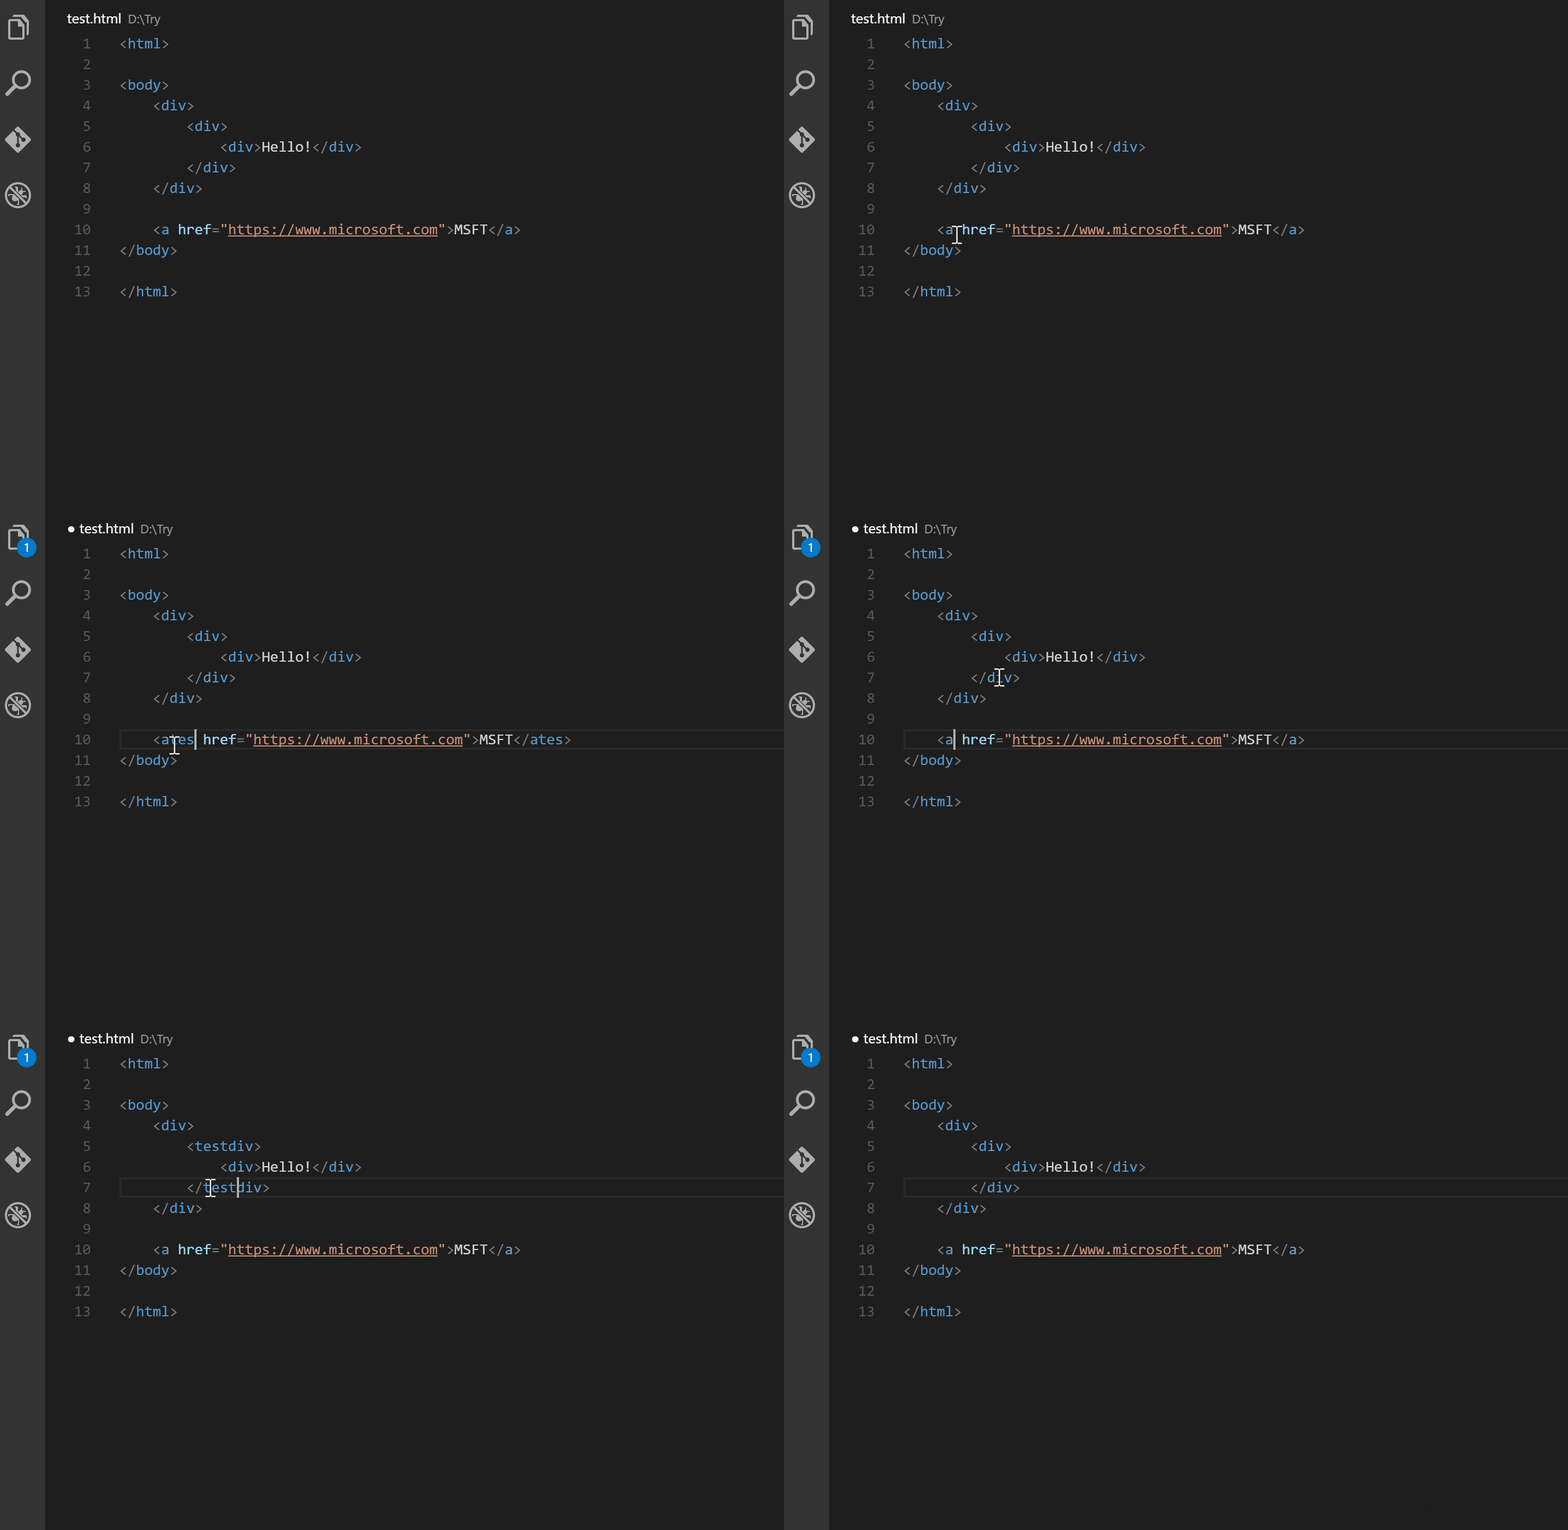
Do you work on lightning or visualforce ? If yes, this extension is definitely of your use. When this extension is activated and you rename one HTML/XML tag, the paired HTML/XML tag is automatically renamed. It also works with lightning/aura tags.
10. vscode-icons
With vscode-icons you can identify your project folder and files with user friendly icons.
Official Link to Marketplace:- https://marketplace.visualstudio.com/items?itemName=vscode-icons-team.vscode-icons
- ForceCode:- This is a one stop shop for Salesforce Development in VSCode. It is quite easier to use and has a number of features which are unique to this extension and very useful like:- Bulk record updates, Execute Anonymous etc. Link:- https://marketplace.visualstudio.com/items?itemName=JohnAaronNelson.ForceCode
- CodeScan:- If you use SonarQube tool for scanning your code in order to implement best practices, this extension is of much use. You can also use CodeScan cloud on the other hand which will scan your code as you type it in your IDE and report bugs. Link:- https://marketplace.visualstudio.com/items?itemName=codescansf.codescan-vscode
- CSS Peek:- Allows you to have a look at the CSS code directly from HTML by hovering on it. Link:- https://marketplace.visualstudio.com/items?itemName=pranaygp.vscode-css-peek
- SalesforceDX Code Companion:- This extension works with SalesforceDX CLI and provides some additional features like:- Better performance while pushing the code to Salesforce Org, opening a VF page directly from VSCode and even has a command to open SLDS website which is required very often while working on Lightning/LWC. You can also switch the org easily, open the component library etc. Link:- https://marketplace.visualstudio.com/items?itemName=MohithShrivastava.dx-code-companion
- Trailing Spaces:- This extension highlight the trailing spaces and delete them in a flash. Trailing spaces are the extra spaces at the end of each line that we have while writing code. It's a very useful extension especially if you're tracking your code using git. Trailing spaces makes it difficult to view the actual change as even an extra space is counted as a modification in git. However, using this extension, it'll not be an issue within your project team. Link:- https://marketplace.visualstudio.com/items?itemName=shardulm94.trailing-spaces
Disclaimer:- All these extensions are arranged in the order according to my personal opinion based on their usability, requirement in Salesforce Development. It doesn't classify any extension better then the other, as each of them has it's own features and value.
If you liked this post, make sure to write your opinion in the comments down below and if you think I missed any extension which is of use feel free to write your suggestions also.
Happy Trailblazing..!!


 Posts
Posts