Sublime Text is my favorite text editor and maybe yours also. But even if you prefer any other text editor, no need to worry as I am going to tell you how to setup MavensMate IDE for salesforce with your favorite text editor. Primarily MavensMate supports:- Sublime Text, Atom or Visual Studio as of now so make sure you choose any one of these.
So, let's move forward step by step:-
Install Sublime Text
Go to https://www.sublimetext.com/ and click on download from the navigation menu at the top, it'll take you to the download page.
Download the file according to your OS and install that.
Setting Up MavensMate
1. Install MavensMate
To install MavensMate, you have to go to it's github repository and in the releases, you can download any version you want to. Once you are on the releases page, you'll see something like this:-
Click on this link:- https://github.com/joeferraro/MavensMate-Desktop/releases to go directly to the releases page and download the file according to your system. You have different extensions available like:- exe for Windows, dmg for Mac or deb for linux. Download and install it.
2. Create Project
Once you'll open MavensMate, you will see this screen:-
- Click on New Project.
- Select the Environment Type. It can be production, developer, sandbox, prerelease or a custom URL.
- Click on Connect Button.
- Login with your Salesforce Credentials.
- When you login, it may ask for permissions for making changes allow it to do so.
- Click on the allow button and it'll take you to a new screen where you have to setup your project configuration.
- Fill up the project details and then click on the advanced tab.
- Here you'll see you have the information about the metadata that you are fetching from your org. By default some metadata is selected for you like:- ApexClass, ApexTrigger, ApexPages etc. You can add anything you want from Org Metadata to Project Metadata Subscription like here I have added AuraDefinitionBundle to this metadata so that I can fetch and work on Lightning Components as well.
- Leave the Metadata tab as it is for now and click on Create Project.
- It may take some time and then you'll end up to the home screen of your project.
- Cick on Edit Project.
- On the Edit Project screen, click on Project Metadata Tab, Click on Select All button and click Update Project.
- It may take some time and then you have your project updated successfully with all the files from your org.
- Once you have your project updated, you can click on the 2nd last button from the left menu and open the project in Sublime Text or any text editor you have installed.
- If you are not getting your text editor in here, you can click on settings from the top right corner and you can check and update the installation path of your text editor.
Configuring Sublime Text for MavensMate
- Go to Tools. Click on Command Pallete.
- If you have already Package Control installed then no problem, otherwise type package control in the command pallete and install that first.
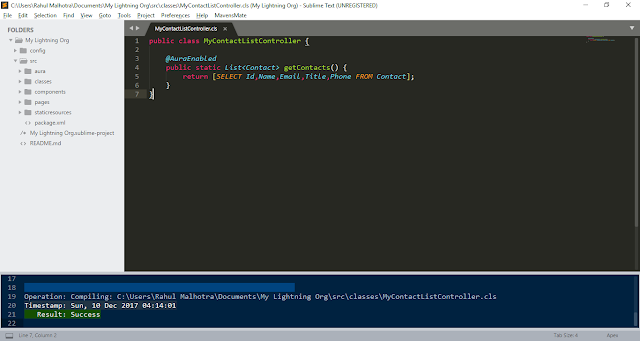
Great...!! You have now MavensMate plugin installed for sublime text and you have configured your text editor for working with Salesforce. You must see MavensMate tab on the right side of help on the top when installed. Now you can code easily here and as you save your file it'll be automatically saved on the Salesforce as shown in the below image:-
Be careful while using MavensMate as it may override your code on Salesforce when multiple users are working on the same org. It usually show a conflict if there is one but it's a better approach to refresh the files from server before start working. For this you can right click on the folder or file from the left side bar and go to MavensMate->Refresh from Server.


I love this article.
ReplyDeleteThanks Rahul Malhotra
My Pleasure.. :-)
DeleteDo check out the lightning tutorial series too - http://bit.ly/sfdclightningtutorialseries
to learn Salesforce Lightning from scratch.
Awesome...
ReplyDeleteThank You :)
Thanks for your feedback. Make sure to share it among your network too :-)
Delete