
Hello Trailblazers,
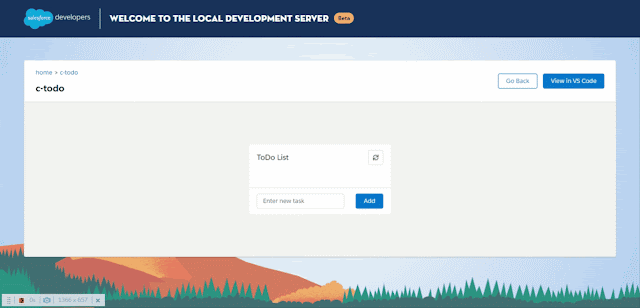
Welcome to the second tutorial in LWC Tutorial Series where we're building a ToDo App Project. We're focusing on the concept of Learning By Doing in this tutorial series. In this tutorial, we'll be adding the JavaScript to our ToDo Application and update the HTML code as well so that it renders dynamically and we'll be moving one step forward to the below result at the end as we'll be able to add elements to todo list dynamically on click of the Add button.
So, let's continue building the above application. This tutorial is published on SFDC Stop YouTube Channel. So, if you want to learn in detail, have a look at the tutorial video down below. Otherwise, you can scroll down to have a look at the code gist with explanation.

So, let's continue building the above application. This tutorial is published on SFDC Stop YouTube Channel. So, if you want to learn in detail, have a look at the tutorial video down below. Otherwise, you can scroll down to have a look at the code gist with explanation.
Tutorial Video
Code Gist with Explanation
I highly recommend you to have a look at the video to understand in detail. However, let's have a quick look at the code below to understand in short:-
That's all for this tutorial. I hope you liked it. All the code used in this tutorial is available on GitHub and you can have a look at that by clicking here. Make sure to have a look at the video if you want to learn in detail and let me know your feedback in the comments down below.
Happy Trailblazing..!!
JS Snippet (todo.js)
As you can see above, I created an array of todo tasks with name todoTasks and initialized it as an empty array. along with the newTask variable which is an empty string initially. The array is annotated with @track annotation because we need to re-render the HTML whenever a new task is added to the list. The newTask variable will store the name of new todo task that we're going to add to the list.
After that we've defined an updateNewTask() method which is used to update the value of the new task variable as we type in the new task name in the input field. event.target.value will give us the value as we're going to bind this method to the onchange attribute of input field in HTML.
Finally, we have an addTaskToList() method which is used to add the task to the todo list. This method will create a new todo task object with an id and a name and push it to the todoTasks array, in the new object, the id of the todo task will be the current array length (i.e. number of tasks in the list) + 1 and the name of the task will be the value stored in newTask variable. After adding the new task to the list, we're setting up the newTask variable as blank again.
HTML Snippet (todo.html)
As you can see in the above code, I have removed all the list items under the unordered list and kept only a single list item which is surrounded by a template tag, that template tag is basically a for:each loop which is responsible to iterate the todoTasks array specified in js and in each iteration, the current element can be accessed by the todoTask variable which is specified as the value for for:item in the template. For each list item, I am keeping the todoTask id as the key.
Note:- The first HTML element under the template tag running a for loop must have a key element and that key should be unique.
So, in our case the key is specified by todoTask.id as we're setting up the id each time we're adding an element to the todo tasks list. At the place of task name, I have specified {todoTask.name} which will replace this expression with the name of current todo task as this list is being rendered.
If you carefully see the Enter New Task input field, I have binded the newTask javascript variable as the value of input field and I have also binded the updateNewTask() method in the onchange handler of the input field.
So, whenever we're going to write something in this input field, the updateNewTask method will be called automatically and it'll update the value of newTask variable which is being set as the value of input field.
Finally, we specified our addTaskToList method in the onclick handler of the Add button. So, that whenever we're going to click this button, our todo task will be added to the list.
That's all for this tutorial. I hope you liked it. All the code used in this tutorial is available on GitHub and you can have a look at that by clicking here. Make sure to have a look at the video if you want to learn in detail and let me know your feedback in the comments down below.
Happy Trailblazing..!!


No comments:
Post a Comment